background image


28 

EN 


Installation instructions  


Before installation  

Check  that  the  input  voltage 

indicated  on  the 

characteristics plate is the same as the voltage of 
the power outlet you are going to use. 

Open  the  oven  door  and 

take  out  all  the 

accessories 

and remove the packing material. 

Warning!

  The  front  surface  of  the  oven  may  be 

wrapped with a 

protective film

.  Before using the 

oven  for  the  first  time,  carefully  remove  this  film, 
starting on the inside. 

Make sure that the oven is not damaged in any 
way.

  Check  that  the  oven  door  closes  correctly 

and  that  the  interior  of  the  door  and  the  front  of 
the oven opening are not damaged. If you find any 
damage 

contact 

the 

Technical 

Assistance 

Service. 

DO  NOT  USE  THE  OVEN

  if  the  power  cable  or 

the  plug  are  damaged,  if  the  oven  does  not 
function  correctly  or  if  it  has  been  damaged  or 
dropped.  Contact  the  Technical  Assistance 
Service. 

Put  the  oven  on  a  flat  and  stable  surface.  The 
oven  must  not  be  put  close  to  any  sources  of 
heat, radios or televisions. 

During  installation,  make  sure  that  the  power 
cable  does  not  come  into  contact  with  any 
moisture  or  objects  with  sharp  edges  behind 
the  oven.  High  temperatures  can  damage  the 
cable. 

Warning:  after  the  oven  is  installed  you  must 
make sure you can access the plug. 


After installation  

The  oven  is  equipped  with  a  power  cable  and  a 
plug for single phase current. 

If  the  oven  is  to  be  installed  on  a  permanent 
basis 

it  should  be  installed  by  a  qualified 

technician.  In  such  a  case,  the  oven  should  be 
connected  to  a  circuit  with  an  all-pole  circuit 
breaker  with  a  minimum  separation  of  3  mm 
between contacts. 

WARNING: THE OVEN MUST BE EARTHED. 

The  manufacturer  and  retailers  do  not  accept 
responsibility

  for  any  damage  that  may  be 

caused  to  people,  animals  or  property  if  these 
installation instructions are not observed.. 

The oven only functions

 when the door is closed 

correctly. 

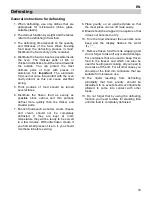
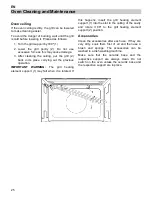
Before  the  first  use,  clean  the  inside  of  the  oven 
and  the  accessories,  following  the  cleaning 
instructions  given  in  the  section  “Oven  cleaning 
and maintenance”. 

During installation,

 follow the instructions supplied separately. 

Summary of Contents for BCG 22

Page 1: ...User Manual EN BCG 22 1730243 a...

Page 2: ...eaning and Maintenance 24 What should I do if the oven doesn t work 26 Technical characteristics 27 Installation instructions 28 Installation 29 Dear Customer Thank you for choosing this BAUMATIC prod...

Page 3: ...te it Children under 3 years must not be left unsupervised in the vicinity of the appliance Cleaning and user maintenance shall not be made by children without supervision GENERAL SAFETY This applianc...

Page 4: ...ll and whole hard boiled eggs should not be heated in the appliance since they may explode even after microwave heating has ended INSTALLATION The electrical installation is to be set up so that the a...

Page 5: ...efore maintenance cut the power supply WARNING Only a competent person can carry out any service or repair operation that involves the removal of a cover which gives protection against exposure to mic...

Page 6: ...se instructions Do not switch on the oven without the turntable support the turntable ring and the respective plate being in place Never switch on the microwave when it is empty If there is no food in...

Page 7: ...lled a magnetron which converts electrical energy into microwave energy These electromagnetic waves are channelled to the interior of the oven through a wave guide and distributed by a metallic spread...

Page 8: ...en 1 Catches 4 Ceramic base 2 Door window glass 5 Control panel 3 Drop down grill 6 Rack 7 Browning Plate 1 Function selection knob 2 Safety Block key 5 Clock key 6 Stop Key 3 Start key 7 Door Open ke...

Page 9: ...ey O Clock Duration display Description of Functions Symbol Function Microwave Power Output Foods Microwave 90 W Slow defrosting for delicate foods keeping food hot 180 W Cooking with little heat boil...

Page 10: ...k key 5 again Hiding Displaying the Clock If the clock display disturbs you you can hide it by pressing the Clock key for 3 seconds The dots that separate the hours and minutes will flash but the rest...

Page 11: ...direction to set the microwaves power level If you do not turn this knob the oven operates at 850 W power 5 Press the OK key 4 to validate 6 Press the Start key 3 The oven will start to operate NOTE T...

Page 12: ...e oven operates at 360 W power The maximum power that can be selected is 360 W 5 Press the OK key 4 to validate 6 Press the Start key 3 The oven will start to operate NOTE The start button may be pres...

Page 13: ...tating knob 8 in either direction to set the food weight If you do not turn this knob the oven operates with 200 g 5 Press the OK key 4 to validate 6 Press the Start key 3 The oven will start to opera...

Page 14: ...minute the oven starts to operate automatically The following table shows the Special Function program indicating weight intervals and cooking and standing times in order to ensure the food is of a un...

Page 15: ...After heating the container may be very hot Although microwaves do not heat up most containers these may heat up through heat transmission from food Memory function Define and store a memory 1 With t...

Page 16: ...n the glass turntable in the microwave oven 5 Select the Microwaves and Grill function and the cooking time as described below How to clean the browning plate The best way to clean the browning plate...

Page 17: ...1 To modify the time turn the rotating knob 8 The new time defined is immediately valid 2 To modify the power only when the cooking process is interrupted press the OK key 4 The respective indicator s...

Page 18: ...g 3 4 min 5 10 min Turn twice 250 g 8 9 min 5 10 min Turn once 500 g 15 16 min 10 15 min Turn twice Poultry poultry parts 200 g 7 8 min 5 10 min Turn three times 500 g 17 18 min 10 15 min Turn once C...

Page 19: ...ch foods such as butter cream cheese and cream should not be completely defrosted If they are kept at room temperature they will be ready to be served in a few minutes With ultra frozen cream if you f...

Page 20: ...ay be more noticeable if the room temperature is low The oven s safe working is not affected by this After you have finished cooking clean up the water coming from the condensation When heating liquid...

Page 21: ...d Potatoes 250 25 ml 850 5 7 2 3 Peel and cut into equal sized pieces Keep covered Paprika Leek 250 250 25 ml 50 ml 850 850 5 7 5 7 2 3 2 3 Cut into chunks or slices Keep covered Frozen Brussel sprout...

Page 22: ...ins do not become encrusted Table and suggestions Microwave Grill The microwave grill function is ideal for cooking quickly and at the same time browning foods Furthermore you can also grill and cook...

Page 23: ...e grill Aluminium containers and foil Pre cooked food in aluminium containers or in aluminium foil can be put in the microwave if the following aspects are respected Keep in mind the manufacturer s re...

Page 24: ...Unglazed yes no yes no no no no no Plastic dishes 2 Heat resistant to 100 C Heat resistant to 250 C yes yes no yes no no no no Plastic films 3 Plastic film for food Cellophane no yes no yes no no no...

Page 25: ...ccur under these stains Do not let any water get inside the oven Oven interior After each time the oven is used clean the inside walls with a damp cloth since this is the easiest way to remove splashe...

Page 26: ...previous operation IMPORTANT WARNING The grill heating element support 1 may fall when it is rotated If this happens insert the grill heating element support 1 into the slot in the ceiling of the cav...

Page 27: ...e oven walls There are any loose items of cutlery or cooking tools inside the oven The food doesn t heat up or heats very slowly Check if You have inadvertently used metal ovenware You have selected t...

Page 28: ...an Directive 2002 96 EC on the management of waste electrical and electronic equipment WEEE home electrical appliances should not be put into the normal systems for disposal of solid urban waste Outda...

Page 29: ...se to any sources of heat radios or televisions During installation make sure that the power cable does not come into contact with any moisture or objects with sharp edges behind the oven High tempera...

Page 30: ...Installation EN Push oven completely into the cabinet and centre it Open microwave door and fasten the appliance to the cabinet using the four screws provided Insert the screws through the front hole...

Page 31: ......

Page 32: ...AUS Home Appliances Pty Ltd 20 Carlotta St Artarmon NSW 2064 Sales Telephone 1800 805 300 Service Telephone 1800 444 357 Website www baumatic com au...

Reviews: