background image

5

461308039 (RS_000) 06/2010

1

��

2

PRESENTATION

Our  cooker  is  fitted  with  a  fully  gas  hotplate.  This 

innovative burner hotplate offers you more scope and 

versatility  in  hotplate  cooking  than  ever  before.  The 

round burners are graduated in their size and output 

to provide the exact heat required for every style of 

cooking.  For  example,  the  large  or  wok  burner  will 

give you the intense heat required for wok cookery, 

while the small simmer burner will handle the smallest 

of  saucepans  with  ease  and  safety.  The  low  heat 

(simmer)  setting  is  extraordinarily  low,  so  you  can 

cook  the  most  delicate  sauces  to  perfection.  This 

innovative, yet very practical combination of burners 

allows you to cook an entire meal on the hotplate at 

once and is of special assistance when entertaining. 

Each knob on the front panel has a diagram printed 

above it showing to which burner it refers.
The oven is fully electrical with electric grill. This can 

be either conventional or forced type (with fan).

The  cooker  has  an  accessory  (e.g.  electronic  clock 

with end-of-cooking, a programmer,...) which makes it 

possible to use the oven without supervision. In order 

to guarantee the customer a good and safe use of the 

appliance, in addition, it has a safety thermostat that 

starts working  in case of failure of the main thermostat  

In  such  an  event,  the  electricity  is  interrupted 

temporarily: 

do not attempt to repair it yourself but 

turn  the  appliance  off  and  contact  your  nearest 

Assistance Centre.

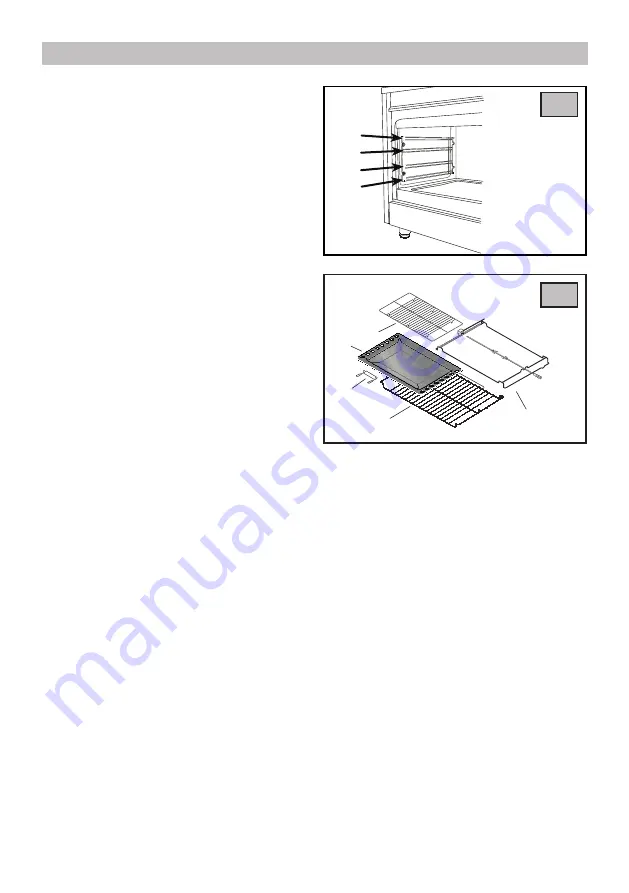
The oven walls are fitted with various guide bars or 

runners (fig. 1) on which the following accessories can 

be placed. Supply and quantities vary from model 

to model (fig. 2):


• 

oven shelf rack (Gf). Ensure shelf is located with 

dish and tray stop pointing upwards and at rear of 

oven.

• 

food  grill  shelf  (Gc)  (*).  Ensure  shelf  is  located 

with stop pointing upwards and at rear of oven.

• 

drip tray (V) 

• 

handle (D)

• 

drip tray grid (E) 

• 

set spit (S)

(*) Only on certain models.

The cookers are equipped with a small compartment 

under the oven that can be used for storing things.

Remember  that  the  surfaces  become  hot,  it  is 

strictly forbidden to place inflammable materials 

inside.

DESCRIPTION OF THE APPLIANCE

Summary of Contents for BAU91EG

Page 1: ...FREESTANDING DUAL FUEL COOKER DOMESTIC USE ONLY OPERATING AND INSTALLATION INSTRUCTIONS...

Page 2: ...ipment or returned to the retailer at the moment of purchase of a new equivalent appliance The user is responsible for delivering the appliance to the appropriate collection centre at the end of its u...

Page 3: ...xed on the appliance and on the label affixed to the packing box IMPORTANT NOTICE The manufacturer shall not be held responsible for any damage to persons or property caused by incorrect installation...

Page 4: ...ore connecting the appliance ensure that the rating plate data corresponds to that of the gas and electricity supply see section TECHNICAL FEATURES Do not install this appliance on a marine craft or i...

Page 5: ...with fan The cooker has an accessory e g electronic clock with end of cooking a programmer which makes it possible to use the oven without supervision In order to guarantee the customer a good and saf...

Page 6: ...hich stays on for all functions Defrost Top and bottom heating elements Top and bottom heating elements and fan Bottom heating element and fan Fan forced heating element and fan Grill heating element...

Page 7: ...push button 6 the AUTO and symbols will turn on and stay on all the time At the end of the set time the symbol will turn off the AUTO symbol will flash and the buzzer will go off Automatic operation...

Page 8: ...the Low position Avoid using over sized pans that may radiate excessive heat and cause damage to surrounding surfaces such as bench tops and glass lid The appliance is equipped with a particular pan s...

Page 9: ...tat knob Never cover the base of the oven or the oven shelf with aluminium foil or other materials as this creates a fire hazard When grilling always put a little water in the grill pan The water prev...

Page 10: ...wait till the thermostat yellow warning light E turns off before placing foods inside oven This function activates the rear heating unit and the fan distributes the heat produced This combination all...

Page 11: ...or bread crumbs If the biscuits will not come away from the baking tray put the tray back in the oven for a while and lift the biscuits up before they cool The next time use a sheet of baking parchme...

Page 12: ...200 190 200 15 20 40 45 CAKES Angel cake Fruit cake Chocolate cake 0 8 0 8 0 8 2 2 2 190 200 200 52 65 45 170 190 190 200 190 200 45 65 45 The values given in the tables temperatures and cooking times...

Page 13: ...sed and dried with a soft cloth Do not use harsh abrasive cleaners or sharp metal scrapers to clean the oven glass door since they can scratch the surface which may result in shattering of the glass N...

Page 14: ...TELY LOWERED as indicated in fig A HOW TO CLEAN THE INNER OVEN DOOR GLASS One of the features of our cookers is that the inner oven door glass can be easily removed for cleaning without the aid of spe...

Page 15: ...ystem call an electrician in The electric oven is not working Check that the programmer accessory if there is one is on the manual position and then repeat the operations described in the manual The t...

Page 16: ...lueing and to maintain temperature of immediate surroundings within safe limits The use of a gas appliance results in production of heat and moisture in the room in which it is installed Ensure that t...

Page 17: ...arest burner it may be protected by a non combustible protective layer in accordance with AS5601 The protection must ensure the surface temperature of the combustible surface does not exceed 65 C abov...

Page 18: ...upper hooks when the cooker is in its position against the wall Attach the chain to the lower hooks if the cooker is installed with a hose assembly so that there is no strain on the hose when the coo...

Page 19: ...cooker at least 60 mm clearance is required Installation using flexible connection As an option the cooker may be installed with a flexible connection hose which complies with AS NZS 1869 AGA Approve...

Page 20: ...If the appliance cannot be adjusted to perform correctly refer to the authorised service provider in your area INSTRUCTIONS FOR THE INSTALLER 20 TAPS fig 20 All gas taps are male cone type with only...

Page 21: ...proceed with burner adjustment as explained in the previous paragraphs INSTRUCTIONS FOR THE INSTALLER CHANGING THE FLEXIBLE GAS HOSE In order to guarantee that the gas hose is always in excellent con...

Page 22: ...the hob unscrewing frontal and rear fixing screws Vs fig 22 which lock the hob at the supports S Pull out the knobs Unscrew the nuts D of the gas aluminium pipes and pull out the thermocouple quick c...

Page 23: ...l Right front Propane Natural 2 75 1 00 54 90 1 4 3 8 4 0 6 Wok Center Propane Natural 2 75 1 00 105 175 5 8 14 6 15 0 ELECTRICAL COMPONENTS DESCRIPTION NOMINAL DATA Lower heating element of the oven...

Page 24: ...461308039 RS_000 06 2010...

Reviews: