background image

FR

Guide rapide

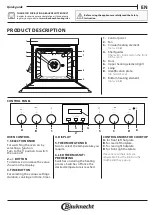
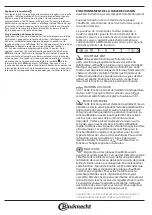
DESCRIPTION DU PRODUIT

PANNEAU DE COMMANDE

1.

Panneau de commande

2.

Ventilateur

3.

Élément chauffant rond

(invisible)

4.

Supports de grille

(le niveau est indiqué à l'avant du

four)

5.

Porte

6.

Élément de chauffage

supérieur/grill

7.

Ampoule

8.

Plaque signalétique

(ne pas enlever

)

9.

Élément chauffant inférieur

(invisible)

COMMANDE DU FOUR
1. BOUTON DE SÉLECTION

Pour allumer le four en 

sélectionnant une fonction.

Tournez à la position  pour 

éteindre le four.

2. /-

Pour diminuer ou augmenter la 

valeur affichée à l'écran.

3. TOUCHE HEURE

Pour sélectionner les différents 

réglages : durée, fin de cuisson, 

minuterie.

4. ÉCRAN

5. BOUTON THERMOSTAT

Tournez pour sélectionner la 

température désirée.

6. VOYANT THERMOSTAT /

PRÉCHAUFFAGE

S'allume pendant le processus

de chauffage. S'éteint une fois la

température désirée atteinte.

BOUTONS DE COMMANDE DE 

LA TABLE DE CUISSON

A.

pour la zone de cuisson avant

gauche.

B.

pour la zone de cuisson arrière

gauche.

C.

pour la zone de cuisson arrière

droite.

D

. pour la zone de cuisson avant

gauche.

Veuillez noter : tous les boutons sont 

escamotables. Appuyez au centre des 

boutons pour les faire sortir.

1

2
3

4

5

8

9

7

6

1

4

A

B

D

6

3

2

5

C

MERCI D'AVOIR ACHETÉ UN PRODUIT BAUKNECHT

Afin de profiter d’une assistance complète, 

veuillez enregistrer votre appareil sur 

www . bauknecht . eu / register

Lisez attentivement les consignes de sécurité avant 

d’utiliser l’appareil.

Summary of Contents for HVS5 TH8VS3 ES

Page 1: ...t Timer 4 DISPLAY 5 THERMOSTATREGLER Drehen Sie ihn zum Wählen der gewünschten Temperatur 6 KONTROLLLEUCHTE THERMOSTAT VORHEIZEN Schaltet sich während dem Heizvorgang an Schaltet sich aus wenn die gewünschte Temperatur erreicht ist BEDIENKNÖPFE DES KOCHFELDS A Kochfeld vorne links B Kochfeld hinten links C Kochfeld hinten rechts D Kochfeld vorne rechts Bitte beachten Alle Bedienknöpfe sind versenk...

Page 2: ...ht ermöglicht das einfache Entfernen von Schmutz und Speiseresten 200 ml Trinkwasser auf den Ofenboden geben und die Funktion 35 Minuten bei 90 C verwenden Die Funktion aktivieren wenn der Ofen kalt ist und ihn für 15 abkühlen lassen UMLUFT Zum Garen von Fleisch und Backen von salzigen oder süßen Kuchen mit flüssiger Füllung auf einer Ebene sowie Pizza auf einer oder zwei Ebenen Zum Garen auf zwei...

Page 3: ... Temperatur drehen Um die Funktion jederzeit zu unterbrechen den Ofen ausschalten den Auswahlknopf und den Thermostatregler auf und drehen 3 VORHEIZEN Sobald die Funktion aktiviert wurde schaltet sich die Kontrollleuchte des Thermostat ein und signalisiert dass das Vorheizen begonnen hat Am Ende dieses Vorgangs schaltet sich die Kontrollleuchte des Thermostats aus und gibt an dass der Ofen die ein...

Page 4: ...LZSTUFE Zum Aufgehen von Teig Aufweichen von gekühlter Butter Warmhalten von Milch in der Trinkflasche oder von Babynahrung zur Herstellung von Joghurt zum Schmelzen von Schokolade usw Diese Betriebsart funktioniert nur bei leuchtender Restwärme Kontrollleuchte Achten Sie darauf dass die Restwärme Kontrollleuchte der Kochzone leuchtet die Sie verwenden möchten Den Bedienknopf auf drehen Zum Abscha...

Page 5: ... Salzige Kuchen Gemüsekuchen Quiche Ja 175 200 40 50 2 Ja 175 190 50 65 3 1 Blätterteigtörtchen salziges Blätterteiggebäck Ja 180 200 20 30 3 Ja 175 200 25 45 3 1 Lasagne überbackene Pasta Cannelloni Aufläufe Ja 190 200 40 65 2 Lamm Kalb Rind Schwein 1 kg Ja 190 200 90 110 2 Hähnchen Kaninchen Ente 1 kg Ja 190 200 65 85 2 Puter Gans 3 kg Ja 190 200 140 180 1 2 Fisch gebacken in Folie Filets ganz J...

Page 6: ...s sofort mit einem feuchten Mikrofasertuch reinigen INNENFLÄCHEN Den Ofen nach jedem Gebrauch abkühlen lassen und anschließend reinigen vorzugsweise wenn dieser noch warm ist um durch Speiserückstände verursachte Ablagerungen oder Flecken zu entfernen Zum Trocknen von Kondensation die sich beim Garen von Speisen mit einem hohen Wassergehalt bildet den Ofen vollständig abkühlen lassen und anschließ...

Page 7: ... in der korrekten Position befinden 5 Versuchen die Tür zu schließen und sicherstellen dass sie auf das Bedienfeld ausgerichtet ist Ist dies nicht der Fall die oben aufgeführten Schritte wiederholen Die Tür könnte beschädigt werden wenn dies nicht richtig funktioniert AUSWECHSELN DER LAMPE 1 Trennen Sie den Ofen von der Stromversorgung 2 Die Abdeckung von der Beleuchtung abschrauben die Lampe erse...

Page 8: ...nschen entspricht zu den höheren Einstellungen übergehen Es wird empfohlen die mitgelieferten Zubehörteile und vorzugsweise Kuchenformen und Backbleche aus dunklem Metall zu verwenden Es können auch Töpfe und Zubehörteile aus feuerfestem Glas oder Keramik verwendet werden aber es ist zu berücksichtigen dass sich die Garzeiten dadurch etwas verlängern GLEICHZEITIGES GAREN VERSCHIEDENER SPEISEN Bei ...

Page 9: ...he various settings duration cooking end time timer 4 DISPLAY 5 THERMOSTAT KNOB Turn to select the temperature you require 6 LED THERMOSTAT PREHEATING Switches on during the heating process Switches off once the desired temperature is reached CONTROL KNOBS FOR COOKTOP A for front left hotplate B for rear left hotplate C for rear right hotplate D for front right hotplate Please note all the knobs a...

Page 10: ...special low temperature cleaning cycle allows dirt and food residues to be removed with ease Pour 200 ml of drinking water on the bottom of the oven and use the function for 35 at 90 C Activate the function when the oven is cold and let it cool down for 15 CONVECTION BAKE For cooking meat and pies with liquid filling savoury or sweet on a single shelf and pizzas on one or two shelves When cooking ...

Page 11: ...TION To start the function you have selected turn the thermostat knob to set the temperature you require To interrupt the function at any time switch off the oven turn the selection knob and the thermostat knob to and 3 PREHEATING Once the function has been activated the LED thermostat will switch on signalling that the preheating process has begun At the end of this process the LED thermostat swi...

Page 12: ...to rise to soften butter taken from the fridge to keep baby bottles or food warm also for making yoghurt melting chocolate etc This function is only available when the residual heat indicator is on For this function make sure the residual heat indicator of the desired hotplate is on Turn the knob to To deselect the function change the position of the knob HEAT MAINTENANCE To maintain a constant te...

Page 13: ...3 1 Savoury pies vegetable pie quiche Yes 175 200 40 50 2 Yes 175 190 50 65 3 1 Vols au vents puff pastry crackers Yes 180 200 20 30 3 Yes 175 200 25 45 3 1 Lasagne baked pasta canneloni flans Yes 190 200 40 65 2 Lamb veal beef pork 1 kg Yes 190 200 90 110 2 Chicken rabbit duck 1 kg Yes 190 200 65 85 2 Turkey goose 3 kg Yes 190 200 140 180 1 2 Baked fish en papillote fillets whole Yes 180 200 40 6...

Page 14: ...ith a damp microfibre cloth INTERIOR SURFACES After every use leave the oven to cool and then clean it preferably while it is still warm to remove any deposits or stains caused by food residues To dry any condensation that has formed as a result of cooking foods with a high water content leave the oven to cool completely and then wipe it with a cloth or sponge Clean the glass in the door with a su...

Page 15: ...le pressure to check that the catches are in the correct position 5 Try closing the door and check to make sure that it lines up with the control panel If it does not repeat the steps above The door could become damaged if it does not work properly REPLACING THE LAMP 1 Disconnect the oven from the power supply 2 Unscrew the cover from the light replace the bulb and screw the cover back on the ligh...

Page 16: ... is not cooked enough then switch to higher settings Use the accessories supplied and preferably dark coloured metal cake tins and baking plates You can also use Pyrex or stoneware pans and accessories but bear in mind that cooking times will be slightly longer COOKING DIFFERENT FOODS AT THE SAME TIME Using the Forced Air function you can cook different foods which require the same cooking tempera...

Page 17: ... de cuisson minuterie 4 ÉCRAN 5 BOUTON THERMOSTAT Tournez pour sélectionner la température désirée 6 VOYANT THERMOSTAT PRÉCHAUFFAGE S allume pendant le processus de chauffage S éteint une fois la température désirée atteinte BOUTONS DE COMMANDE DE LA TABLE DE CUISSON A pour la zone de cuisson avant gauche B pour la zone de cuisson arrière gauche C pour la zone de cuisson arrière droite D pour la z...

Page 18: ...e cycle de nettoyage à basse température spécial permet d enlever la saleté et les résidus d aliments plus facilement Versez 200 ml d eau potable au fond du four et utilisez la fonction pendant 35 à 90 C Lancez la fonction lorsque le four est froid et laissez le refroidir 15 minutes CONVECTION FORCÉE Pour cuire des viandes et des tartes contenant une garniture liquide salée ou sucrée sur une seule...

Page 19: ...lectionnée tournez le bouton du thermostat pour régler la température requise Pour interrompre la fonction à tout moment éteignez le four tournez le bouton de sélection et le bouton de thermostat sur et 3 PRÉCHAUFFAGE Une fois la fonction activée le thermostat à LED s allumera pour signaler que le processus de préchauffage a commencé À la fin de ce processus le thermostat à LED s éteint pour indiq...

Page 20: ...e ramollir une plaquette de beurre dur sortie du réfrigérateur réchauffer un biberon ou le repas d un bébé fabriquer du yaourt faire fondre du chocolat etc Cette fonction est disponible uniquement lorsque l indicateur de chaleur résiduelle est allumé Vérifiez que l indicateur de chaleur résiduelle de la zone de cuisson que vous désirez utiliser est allumé Positionnez le bouton sur Pour désactiver ...

Page 21: ...ux légumes quiches Oui 175 200 40 50 2 Oui 175 190 50 65 3 1 Vol au vent biscuits à pâte feuilletée Oui 180 200 20 30 3 Oui 175 200 25 45 3 1 Lasagnes pâtes au four cannellonis tartes Oui 190 200 40 65 2 Agneau veau bœuf porc 1 kg Oui 190 200 90 110 2 Poulet lapin canard 1 kg Oui 190 200 65 85 2 Dinde oie 3 kg Oui 190 200 140 180 1 2 Poisson au four en papillote filet entier Oui 180 200 40 60 2 Lé...

Page 22: ...ion laissez le four refroidir et nettoyez le de préférence lorsqu il est encore tiède pour enlever les dépôts ou taches laissés par les résidus de nourriture Pour enlever la condensation qui se serait formée lors de la cuisson d aliments avec une forte teneur en eau laissez le four refroidir complètement et essuyez le avec un chiffon ou une éponge Nettoyez le verre dans la porte avec un détergent ...

Page 23: ...es loquets sont bien placés 5 Essayez de fermer la porte et assurez vous qu elle est alignée avec le panneau de commande Sinon répétez les étapes précédentes La porte pourrait s endommager si elle ne fonctionne pas correctement REMPLACEMENT DE L AMPOULE 1 Débranchez le four 2 Dévissez le couvercle de l ampoule remplacez l ampoule et revissez le couvercle 3 Rebranchez le four à l alimentation élect...

Page 24: ...assez cuits augmentez les Utilisez les accessoires fournis et de préférence des moules à gâteau en métal foncés et des plats de cuisson Vous pouvez aussi utiliser des plaques et accessoires en pyrex ou en céramique cependant les temps de cuisson seront sensiblement plus longs CUISSON D ALIMENTS DIFFÉRENTS EN MÊME TEMPS La fonction Chaleur pulsée permet de cuire simultanément plusieurs aliments néc...

Page 25: ... het selecteren van diverse instellingen duur eindtijd bereiding kookwekker 4 DISPLAY 5 THERMOSTAATKNOP Draai om de gewenste temperatuur te selecteren 6 LED THERMOSTAAT VOORVERWARMING Gaat aan tijdens het verwarmen Gaat uit eens de gewenste temperatuur bereikt is BEDIENINGSKNOPPEN VOOR KOOKPLAAT A voor kookzone linksvoor B voor kookzone linksachter C voor kookzone rechtsachter D voor kookzone rech...

Page 26: ... vrijkomt kunnen vuil en voedselresten gemakkelijk worden verwijderd Doe 200 ml drinkbaar water onder in de oven en gebruik de functie gedurende 35 op 90 C Activeer de functie wanneer de oven koud is en laat 15 afkoelen CONVECTIEBAKKEN Voor het bereiden van vlees en taarten met een vloeibare vulling hartig of zoet op één steunhoogte en pizza s op één of twee steunhoogtes Bij bereiding op twee steu...

Page 27: ...raai de thermostaatknop op de gewenste temperatuur Om de functie op elk moment te onderbreken zet de oven uit draai de keuzeknop en de thermostaatknop op en 3 VOORVERWARMEN Nadat de functie is geactiveerd zal de LED thermostaat inschakelen om aan te geven dat het voorverwarmingsproces begonnen is Aan het einde van dit proces schakelt de LED thermostaat uit wat aangeeft dat de oven de ingestelde te...

Page 28: ...mbolen GEMATIGD VERWARMEN Deze functie is geschikt voor het laten rijzen van deeg om koude boter zacht te laten worden babyzuigflessen of pap warm te houden om yoghurt te maken chocolade te smelten etc Is alleen beschikbaar als het restwarmtelampje brandt Controleer eerst of het restwarmtelampje van de betreffende kookzone brandt Draai vervolgens de knop op De functie wordt uitgeschakeld door de s...

Page 29: ...0 20 3 1 Hartige taarten groentetaart quiche Ja 175 200 40 50 2 Ja 175 190 50 65 3 1 Pasteitjes bladerdeeghapjes Ja 180 200 20 30 3 Ja 175 200 25 45 3 1 Lasagne gebakken pasta cannelloni ovenschotels Ja 190 200 40 65 2 Lamsvlees kalfsvlees rundvlees varkensvlees 1 kg Ja 190 200 90 110 2 Kip konijn eend 1 kg Ja 190 200 65 85 2 Kalkoen gans 3 kg Ja 190 200 140 180 1 2 Vis uit de oven in folie filet ...

Page 30: ... met de oppervlakken het apparaat verwijder het dan onmiddellijk met een vochtig microvezeldoekje INTERNE OPPERVLAKKEN Na elk gebruik moet de oven afkoelen en dan gereinigd worden bij voorkeur wanneer die nog warm is om afzettingen of vlekken veroorzaakt door voedselresten te verwijderen Laat voor het drogen van condens die zich heeft gevormd vanwege het breiden van voedsel met een hoog vochtgehal...

Page 31: ...Zachtjes drukken om te controleren of de vergrendelingen in de juiste positie staan 5 Probeer de deur te sluiten en controleer of het in lijn met het bedieningspaneel is Als dit niet het geval is herhaalt u de bovenstaande stappen Als het niet goed werkt kan de deur beschadigd raken VERVANGEN VAN HET LAMPJE 1 Koppel de oven los van de netvoeding 2 Schroef het beschermkapje van de lamp vervang de l...

Page 32: ...len waarden Als de bereiding niet naar wens is kunt u hogere waarden gebruiken Geadviseerd wordt om de bijgeleverde accessoires te gebruiken en indien mogelijk taartvormen en bakplaten van donker metaal U kunt ook vuurvaste of aardewerk pannen en accessoires gebruiken de bereidingstijden zijn dan iets langer HET TEGELIJKERTIJD BEREIDEN VAN VERSCHILLENDE GERECHTEN Met de functie Hete Lucht kunt u t...

Page 33: ... cottura timer 4 DISPLAY 5 MANOPOLA TERMOSTATO Ruotare per selezionare la temperatura desiderata 6 SPIA TERMOSTATO PRERISCALDAMENTO Si accende durante la fase di riscaldamento Si spegne al raggiungimento della temperatura desiderata MANOPOLE COMANDO PER PIANO COTTURA A per zona di cottura anteriore sinistra B per zona di cottura posteriore sinistra C per zona di cottura posteriore destra D per zon...

Page 34: ...ra permette di rimuovere facilmente sporco e residui di cibo Versare 200 ml di acqua potabile sul fondo del forno e attivare la funzione per 35 a 90 C Attivare la funzione con il forno freddo lasciandolo raffreddare per 15 min VENTILATO Per cuocere carni e torte con ripieno liquido salate o dolci su un solo ripiano pizze su singolo o doppio livello Per le cotture su due livelli invertire la posizi...

Page 35: ... manopola termostato per impostare la temperatura desiderata Per interrompere una funzione in qualsiasi momento spegnere il forno ruotare la manopola di selezione e la manopola del termostato su e 3 PRERISCALDAMENTO Una volta avviata la funzione il LED del termostato si accende per segnalare che si è attivata la fase di preriscaldamento Al termine di questa fase il LED del termostato si spegne ad ...

Page 36: ...nte ai differenti livelli di potenza e da una serie di simboli di funzione TEPORE Per far lievitare la pasta ammorbidire il burro tolto dal frigo mantenere al caldo i biberon o la pappa dei bambini per preparare lo yogurt sciogliere il cioccolato ecc La funzione è disponibile soltanto con la spia del calore residui accesa Per il funzionamento accertarsi che la spia di calore residuo della zona di ...

Page 37: ...250 10 20 3 1 Torte salate torta di verdure quiche Sì 175 200 40 50 2 Sì 175 190 50 65 3 1 Voulevant Salatini di pasta sfoglia Sì 180 200 20 30 3 Sì 175 200 25 45 3 1 Lasagne Pasta al forno Cannelloni Sformati Sì 190 200 40 65 2 Agnello Vitello Manzo Maiale 1 Kg Sì 190 200 90 110 2 Pollo Coniglio Anatra 1 kg Sì 190 200 65 85 2 Tacchino Oca 3 kg Sì 190 200 140 180 1 2 Pesce al forno al cartoccio fi...

Page 38: ...otti dovesse venire a contatto con le superfici pulire subito con un panno in microfibra umido SUPERFICI INTERNE Dopo ogni uso lasciare raffreddare il forno e pulirlo preferibilmente quando è ancora tiepido per rimuovere incrostazioni e macchie dovute a residui di cibo Per asciugare la condensa dovuta alla cottura di alimenti ad alto contenuto di acqua passare un panno o una spugna a forno freddo ...

Page 39: ...ressione per assicurare il corretto posizionamento dei fermi 5 Provare a chiudere la porta verificando che sia allineata al pannello di controllo Se non lo fosse ripetere tutte le operazioni funzionando male la porta potrebbe danneggiarsi SOSTITUIRE LA LAMPADA 1 Scollegare il forno dalla rete elettrica 2 Svitare la copertura della lampada sostituire la lampada e avvitare di nuovo il coperchio dell...

Page 40: ...erato passare a quelli più alti Si consiglia di utilizzare gli accessori in dotazione e tortiere o teglie possibilmente in metallo scuro È possibile utilizzare anche tegami e accessori in pyrex o in ceramica ma occorre considerare che i tempi di cottura si allungheranno leggermente COTTURA SIMULTANEA DI PIETANZE DIVERSE Utilizzando la funzione Termoventilato è possibile cuocere contemporaneamente ...

Page 41: ...n hora de finalización de la cocción temporizador 4 PANTALLA 5 SELECTOR DEL TERMOSTATO Gire para seleccionar la temperatura deseada 6 LED DEL TERMOSTATO PRECALENTAMIENTO Se enciende durante el proceso de precalentamiento Se apaga cuando se alcanza la temperatura deseada SELECTORES DE CONTROL DE LA SUPERFICIE DE COCCIÓN A de la placa frontal izquierda B de la placa trasera izquierda C de la placa t...

Page 42: ...r la suciedad y los residuos de alimentos con facilidad Vierta 200 ml de agua potable en el fondo del horno y utilice la función durante 35 a 90 C Active la función con el horno frío y déjelo enfriar durante 15 una vez terminado el ciclo HORNO DE CONVECCIÓN Para cocinar carnes o tartas con relleno líquido dulces o saladas en un solo nivel y pizzas en uno o dos niveles En caso de cocinar en dos niv...

Page 43: ...ccionada gire el selector del termostato hasta la temperatura deseada Para interrumpir la función en cualquier momento apague el horno gire el selector y el selector del termostato hasta y 3 PRECALENTAMIENTO Una vez activada la función el led del termostato se encenderá para indicar que el proceso de precalentamiento se ha iniciado Al final del proceso el led del termostato se apaga indicando que ...

Page 44: ... ablandar mantequilla sacada del frigorífico mantener biberones o comida calientes y también para hacer yogur derretir chocolate etc Esta función solo está disponible cuando el indicador de calor residual esté encendido Para esta función asegúrese de que el indicador de calor residual de la placa deseada esté encendido Gire el selector a Para deseleccionar la función cambie la posición del selecto...

Page 45: ...0 3 1 Tartas saladas tarta de verdura quiche Sí 175 200 40 50 2 Sí 175 190 50 65 3 1 Volovanes hojaldres Sí 180 200 20 30 3 Sí 175 200 25 45 3 1 Lasaña pasta al horno canelones budines Sí 190 200 40 65 2 Cordero ternera buey cerdo 1 kg Sí 190 200 90 110 2 Pollo conejo pato 1 kg Sí 190 200 65 85 2 Pavo oca 3 kg Sí 190 200 140 180 1 2 Pescado al horno en papillote filetes entero Sí 180 200 40 60 2 V...

Page 46: ...e microfibra SUPERFICIES INTERIORES Después de cada uso deje que el horno se enfríe y a continuación límpielo preferiblemente cuando aún esté tibio para quitar los restos o las manchas causadas por los residuos de los alimentos Para secar la condensación que se haya podido formar debido a la cocción de alimentos con un alto contenido en agua deje que el horno se enfríe por completo y límpielo con ...

Page 47: ...s están en la posición correcta 5 Intente cerrar la puerta y compruebe que esté alineada con el panel de control Si no lo está repita los pasos de arriba La puerta podría dañarse si no funciona correctamente SUSTITUCIÓN DE LA BOMBILLA 1 Desconecte el horno de la red eléctrica 2 Desenrosque la tapa de la lámpara sustituya la bombilla y vuelva a enroscar la tapa de la lámpara 3 Vuelva a conectar el ...

Page 48: ...ente auméntelos Utilice los accesorios suministrados y si es posible moldes y bandejas de horneado metálicos y de color oscuro También puede utilizar recipientes y accesorios tipo pírex o de cerámica aunque deberá tener en cuenta que los tiempos de cocción serán ligeramente mayores COCCIÓN DE VARIOS ALIMENTOS A LA VEZ El uso de la función Aire forzado permite cocinar al mismo tiempo distintos alim...

Page 49: ...чных настроек длительность время окончания приготовления таймер 4 ДИСПЛЕЙ 5 РУЧКА ТЕРМОСТАТА Поверните для выбора нужной температуры 6 ИНДИКАТОР ТЕРМОСТАТА ПРОГРЕВ Горит в процессе нагрева Гаснет после достижения требуемой температуры РУЧКИ УПРАВЛЕНИЯ ВАРОЧНОЙ ПАНЕЛЬЮ A передняя левая зона нагрева B задняя левая зона нагрева C задняя правая зона нагрева D передняя правая зона нагрева Примечание Вс...

Page 50: ... включите этот режим на 35 мин при температуре 90 C Запускайте режим только когда духовка холодная После завершения режима дайте духовке остыть подождав 15 мин КОНВЕКЦИОННОЕ ВЫПЕКАНИЕ Режима для приготовления мяса и пирогов с мягкой начинкой сладкой и несладкой на одном уровне и пиццы на одном или двух уровнях В случае одновременного использования двух уровней для достижения более однородных услов...

Page 51: ...лючения выбранного режима установите нужную температуру повернув ручку термостата Чтобы прервать действие режима в любой момент выключите духовку повернув ручку выбора и ручку термостата на и 3 ПPOГPEВ При включении режима загорается индикатор термостата сообщающий о начале процесса нагрева Индикатор гаснет в момент завершения нагрева указывая на то что духовка достигла установленной температуры П...

Page 52: ...щую различным настройкам мощности и ряд символов режимов ЩАДЯЩИЙ НАГРЕВ Режим для подъема теста размягчения сливочного масла из холодильника поддержания теплыми детского питания и бутылочек приготовления йогуртов растапливания шоколада и пр Данный режим доступен только при горящем индикаторе остаточного тепла Чтобы использовать режим убедитесь что индикатор остаточного тепла выбранной зоны нагрева...

Page 53: ...Несладкая выпечка пирог с овощной начинкой лоранский пирог Да 175 200 40 50 2 Да 175 190 50 65 3 1 Волованы печенье из слоеного теста Да 180 200 20 30 3 Да 175 200 25 45 3 1 Лазанья паста каннеллони фланы Да 190 200 40 65 2 Баранина телятина говядина свинина 1 кг Да 190 200 90 110 2 Курица кролик утка 1 кг Да 190 200 65 85 2 Индейка гусь 3 кг Да 190 200 140 180 1 2 Запеченная рыба в фольге филе це...

Page 54: ... прибора немедленно протрите его влажной салфеткой из микроволокна ВНУТРЕННИЕ ПОВЕРХНОСТИ После каждого использования дайте духовке остыть и очистите ее желательно пока она еще теплая от отложений и пятен образующихся при приготовлении пищи Для удаления конденсата возникающего при приготовлении продуктов с высоким содержанием влаги дождитесь полного охлаждения духовки и протрите ее салфеткой или г...

Page 55: ...ерцу и убедитесь что она находится в одной плоскости с панелью управления Если это не так повторите приведенные выше шаги Неправильно установленная дверца может выйти из строя ЗАМЕНА ЛАМПЫ 1 Отключите духовку от электросети 2 Отверните плафон замените лампу и наверните плафон в исходное положение 3 Подключите духовку к электросети Примечание Используйте лампы со следующими характеристиками лампы н...

Page 56: ...жется не готовым переходите к более высоким настройкам Используйте входящие в комплект принадлежности отдавайте предпочтение формам для выпечки и противням из темного металла Вы также можете использовать посуду из жаропрочного стекла или керамики При этом учитывайте что продолжительность приготовления в ней немного увеличивается ОДНОВРЕМЕННОЕ ПРИГОТОВЛЕНИЕ НЕСКОЛЬКИХ БЛЮД В режиме Конвекция можно ...

Reviews: