background image

Especificaciones

33

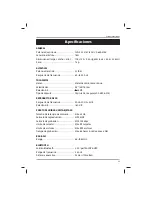
Especificaciones

GENERAL

Potencia de entrada............................... 100–240 V~50/60 Hz, 0.65 A MAX

Consumo eléctrico................................... 18 W

Dimensiones (largo × ancho × alto)....... 17.5 × 13.2 × 9.3 pulgadas (44.5 × 33.5 × 23.5 cm)

Peso........................................................... 7 kg

ALTAVOCES

Potencia de salida................................... 2× 10 W

Respuesta de frecuencia........................ 60–16,000 Hz

TOCADISCOS

Motor.......................................................... Motor de corriente continua

Velocidades.............................................. 33

1⁄3

/45/78 rpm

Relación S/R.............................................

 45 dB

Tipo de cápsula........................................ Cápsula de la aguja (402-M208-015)

REPRODUCTOR DE CD

Respuesta de frecuencia........................ 20 Hz–20 Hz ± 3 dB

Relación S/R............................................. >60 dB

PUERTO DE UNIDAD USB/TARJETA SD

Tamaño de la tarjeta de memoria........ Máx. 32 GB

Formato de reproducción...................... MP3, WMA

Formato de grabación............................ MP3, 128 kbps

Límite de carpetas................................... Máx. 99 carpetas

Límite de archivos.................................... Máx. 999 archivos

Tiempo de grabación.............................. Máx. 65 horas (uso de aprox. 4 GB)

RADIO FM

Rango........................................................ 88–108 MHz

BLUETOOTH

Versión Bluetooth.................................... V 2.0; perfil A2DP & HFP

Rango de frecuencia............................... 2.4 GHz

Distancia operativa.................................. 33 pies (10 metros)

Summary of Contents for XR-179ERB-1

Page 1: ...NOSTALGIC TURNTABLE WITH BLUETOOTH English 02 Español 19 User Manual Manual del usuario TOCADISCOS NOSTÁLGICO CON BLUETOOTH ...

Page 2: ...rom USB device SD card 10 Delete a file 10 Record onto a USB device SD card 11 Listening to an external audio device Bluetooth mode 11 Playback controls 12 Disconnecting a Bluetooth device 12 Listening to an external audio device AUX mode 12 Listening to the FM radio 13 Cleaning and maintenance 13 Cleaning 13 Handling a vinyl record 13 Replacing the turntable stylus 13 Storage 14 Specifications 15...

Page 3: ...operty damage and will invalidate your warranty We assume no responsibility for any eventual damages caused by improper or faulty use Only place the device on flat level surfaces without vibrations otherwise there is a risk of unintended falling from an elevated position Do not place the device in a confined space such as a bookcase or built in cabinet The device should be operated only by the type ...

Page 4: ...s they have been given supervision or instruction concerning use of the product by a person responsible for their safety Do not put any objects on top of the device Do not expose the device to microwaves Keep the device away from oils chemicals or any other organic liquids Do not place or store the device where it can fall or be pulled into a bath or sink Do not place or drop it in water or any ot...

Page 5: ... 13 15 14 4 1 Turntable cover 2 Cover support latch 3 Stereo speaker 2 4 Display panel 5 USB SD button 6 REC DEL button 7 REP PROG button 8 Selection knob Front View 12 Product overview 9 FM BLUETOOTH switch 10 POWER button 11 Compact disc tray 12 Radio tuner knob 13 3 5 mm headphone jack 14 3 5 mm AUX IN jack 15 OPEN CLOSE button 16 VOLUME knob stop playback in CD USB SD Bluetooth modes stop reco...

Page 6: ... 36 37 31 32 28 20 USB port 21 SD MMC CARD port 22 Support feet 4 23 FM antenna 24 RCA output jacks left right 25 Power input jack DC 12 V 2 A 26 Power adapter 27 Handle 28 Turntable platter 29 45 RPM adapter 30 Tone arm 31 Cue lever 32 Tone arm lock 33 Speed switch 34 AUTO STOP switch 35 Stylus cartridge 36 Stylus 37 Stylus holder ...

Page 7: ...ress the POWER button 10 to power the device on or off Using headphones Connect headphones not provided to the headphone jack 13 for private listening The stereo speakers 3 will not work if you use headphones WARNING Do not adjust the headphone volume too high There is danger of hearing impairment Using external speakers This feature enables you to play audio on the device through external speaker...

Page 8: ...er Auto stop function 9 If the AUTO STOP switch is set to the OFF position the turntable platter continues spinning and has to be stopped manually at the end 10 Push the cue lever backwards to raise the tone arm Re position the tone arm back to the rest position Pull the cue lever forwards to lower the tone arm Lock the tone arm to protect it from accidental movement 11 Carefully pull the cover su...

Page 9: ... display panel 4 To repeat all the tracks press the REP PROG button again Press the REP PROG button once again to disenable the repeat mode 5 Press the button 19 during playback to pause the sound track PLAY indicator flashes on the display panel To resume playback press the button again 6 Turn the VOLUME knob 16 to adjust the volume 7 Use the buttons 17 18 to navigate between previous and next tr...

Page 10: ...nd a SD card inserted press the USB SD button 5 to toggle between USB and SD mode 3 The device will start reading the storage media automatically after mode selection and will display the total number of folders and MP3 WMA files The PLAY indicator stays lit on the display panel To pause playback press the button 19 once Press it again to continue playback To play the previous track press the butt...

Page 11: ...to an external audio device Bluetooth mode This device can play audio signal received from your external device via Bluetooth You need to do initial pairing between the device and your external device The effective distance between your external device and this device is about 33 feet 10 meters 1 Turn the selection knob 8 to FM BLUETOOTH 2 Slide the FM BLUETOOTH switch 9 to the BLUETOOTH position ...

Page 12: ...xternal audio device AUX mode This device can play audio from an external audio device in AUX mode with an AUX cable not included 1 Turn the selection knob 8 to AUX AU indicator will be lit on the display panel 2 Connect one end of a 3 5 mm AUX IN cable not included into the 3 5 mm AUX IN jack 14 of the device and the other end to your external audio device such as CD player tablet MP3 player smar...

Page 13: ...ing 1 Power off and unplug all cables from the device 2 Clean the device with a clean soft and dry cloth 3 Do not touch the stylus tip with your fingers Remove the dust on the stylus cartridge with a soft brush Dust the stylus from time to time using a very soft brush brushing from back to front of the cartridge Handling a vinyl record Do not touch the vinyl record groove once out of the sleeve On...

Page 14: ...ee Fig 1 above 3 Carefully remove the stylus holder see Fig 2 above 4 To assemble the new stylus hold the front tip of the stylus holder and attach its rear edge to the stylus cartridge see Fig 3 above 5 Carefully and gently push the tone arm and the stylus holder together see Fig 4 above The new stylus is now ready for use Storage All parts must be completely dry before being stored Remove all th...

Page 15: ... 78 rpm S N Ratio 45 dB Cartridge type Needle cartridge 402 M208 015 CD PLAYER Frequency response 20 Hz 20 Hz 3 dB S N Ratio 60 dB USB DRIVE SD CARD PORT Memory card size Max 32 GB Playing format MP3 WMA Recording format MP3 128 kbps Folders limit Max 99 folders Files limit Max 999 files Recording time Max 65 hours use of approx 4 GB FM RADIO Range 88 108 MHz BLUETOOTH Bluetooth version V 2 0 prof...

Page 16: ...vice closer to the device The device is too close to a TV set or another device PHONO The vinyl record will not play Make sure the selection knob is set to PHONO mode and the right speed 33 45 or 78 RPM is selected Install the 45 RPM adapter if your vinyl record needs it Check the stylus condition and whether it is in the appro priate position or consider to replace a worn out stylus CD The CD wil...

Page 17: ...ck that the volume of the external device is at 70 80 RADIO Cannot listen to any station or signal appears weak Properly tune in the desired station using the radio tuner knob Keep away any digital devices or mobile phones from the antenna as this may lead to interference of reception Re position the antenna Note If normal operation or any of the above solutions do not fix the issue unplug the pow...

Page 18: ...ul interference to radio communications However there is no guarantee that interference will not occur in a particular installation If this equipment does cause harmful interference to radio or television reception which can be determined by turning the equipment off and on the user is encouraged to try to correct the interference by one or more of the following measures Reorient or relocate the r...

Page 19: ...os de un dispositivo USB tarjeta SD 28 Eliminar un archivo 28 Grabar en un dispositivo USB tarjeta SD 29 Escuchar un dispositivo de audio externo modo Bluetooth 29 Controles de reproducción 30 Desconexión de un dispositivo Bluetooth 30 Escuchar un dispositivo de audio externo modo AUX 30 Escuchar la radio FM 31 Limpieza y mantenimiento 31 Limpieza 31 Manejar un disco de vinilo 31 Sustituir la aguj...

Page 20: ...a instalación inapropiada y el uso de accesorios no recomendados por el fabricante del aparato pueden provocar lesiones personales y daños materiales e invalidarán la garantía No asumimos ninguna responsabilidad en caso de posibles daños causados por un uso indebido o incorrecto Coloque el aparato únicamente sobre superficies planas y niveladas sin vibraciones ya que de lo contrario existe el riesg...

Page 21: ...n obstruirse No sumerja el cable eléctrico el enchufe ni el propio aparato en agua ni en otros líquidos No exponga las conexiones eléctricas al agua Asegúrese de que todas las conexiones eléctricas estén limpias y secas antes de encenderlas El aparato no está diseñado para ser usado por personas incluidos niños con problemas físicos sensoriales o mentales o falta de experiencia y conocimientos a m...

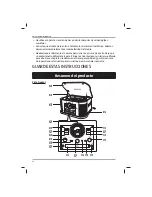
Page 22: ...ontacto con un taller cualificado para ello No se aceptarán reclamaciones de responsabilidad y garantía en caso de reparaciones efectuadas por el usuario o por un manejo incorrecto GUARDE ESTAS INSTRUCCIONES Resumen del producto USB SD REC DEL REP PROG FM BLUETOO TH FM BLU ETOOTH PHONO CD AUX POWER TUNIN G AUX VOLU ME OPEN CLOS E USB SD REC DEL REP PROG PHONO FM BLUETOOTH CD AUX FM BLUETOOTH TUNING...

Page 23: ...mm 14 Toma AUX IN de 3 5 mm 15 Botón OPEN CLOSE 16 Botón de VOLUME 17 Botón 18 Botón 19 Botón detener reproducción en los modos CD USB SD Bluetooth detener grabación alternar entre la reproducción USB tarjeta SD grabar eliminar grabación repetir pistas programar una lista de música USB SD MMC CARD 20 21 24 23 22 26 25 Vista trasera 20 Puerto USB 21 Puerto TARJETA SD MMC 22 Pies de soporte 4 23 Ant...

Page 24: ...ón 1 Desembale el aparato y mantenga todo el material de embalaje hasta asegurarse de que el nuevo aparato esté libre de daños y en buen estado operativo 2 Coloque el aparato sobre una superficie plana y nivelada que esté libre de vibraciones 3 Antes del primer uso retire el envoltorio de plástico negro que sostiene el brazo fonocaptor 30 4 Quite la protección de la aguja funda de plástico blanca ...

Page 25: ...oja en la parte trasera de los altavoces externos Escuchar un disco de vinilo 1 Levante la tapa del tocadiscos 1 hasta arriba hasta que el pestillo de soporte de la tapa 2 se detenga y se abra por completo En caso necesario empuje el pestillo con un poco de presión 2 Gire el botón de selección 8 a PHONO Aparece PH en la pantalla 4 3 Coloque un disco de vinilo en el centro del plato giradiscos 28 S...

Page 26: ...Cierre lentamente la tapa del tocadiscos 1 con las manos Asegúrese de sujetar la tapa con cuidado para evitar atraparse los dedos Función de parada automática La función de parada automática está diseñada para prolongar la vida útil de la aguja 36 Si el interruptor AUTO STOP 34 está en la posición ON el plato giradiscos 28 dejará automáticamente de girar cuando el disco de vinilo termine de reprod...

Page 27: ...UME 16 para ajustar el volumen 7 Utilice los botones 17 18 para navegar entre las pistas anteriores y siguientes Para avanzar o retroceder durante la reproducción pulse y mantenga pulsado el botón respectivamente y suéltelo cuando llegue a la posición de la pista que desea 8 Pulse el botón USB SD 5 para detener la reproducción Función del programa Se pueden programar hasta 20 pistas desde el CD y ...

Page 28: ... el modo y mostrará el número total de carpetas y archivos MP3 WMA El indicador PLAY se mantiene encendido en la pantalla Para pausar la reproducción pulse el botón 19 una vez Vuelva a pulsarlo para continuar la reproducción Para reproducir la pista anterior pulse el botón 17 una vez o púlselo y manténgalo pulsado para avanzar rápidamente por las pistas anteriores Para reproducir la pista siguient...

Page 29: ...de audio 4 Pulse el botón USB SD 5 para detener la grabación La s pista s de sonido se guardará n directamente en el dispositivo USB tarjeta SD como archivo s MP3 Escuchar un dispositivo de audio externo modo Bluetooth Este aparato puede reproducir la señal de audio recibida desde su dispositivo externo a través de Bluetooth Debe realizar el emparejamiento inicial entre el aparato y su dispositivo...

Page 30: ...n dispositivo Bluetooth Desconecte o borre manualmente el emparejamiento desde el dispositivo Bluetooth conectado Escuchar un dispositivo de audio externo modo AUX Este aparato puede reproducir un audio de un dispositivo de audio externo en el modo AUX con un cable AUX no incluido 1 Gire el botón de selección 8 a AUX El indicador AU se iluminará en la pantalla 2 Conecte un extremo de un cable AUX ...

Page 31: ... de alcohol limpiadores abrasivos o cepillos duros para limpiar el aparato ya que podrían dañar la superficie o las marcas del aparato Limpieza 1 Apague y desenchufe todos los cables del aparato 2 Limpie el aparato con un paño limpio suave y seco 3 No toque la punta de la aguja con los dedos Quite el polvo de la cápsula de la aguja con un cepillo suave Limpie la aguja de vez en cuando usando un ce...

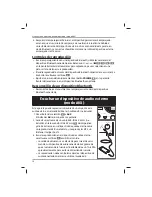
Page 32: ...0 y retire la protección de la aguja de la cápsula de la aguja 2 Presione hacia abajo el borde superior del soporte de la aguja para quitarlo véase la fig 1 anterior 3 Quite con cuidado el soporte de la aguja véase la fig 2 anterior 4 Para montar la nueva aguja sujete la punta frontal del soporte de la aguja y conecte su borde trasero a la cápsula de la aguja véase la fig 3 anterior 5 Con cuidado ...

Page 33: ...lación S R 45 dB Tipo de cápsula Cápsula de la aguja 402 M208 015 REPRODUCTOR DE CD Respuesta de frecuencia 20 Hz 20 Hz 3 dB Relación S R 60 dB PUERTO DE UNIDAD USB TARJETA SD Tamaño de la tarjeta de memoria Máx 32 GB Formato de reproducción MP3 WMA Formato de grabación MP3 128 kbps Límite de carpetas Máx 99 carpetas Límite de archivos Máx 999 archivos Tiempo de grabación Máx 65 horas uso de aprox...

Page 34: ...da correctamente En el modo Bluetooth asegúrese de que el dispositivo esté dentro del alcance de Bluetooth del aparato Acerque el dispositivo externo al aparato El aparato está demasiado cerca de un televisor u otro dispositivo PHONO El disco de vinilo no se reproduce Asegúrese de que el botón de selección esté en el modo PHONO y de que se haya seleccionado la velocidad correcta 33 45 o 78 RPM Ins...

Page 35: ...vada y sea visible Si hay demasiados dispositivos con Bluetooth cerca del aparato apague los dispositivos externos que no use para evitar interferencias Compruebe la conexión de alimentación en caso necesario AUX No se reproducirá nada a través de la conexión AUX IN Asegúrese de que el cable AUX esté firmemente conectado y compruebe si el dispositivo externo funciona y no está dañado Asegúrese de q...

Page 36: ...tivo digital de la clase B conforme al apartado 15 de las normas de la FCC Estos límites están diseñados para ofrecer una protección razonable frente a interferencias perjudiciales en una instalación residencial Este equipo genera utiliza y puede irradiar energía de radiofrecuencia y si no se instala y se utiliza de acuerdo con las instrucciones puede ocasionar interferencias perjudiciales para la...

Page 37: ...D BY DISTRIBUIDO POR ALDI INC BATAVIA IL 60510 WWW ALDI US US YEAR WARRANTY AÑOS DE GARANTÍA 3 AFTER SALES SUPPORT SERVICIO POSVENTA MODEL MODELO XR 179ERB 1 57726 12 2018 info customercareusa com 866 235 5029 US ...

Reviews: