background image


After Sales Support 

TEL: 1300 766 659 

11


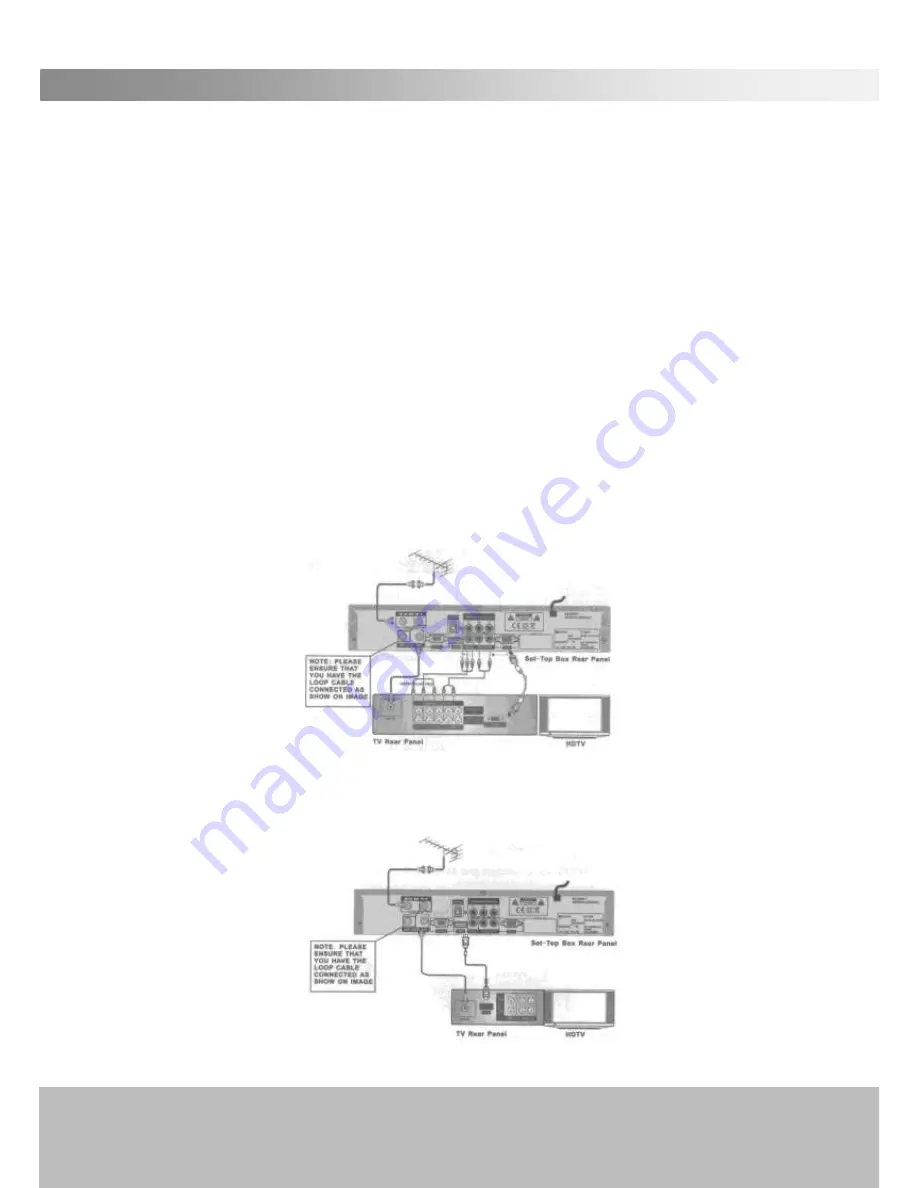
Connect to your Home Theatre Equipment [TV, Audio Receiver, etc.] 

This section covers connecting the PVR to a TV or a computer monitor by various cable 
connections: 

a.


Component Cable with audio by AUDIO L/R (red and white lead). 

b.


HDMI using a HDMI cable (not supplied).  

c.


RCA type yellow video lead with audio by AUDIO L/R (red and white lead). 

d.


Optional audio using an optical cable. 

e.


VGA connector with audio by AUDIO L/R (red and white lead). 


1 . Connect your TV antenna cable to the "

ANT IN

" jack on the back of the 

PVR using coaxial RF cable.  Check that you have the Loop Cable installed as 
shown in all diagrams. 

YPbPr

 or 

Component Cable


2. Connect the YPbPr out connectors and AUDIO L/R out connectors on the 
back of the PVR receiver to the COMPONENT IN on your television using RCA-
type cables. 


HDMI 

3. Connect the HDMI out connector on the PVR receiver to the HDTV and 

Audio-Amplifier/Receiver (where available) using HDMI cable 


Summary of Contents for HDPVR2400

Page 1: ...High Definition Personal Video Recorder Instruction Guide Model Number HDPVR2400 After Sales Support C TEL 1300766659 ...

Page 2: ... product failure within its intended use over the course of the first 2 years after the date of purchase we will remedy the problem as quickly as possible once it has been brought to our attention In the unlikely event of such an occurrence or if you require any information about the product please contact us via our after sales support services details of which can be found in this manual and on ...

Page 3: ...After Sales Support TEL 1300 766 659 3 INDEX ...

Page 4: ...ed power cord It may cause an electric shock Never open the cover High voltage in the unit may result in electrocution Disconnect the power cord to the unit before connecting any cables CAUTION To prevent fire or electrical shock do not expose the appliance to water Ensure that objects filled with liquids such as vases are not placed on the apparatus If an object or liquid gets into the unit disco...

Page 5: ...ing accessories are supplied with the receiver High Definition Personal Video Recorder PVR Remote Control RCA Video Audio Cable YPbPr Component Video Cable Batteries 2 X AAA Size User Manual IEC Connector Cable Short cable referred to as a Loop Cable in Manual PACKAGE CONTENTS ...

Page 6: ...n and the PVR is not operating 1 POWER Button Turns the receiver s power on or off 2 Menu Button MENU Press to display the Main Menu or to exit from the menu 3 Volume Left Right Button Moves the cursor left right when in the menu or adjusts the volume level in the normal state Watching TV 4 Channel Up Down Button Moves the cursor up down when in the menu or changes the current program to the previ...

Page 7: ...to a TV audio input HD Monitors audio input or an External Audio Amplifier 4 VIDEO Yellow RCA Connect to a TV with video input 5 YPbPr Connect component video to HD Monitors YPbPr Type 6 DIGITAL AUDIO Coaxial Optical Connect to an External Audio Amplifier with S PDIF Coaxial Optical Digital Audio 7 VGA Connector Connect component video to HD Monitors VGA Type 8 HDMI Connector Connect High Definiti...

Page 8: ...to the previous menu or to escape from the current mode 15 Up Down Change the channel or move cursor in the menu 16 Left Right Adjust volume or move cursor in the menu 17 OK Press to select the item in the menu or to list the TV Radio channels 18 PAGE PAGE Press to page up down in the channel list 19 RECALL Press to return the previous channel 20 Display the information of the current program 21 3...

Page 9: ...record session or return normal playback speed from fast forward or pause Jump Rewind the recording at a special interval Jump Fast forward the recording at a special interval REW X2 X4 X8 X16 Fast Rewind Button will cycle through these options if pressed repeatedly FF x X X2 X4 X8 X16 Fast Forward Button will cycle through these options if pressed repeatedly PAUSE Pause the playback STOP Stop the...

Page 10: ...Always replace both batteries at the same time Never mix new and old batteries or batteries of a different type 4 If you don t intend to use the remote controller for an extended period remove the batteries to prevent possible leakage corrosion and damage to the remote 5 Do not drop apply shock or step on the remote control 6 Do not spill water on the remote control Note If the receiver does not r...

Page 11: ...ptional audio using an optical cable e VGA connector with audio by AUDIO L R red and white lead 1 Connect your TV antenna cable to the ANT IN jack on the back of the PVR using coaxial RF cable Check that you have the Loop Cable installed as shown in all diagrams YPbPr or Component Cable 2 Connect the YPbPr out connectors and AUDIO L R out connectors on the back of the PVR receiver to the COMPONENT...

Page 12: ...ket 4 on the PVR Yellow cable connects to the yellow AV in on the TV 5 Optional Connect Optical S PDIF out connector on the HDTV receiver to the Audio Amplifier using optical cable VGA After Sales Support TEL 1300766659 6 Connect the VGA out connector and AUDIO L R out connectors on the PVR receiver to the A V IN connectors and VGA on your Computer Monitor using computer monitor and RCA type cable...

Reviews: