Bauhn ATVU42-515 Instruction Manual Download Page 4

1300 886 649

Model: ATVU42-515 Product Code: 50150 05/2015

www.tempo.org

AUS

Remote Control (Cont.)
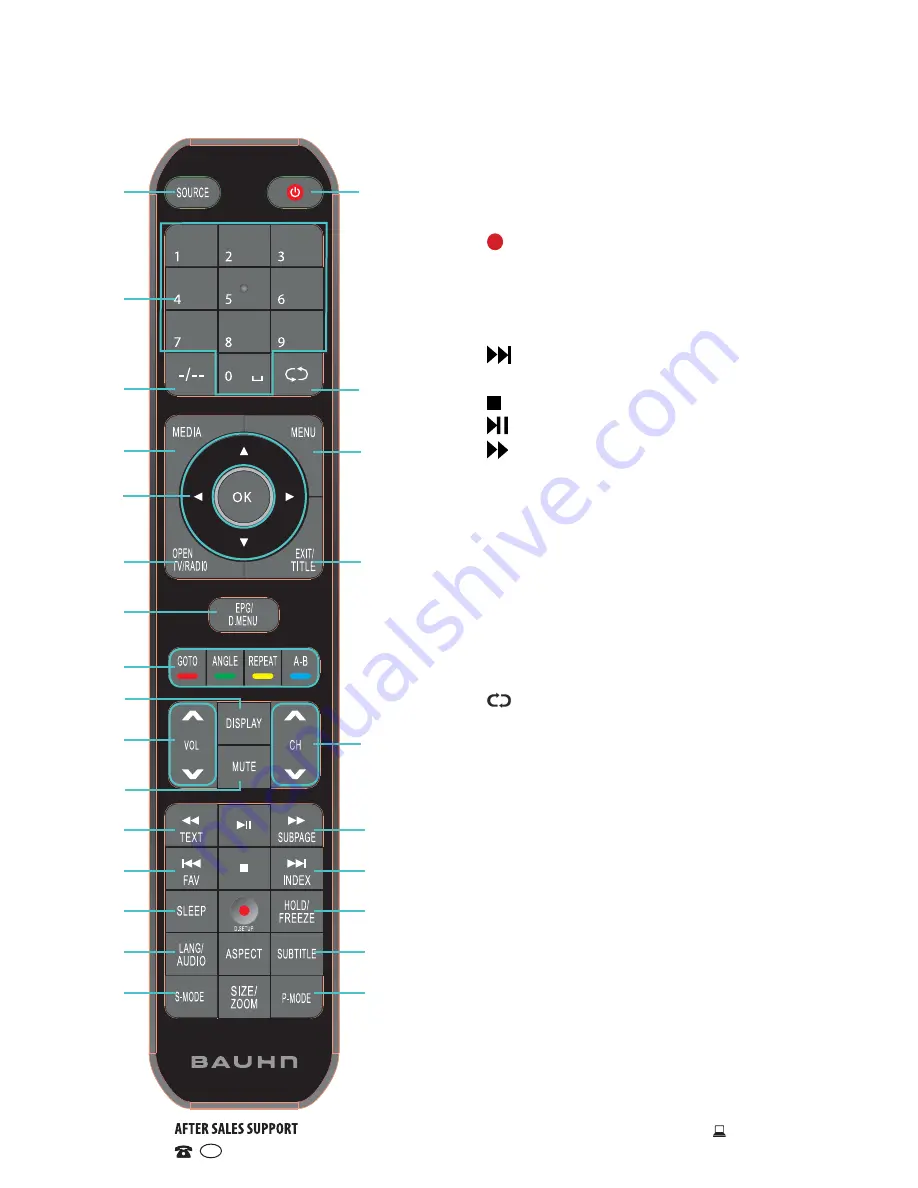
18  P-MODE:

 Switch the picture mode.

19  SUBTITLE:

 Enable/disable subtitles.

20  ASPECT:

 Press repeatedly to select the 

desired screen aspect ratio. 

21 

: Record program in DTV mode.


D-SETUP: 

Display the setup menu 

(DVD)*.

22  HOLD/FREEZE:

 Freeze the current 

teletext page.

**

 Freeze a picture screen.

23 

 /INDEX

: Play the next file. Display 

the record program list (DTV).

24   

: Stop playing.

25 


: Start or pause playing.

26 


: Move fast forward.  

SUBPAGE: 

Teletext Subpage

*

27  CH+/-: 

Press to play the next or 

previous channel; press repeatedly to 
scan through the channels.

28  EXIT/TITLE: 

Exit from the main TV 

menu displayed on the screen. Display 
the DVD title menu (DVD)*.

29  MENU:

 Display the main menu; press 

again to return to the previous menu 
page.

30 

 :

 Return to the previous channel.

31  POWER:

 Set the unit in standby mode; 

press it again to switch it on.

NOTES:

*

    DVD related functions are ineffective on 

the ATVU42-515.

**

  Teletext or Austext is no longer available, 

nor is there any plan for a replacement 
teletext service in Australia. For more 
information, please visit the websites of 
the Australian channel providers. 
However, one teletext option, “closed 
captions”, is still working on most 
Australian television channels. This 
service allows you to activate subtitles 
while watching normal television 
programs that provide it.

1

2

3

4

6

8

10

9

12

26

13

23

14

22

15

19

16

18

17

20

21

24

25

11

7

5

27

28

29

30

31

iii

Summary of Contents for ATVU42-515

Page 1: ...INSTRUCTION MANUAL Model Number ATVU42 515 42 106 cm Ultra High Definition LED LCD TV 1300 886 649 Model ATVU42 515 Product Code 50150 05 2015 www tempo org AUS...

Page 2: ...standards of performance and safety and as part of our philosophy of customer service and satisfaction are backed by our comprehensive 1 Year Warranty We hope you will enjoy using your purchase for m...

Page 3: ...ble DVD REPEAT Change repeat mode DVD A B Repeat playing between A and B DVD In TELETEXT mode the colour buttons will display the preferred pages 9 DISPLAY Display information of the current program D...

Page 4: ...XIT TITLE Exit from the main TV menu displayed on the screen Display the DVD title menu DVD 29 MENU Display the main menu press again to return to the previous menu page 30 Return to the previous chan...

Page 5: ...The service life of batteries depends on usage and environmental conditions They should normally last for about one year If the remote control fails to work even when it is operated near the TV replac...

Page 6: ...eft of the sensor as illustrated on the right The remote control will not operate if its path is blocked NOTES Do not drop step on or otherwise impact the remote control This may damage the parts or l...

Page 7: ...benefits conferred by this warranty are in addition to all rights and remedies in respect of the product that the consumer has under the Competition and Consumer Act 2010 and similar state and territo...

Page 8: ...te Control ii Warranty Details vi General Safety Instructions 1 Installation 5 Controls and Connections 7 Getting Started 14 Basic Operations 15 Electronic Program Guide EPG 17 Recording 18 USB Mode 2...

Page 9: ...zard do not expose this appliance to rain or moisture Do not change or modify the appliance in any way Only use the attachments accessories specified by the manufacturer The lightning flash with an ar...

Page 10: ...bles and make sure it is installed securely If the antenna touches a power line contact with the antenna could result in fire electric shock or serious injury Ventilation Install the unit at an adequa...

Page 11: ...irons The excessive heat could melt the insulation and expose live wires resulting in fire or electric shock Disconnect Always grasp the plug when disconnecting the power cord Pulling the cord can dam...

Page 12: ...ilities or lack of experience and knowledge unless they have been given supervision or instructions concerning use of the product by a person responsible for their safety Children Supervise young chil...

Page 13: ...point and align the stand leg with the TV bottom Step 3 Tighten the screws supplied with a screwdriver to affix the stand to the panel as illustrated on the right 3 CAUTION Do not apply excessive for...

Page 14: ...ount this TV IMPORTANT Make sure the TV set is unplugged from the power supply before wall mounting it and removing the stand We recommend you contact a professional for assistance when wall mounting...

Page 15: ...isplay Screen 2 IR infra red sensor for remote control Power Indicator In standby mode the indicator light is red when switching on the unit the indicator light will illuminate blue 3 VOL Decrease inc...

Page 16: ...VGA interface 4 PC AUDIO INPUT connect to a PC audio source 5 VIDEO INPUT Composite supports Standard Definition picture quality connections 6 AUDIO R L INPUT shared between Composite and Component vi...

Page 17: ...rom the main unit before connecting the TV to an AC power source Read through the instructions before connecting the TV to other equipment To power outlet Main unit Connecting an external antenna For...

Page 18: ...t Code 50150 05 2015 www tempo org AUS Composite video CVBS connection For basic connection use the composite Audio L R white red and CVBS yellow cable to connect the unit with other devices AV cable...

Page 19: ...11 1300 886 649 Model ATVU42 515 Product Code 50150 05 2015 www tempo org AUS Controls and Connections Cont HDMI connection HDMI cable not included PC VGA connection VGA cable not included...

Page 20: ...ols and Connections Cont Coaxial S PDIF connection Use a coaxial cable to connect the unit with an amplifier or other audio decoding device for coaxial audio signal output Coaxial cable is not include...

Page 21: ...tempo org AUS USB connection Insert a USB memory device into the USB port for PVR recording time shifting and playback of video music photo multimedia files Controls and Connections Cont Earphone con...

Page 22: ...l glow blue Press it again to power off standby mode the indicator will glow red First use When you switch on the TV for the first time the First Time Setup menu will be displayed on the screen as ill...

Page 23: ...e channel and press OK to view Volume control Press the VOL button to adjust the volume level Press the MUTE button to mute the sound press it again to restore sound Picture and sound mode Press the P...

Page 24: ...page 26 for instructions on how to add channels to the Favourites list Quick select While viewing a channel press the OK button to enter the Channels List directly Press the buttons to select the cha...

Page 25: ...nel and the columns below will display the list of available channels and their programs at various timeslots Before you can view any EPG information you have to activate every channel for which you w...

Page 26: ...LED light will flash blue and red To watch a recorded program Press the INDEX button on the remote control to display the list of recorded programs Use the buttons to select a recorded file Press the...

Page 27: ...ice and use the buttons to select Play and press OK to play the program in time shift mode Use the keys then press OK to select a function such as Fast Backward Fast Forward Previous and Next from the...

Page 28: ...time shift recording mode you may experience some difficulty with a scheduled recording at different times without removing the USB recording device You will need to remove the USB device as it is re...

Page 29: ...then press OK to enter Photo mode Select the USB drive and press OK Photo files can only be played in this menu category Use the buttons to select the desired folder or file then press OK to open the...

Page 30: ...t the desired folder or file then press OK to open the folder or select files and then press PLAY to start playing the files Press the RED button on the remote control to access the sub menu functions...

Page 31: ...ter Text mode Select the USB drive and press OK Only text files can be played in this menu category Use the buttons to select the folder or file then press OK to open the folder or select files and th...

Page 32: ...different submenus Press OK to enter the submenu page Press the buttons to select the preferred option Press the buttons to adjust the value Press the MENU button to return to the previous menu page P...

Page 33: ...to enter Enter your password factory default password is 0000 Then select Auto Tuning and press OK or button to start scanning DTV Manual Scan Press OK or to enter Enter your password factory default...

Page 34: ...button on the remote control to skip the highlighted channel Select the channel you wish to move Press the YELLOW button on the remote control enter MOVE mode Use the buttons to select the preferred p...

Page 35: ...o standard Color Temp Use this item to adjust the optimum colour temperature suitable for viewing Available options Cool Medium Warm User Red Green Blue These values can only be adjusted when the Colo...

Page 36: ...t between the left and right speaker from 50 to 50 Auto Volume Us e this item to turn on off Auto Volume level Surround S ound Use this item to turn on off Surround Sound simulation AD Audio D escript...

Page 37: ...OK or to enter Then you can select the desired primary and secondary subtitle language and turn on off the Hearing Impaired function when this mode is on only adjustable if there is a signal PVR File...

Page 38: ...bles disables turning on the TV when the HDMI connected device is turned on Root Menu Shows the menu settings of the HDMI connected device ARC This item is used to turn on off Audio Return Channel Whe...

Page 39: ...urn on off the lock settings Set Password Press OK or button to enter Follow on screen instructions and input the old password and new password Lock Channel Press OK or to enter Press the button to se...

Page 40: ...Sound Menu settings Time Lock Turn on off Time Menu settings Option Lock Turn on off General Menu settings Key Lock Enable disable the keypad on the back of the TV Source Lock Enable disable the avai...

Page 41: ...ime to automatically turn off the TV On Time Set time to automatically turn on the TV from standby Sleep Timer This item is used to adjust the Sleep Timer Available options OFF 5 15 30 60 90 120 240 m...

Page 42: ...D button to schedule a recording Press the button and select Mode Press the to select the recording frequency Available options are Auto Once Everyday Weekly Note When the mode is set to Once Everyday...

Page 43: ...e buttons to highlight PC Setup then press OK or to enter Press the buttons to select the preferred item Press OK or to enter the submenu press the buttons to adjust the value Auto Adjust Use this ite...

Page 44: ...ssing the VOL VOL button No operations can be performed with the remote control unit Check the batteries are correctly installed The batteries may be exhausted replace them Make sure to point the remo...

Page 45: ...hard disk Please refer first to the instructions describing how to use USB devices with this unit If the problem still occurs your device may not be compatible This machine has been tested with the ma...

Page 46: ...JPEG BMP PNG Power Source AC 100 240V 50 60Hz Power Consumption 100W Dimensions With stand 973 220 611 mm w x d x h Without stand 973 x 90 x 569 mm w x d x h Weight With stand 8 07kg Without stand 7 8...

Page 47: ...ta may be lost We recommend you save this data elsewhere prior to sending the product for repair You should also be aware that rather than repairing goods we may replace them with refurbished goods of...

Page 48: ...40 1300 886 649 Model ATVU42 515 Product Code 50150 05 2015 www tempo org AUS This page has been left blank intentionally...

Page 49: ...41 1300 886 649 Model ATVU42 515 Product Code 50150 05 2015 www tempo org AUS This page has been left blank intentionally...

Page 50: ...o return this product for a warranty claim make sure to include all accessories with the product Product does not work If you encounter problems with this product or if it fails to perform to your exp...

Reviews: