background image

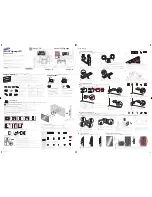
General Information and Safety Instructions 

FIRE AND SHOCK PRECAUTIONS

Ÿ

the unit free from foreign objects, such as hairpins, nails, paper, etc. Do not put the set into a 
bookcase or other enclosures in which it would be poorly ventilated. Do not place it on carpet or a 
bed as low ventilation holes could become obstructed.

Ÿ

Do not set liquids, including flower vases and vessels filled with chemicals or water etc, on top of 

the unit as liquid could get inside the unit. If a hazardous object falls inside the TV set, unplug 
immediately and call 1300 366 144 for further instruction. When placing or moving the TV set, take 
care to insure that the power cord is disconnected. 

Ÿ

To avoid damage to the power cord, never allow heavy objects such as the TV set itself to be 
placed on the power cord. Keep cord away from radiating appliances. Do not allow cord to become 
knotted or tangled. Do not lengthen the cord. When removing the power plug from the socket, 
always hold onto the plug, never pull by the cord. 

Ÿ

This TV set must be connected to a mains power outlet with a protective earth connection.

      The mains power outlet should remain readily accessible after installation.

      Naked flamed sources, such as lighted candles are never to be placed on or around the TV.

Ÿ

A minimum distance around the TV for sufficient ventilation. (150mm recommended minimum)

WARNING

Ÿ

Do not remove the back cover of the TV set. Accidental contact with high voltage components 
could result in electric shock. 

Ÿ

If your set emits smoke or produces a strange sound or smell, immediately turn off your TV.

Ÿ

During vacation or other occasions when you will not be using the set for an extended period, 

remove the power plug from the socket.

IMPORTANT INFORMATION

If a television is not positioned in a sufficiently stable location, it can be potentially hazardous due to 
falling. 

Many injuries, particularly to children, can be avoided by taking simple precautions such as:

Ÿ

Only using furniture that can safely support the television.

Ÿ

Ensuring the television is not overhanging the edge of the supporting furniture.

Ÿ

Not placing the television on tall furniture (for example, cupboards or bookcases) without 

anchoring both the furniture and the television to a suitable support.

Ÿ

Not standing the televisions on cloth or other materials placed between the television and 
supporting furniture.

Ÿ

Educating children about the dangers of climbing on furniture to reach the television or its controls.

Ÿ

If a problem occured, and you do not know how to solve it, please do not hesitate to contact  

After 

Sales Support Center

 to repair or replace the product and not return the product to the store. 

Adequate ventilation must be provided to prevent heat build up inside the unit. Keep the inside of 

3

Summary of Contents for ALCD3257

Page 1: ...81cm LCD HDTV with HD TUNER Instruction Manual Model Number ALCD3257 After Sales Support TEL 1300 366 144 WEB WWW awa com au...

Page 2: ...over the course of the first 2 years after the date of purchase we will remedy the problem as quickly as possible once it has been brought to our attention In the unlikely event of such an occurrence...

Page 3: ...aring the remote control 10 Learning the remote control 11 12 12 12 12 13 13 13 13 Turning your TV on and off Selecting the video source Adjusting the volume Changing channels Displaying channel lists...

Page 4: ...nce around the TV for sufficient ventilation 150mm recommended minimum WARNING Do not remove the back cover of the TV set Accidental contact with high voltage components could result in electric shock...

Page 5: ...rts List Accessories list Manual Book Quick Setup Guide Remote Batteries 116cm LCD HDTV with HD TUNER Instruction Manual Model Number ALCD3257 After Sales Support TEL 1300 366 144 WEB WWW awa com au 1...

Page 6: ...ment to your TV Front panel NO Component Component Description 1 POWER Switch Press to turn the main power ON or OFF 2 POWER Indicator 3 Remote sensor Receives signals from the remote control Do not b...

Page 7: ...ture quality 5 A V input 2 output 1 Connect standard video audio cables to these jacks 6 S Video 1 Connect an S Video device to this jack inserting the left and right audio leads into S VIDEO L and S...

Page 8: ...ion terminal to the cable NOTE colors for inputs and cables must correspond on both devices VGA Computer Y P B C B P R C R Audio L Audio R Red Red White Blue Green Devices With Component output jacks...

Page 9: ...re a Component YPBPR signal to be set to output in the devices settings please consult your device user manual for instructions Connecting HDMI Supports digital connections between HDMI enabled AV dev...

Page 10: ...video graphic cards Connecting AUDIO Connect RCA audio cables to R AUDIO L on the rear of your set and the other ends to corresponding audio in connectors on the Amplifier or DVD Home Theater Connecti...

Page 11: ...designated disposal area Do not throw the batteries into fire 2 Do not mix battery types or combine used batteries with new ones 3 Remove depleted batteries immediately to prevent battery acid from l...

Page 12: ...ram information Next channel up button Volume decrease Left button Enter button Display the main menu Back menu display Mute the sound EXIT all menu display Electronic Program Guide Select AV Signal S...

Page 13: ...ideo source depending on the video device you have connected to your TV you can select DTV ATV AV S Video Component VGA and HDMI as the video source To select the video source Press Source When the li...

Page 14: ...uages English DOLBY Freeze Off Sleep Timer 120min No Information 12 02 576i Reminder DATE Schedule OK Inform EXIT 01 Jul 2008 14 00 PROGRAM GUIDE 01 Jul 14 00 15 00 DTV 11 Dt65 480p 14 00 17 00 Dt65 4...

Page 15: ...al Tuning ATV Manual Tuning Program Edit EXIT MENU OK CHANNEL EXIT OK Favorite List 11 DT65 480p 12 DT65 720p 13 DT65 480p 1 TV1 2 BBC1 3 S 01 4 S 02 5 C 42 6 S 04 7 C 02 DTV DTV DTV TV TV TV TV TV TV...

Page 16: ...arm Warmer Medium 4 If you press to select the Enhanced Setting option then press OK to enter You can select Film Mode or Noise Reduction press VOL VOL to adjust the option Enhanced Setting Accesses a...

Page 17: ...ress to Press Press to select Search then press to Tuning menu VOL VOL Tuning CH CH Tuning Tuning menu VOL VOL CH CH VOL VOL Tuning VOL VOL Editing channels from memory After you scan for channels you...

Page 18: ...You can change it from 5 seconds 10 seconds 15seconds 20seconds 25seconds 30seconds 35seconds 40seconds 45seconds 50seconds 55seconds and 60seconds Time Press to select Time in the Option Osd and pres...

Page 19: ...NU on the right side of the front panel and POWER Menu and NUMBER etc on the remote control Press Menu to display the main menu only Lock Settings can be selected and adjusted by entering your passwor...

Page 20: ...ngs Basic settings includes setting picture mode as standard setting audio mode as standard setting zoom mode as 16 9 setting volume as min volume that you set etc CH OK Image Position Adjust the imag...

Page 21: ...he remote control does not operate Disorder display at power on Make sure the power cord is plugged in then press Power Bottom of the unit The remote control batteries may be dead Replace the batterie...

Page 22: ...z 1080I 60Hz Power source AC 220 240V Power consumption W Audio output 6W 6W Connections ANT input Cable antenna 1 Video input Video 2 S Video 1 Component video 2 Video output Video 1 VGA input Analog...

Reviews: