background image

Taste 3/RPT (3)

• 

Drücken Sie diese Taste, um den aktuell gespielten Titel zu wiederholen.

• 

Im Display (6) erscheint  .

• 

Drücken Sie diese Taste erneut, um alle Titel zu wiederholen (Grundeinstellung).

• 

Im Display (6) erscheint  .

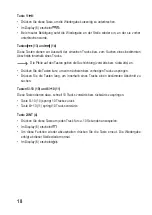
Taste 4/RDM (12)

• 

Drücken Sie diese Taste, um alle Tracks in zufälliger Reihenfolge abzuspielen.

• 

Im Display (6) erscheint 

.

• 

Um  diese  Funktion  wieder  abzuschalten,  drücken  Sie  die  Taste  erneut.  Die  Wiedergabe 

erfolgt ab dieser Stelle wieder in normaler Reihenfolge.

• 

Im Display (6) erscheint  .

19

Summary of Contents for 2160334

Page 1: ...Bedienungsanleitung RUSD 1801 Autoradio Best Nr 2160334 Seite 2 23 Operating Instructions RUSD 1801 Car radio Item No 2160334 Page 24 45 ...

Page 2: ...bau 9 9 Elektrischer Anschluss 10 a Antennenanschluss 11 b Anschluss der LINE Ausgänge 11 c Anschluss AUX 11 d Anschluss der Lautsprecher und der Stromversorgung 12 10 Bedienung 13 a Allgemeine Bedienung 13 b Menü Einstellungen 15 c UKW Radiobetrieb 16 d USB Speicherkartenbetrieb 17 11 Problembehandlung 20 12 Wartung und Pflege 21 a Sicherungswechsel 21 b Reinigung 21 13 Konformitätserklärung DOC ...

Page 3: ...hten Sie hierauf auch wenn Sie dieses Produkt an Dritte weitergeben Heben Sie deshalb diese Bedienungsanleitung zum Nachlesen auf Bei technischen Fragen wenden Sie sich bitte an Deutschland www conrad de Österreich www conrad at Schweiz www conrad ch 2 Symbol Erklärung Das Symbol mit dem Ausrufezeichen weist den Benutzer darauf hin dass er vor der Inbetriebnahme des Gerätes diese Bedienungsanleitu...

Page 4: ...Zulassungsgründen dürfen Sie das Produkt nicht umbauen und oder verändern Falls Sie das Produkt für andere Zwecke verwenden als zuvor beschrieben kann das Produkt beschädigt werden Außerdem kann eine unsachgemäße Verwendung Gefahren wie z B Kurzschluss Brand etc hervorrufen Lesen Sie sich die Bedienungsanleitung genau durch und bewahren Sie diese auf Reichen Sie das Produkt nur zusammen mit der Be...

Page 5: ...rieb mehr möglich ist nehmen Sie das Produkt außer Betrieb und schützen Sie es vor unbeabsichtigter Verwendung Der sichere Betrieb ist nicht mehr gewährleistet wenn das Produkt sichtbare Schäden aufweist nicht mehr ordnungsgemäß funktioniert über einen längeren Zeitraum unter ungünstigen Umgebungsbedingungen gelagert wurde oder erheblichen Transportbelastungen ausgesetzt wurde Gehen Sie vorsichtig...

Page 6: ...len führen Eine Bedienung der Audioanlage darf deshalb immer nur dann erfolgen wenn es die Verkehrssituation erlaubt und Sie durch die Bedienung der Anlage nicht vom Verkehrsgeschehen abgelenkt werden Musik sollte nicht über einen längeren Zeitraum mit übermäßiger Lautstärke gehört werden Hierdurch kann das Gehör geschädigt werden 6 Merkmale und Funktionen UKW Radioteil USB und microSD Kartenleser...

Page 7: ... 14 15 16 17 18 1 Taste MOD 2 Taste 1 3 Taste 3 RPT 4 Taste 2 INT 5 Taste RST 6 Display 7 USB Schnittstelle 8 Taste MUTE 9 Drehregler 10 Taste 5 10 11 Taste 6 10 12 Taste 4 RDM 13 Taste 14 Taste 15 Taste CLK 16 Taste BAND 17 microSD Kartenleser 18 Anschluss AUX 7 ...

Page 8: ...bau des Autoradios oder anderer Komponenten nötig sind müssen immer so ausgeführt werden dass dadurch keine Beeinträchtigung der Verkehrssicherheit oder der konstruktiven Stabilität des Kfz entstehen Bei vielen Kfz erlischt bereits durch das Aussägen eines Blechteils die Betriebserlaubnis Da das Gerät im Betrieb Wärme erzeugt muss der Einbauort hitzeunempfindlich sein Vergewissern Sie sich vor der...

Page 9: ...t ist Bild3 Nachdem Sie alle elektrischen Verbindungen hergestellt haben siehe Elektrischer Anschluss schieben Sie das Gerät in den Einbaurahmen bis es sicher einrastet Bild4 Bewahren Sie die beiden Entriegelungsschlüssel gut auf Sie benötigen sie für eine spätere Demontage des Gerätes b Ausbau Stecken Sie die beiden Entriegelungsschlüssel in die seitlichen Schlitze im Einbaurahmen bis das Gerät e...

Page 10: ...ndungsstellen Achten Sie darauf dass keine der Leitungen durch scharfe Kanten beschädigt werden kann Verwenden Sie nur Lautsprecher mit einer ausreichenden Belastbarkeit siehe Technische Daten Achten Sie darauf dass alle Lautsprecher richtig gepolt sind also die Plus und Minuskennzeichen übereinstimmen Die Anschlusskabel der Lautsprecher sind im Normalfall codiert Einige Lautsprecherhersteller mar...

Page 11: ...t kurz Verlegen Sie die Leitungen nicht in der Nähe anderer Kabel Sie vermeiden so störende Einstreuungen in die Leitungen Um Verzerrungen oder Fehlanpassungen zu vermeiden die zur Beschädigung des Gerätes führen können dürfen an die Cinchanschlüsse nur Geräte mit ebensolchen Cinchanschlüssen angeschlossen werden Verbinden Sie die Cinchbuchsen an der Geräterückseite mit den Eingängen des Leistungs...

Page 12: ...sprecher rechts hinten 3 Lautsprecher rechts vorne 4 Lautsprecher rechts vorne 5 Lautsprecher links vorne 6 Lautsprecher links vorne 7 Lautsprecher links hinten 8 Lautsprecher links hinten Systemstecker A Stromversorgung 1 nicht belegt 2 nicht belegt 3 nicht belegt 4 Dauerstrom 12 V 5 Antennensteuerausgang 6 nicht belegt 7 Zündung 12 V 8 Masse Der Anschluss Dauerstrom 12 V 4 muss an eine Leitung a...

Page 13: ...Sie das Gerät nur dann in Betrieb wenn Sie sich mit den Funktionen und mit dieser Bedienungsanleitung vertraut gemacht haben Überprüfen Sie alle Anschlüsse nochmals auf ihre Richtigkeit Klemmen Sie nach der Überprüfung den Minuspol der Bordbatterie wieder an a Allgemeine Bedienung Taste MOD 1 Mit dieser Taste wird das Gerät ein bzw ausgeschaltet und die Wiedergabequelle gewählt Drücken Sie die Tas...

Page 14: ...ngezeigt Einstellung der Uhrzeit Halten Sie die Taste CLK 15 gedrückt bis die Stundenanzeige der Uhrzeit im Display blinkt Stellen Sie die Stunden durch Drehen des Drehreglers 9 ein Drücken Sie den Drehregler 9 kurz und stellen Sie die Minuten durch Drehen des Drehreglers 9 ein Drücken Sie die Taste CLK 15 um die Einstellung zu speichern Anzeige der Uhrzeit Drücken Sie die Taste CLK 15 kurz um die...

Page 15: ...stoppt nur bei sehr starken Sendern In Gebieten mit sehr vielen Sendestationen und gutem Radioempfang kann es sinnvoll sein die Option einzustellen Hierdurch werden schwache Sender die nur mit Störungen empfangen werden könnten beim automatischen Sendersuchlauf übersprungen Stereo Mono Umschaltung für den Radioempfang die Radiowiedergabe erfolgt in Stereo die Radiowiedergabe erfolgt in Mono Bei sc...

Page 16: ...m Radiobetrieb einzustellen Kurzes Drücken einer Taste startet den automatischen Sendersuchlauf Der Suchlauf hält erst beim nächsten gut zu empfangenden Sender an Wird eine Taste länger gedrückt gehalten ist der manuelle Sendersuchlauf aktiviert Im Display erscheint Die Frequenz wird in diesem Modus solange verändert bis die entsprechende Taste wieder losgelassen wird Kurzes Drücken verändert die ...

Page 17: ... Players an den Anschluss AUX 18 anschließen Aufgrund der sehr großen Vielfalt von USB und SD Speichermedien und ihren manchmal sehr herstellerspezifischen Funktionen kann nicht sichergestellt werden dass alle Medien erkannt werden und alle Bedienungsmöglichkeiten in Verbindung mit diesem Gerät gegeben sind Sollte das Speichermedium nicht erkannt werden ziehen Sie es bitte nochmals heraus und stec...

Page 18: ...rts an Drücken Sie die Tasten kurz um zum nächsten bzw vorherigen Track zu springen Drücken Sie die Tasten lang um innerhalb eines Tracks einen bestimmten Abschnitt zu suchen Tasten 5 10 10 und 6 10 11 Diese Tasten dienen dazu schnell 10 Tracks vorwärts bzw rückwärts zu springen Taste 5 10 10 springt 10 Tracks zurück Taste 6 10 11 springt 10 Tracks vorwärts Taste 2 INT 4 Drücken Sie diese Taste um...

Page 19: ...alle Titel zu wiederholen Grundeinstellung Im Display 6 erscheint Taste 4 RDM 12 Drücken Sie diese Taste um alle Tracks in zufälliger Reihenfolge abzuspielen Im Display 6 erscheint Um diese Funktion wieder abzuschalten drücken Sie die Taste erneut Die Wiedergabe erfolgt ab dieser Stelle wieder in normaler Reihenfolge Im Display 6 erscheint 19 ...

Page 20: ...d oder Lautsprecher ausbauen und Anschlüsse überprüfen Bei UKW Radiobetrieb kaum Sender zu empfangen Antenne nicht ganz herausgezogen Antenne auf volle Länge ausziehen Antennenanschluss hat sich aus dem Gerät gelöst Gerät ausbauen und Anschluss überprüfen Antenne defekt Anschluss Erdung sowie Antenne überprüfen Störungen bei Radio und USB bzw SD Speicherkartenbetrieb Störungen gelangen über die Pl...

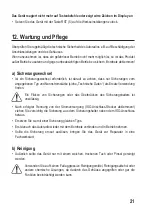
Page 21: ...iehe Technische Daten als Ersatz Verwendung finden Ein Flicken von Sicherungen oder das Überbrücken des Sicherungshalters ist unzulässig Nach erfolgter Trennung von der Stromversorgung ISO Anschluss Stecker abklemmen ziehen Sie vorsichtig die Sicherung aus dem Sicherungshalter neben dem ISO Anschluss heraus Ersetzen Sie sie mit einer Sicherung gleichen Typs Erst danach das Autoradio wieder mit dem...

Page 22: ...netadresse verfügbar www conrad com downloads Wählen Sie eine Sprache durch Anklicken eines Flaggensymbols aus und geben Sie die Bestellnummer des Produkts in das Suchfeld ein anschließend können Sie die EU Konformitätserklärung im PDF Format herunterladen 14 Entsorgung Elektronische Geräte sind Wertstoffe und gehören nicht in den Hausmüll Entsorgen Sie das Produkt am Ende seiner Lebensdauer gemäß...

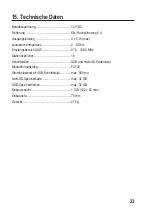
Page 23: ...herimpedanz 4 8 Ohm Empfangsbereich UKW 87 5 108 0 MHz Stationsspeicher 18 Schnittstellen USB und microSD Kartenleser Medienformatierung FAT32 Strombelastbarkeit USB Schnittstelle max 500 mA microSD Speicherkarte max 32 GB USB Speichermedien max 32 GB Einbauschacht 1 DIN 182 x 53 mm Einbautiefe 75 mm Gewicht 275 g 23 ...

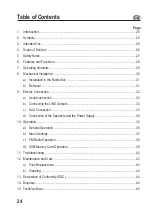
Page 24: ...moval 31 9 Electric Connection 32 a Aerial connection 32 b Connecting the LINE Outputs 33 c AUX Connection 33 d Connection of the Speakers and the Power Supply 34 10 Operation 35 a General Operation 35 b Menu Settings 37 c FM Radio Operation 38 d USB Memory Card Operation 39 11 Troubleshooting 42 12 Maintenance and Care 43 a Fuse Replacement 43 b Cleaning 43 13 Declaration of Conformity DOC 44 14 ...

Page 25: ...g Please remember this if you pass on the product to any third parties Please retain these operating instructions for future reference If you have any technical questions please contact www conrad com contact 2 Symbols The exclamation mark symbol indicates that the user must read these operating instructions before commissioning of the device and observe them during operation The exclamation mark ...

Page 26: ... and approval the product must not be converted and or changed by you Using the product for any other purposes than those described above may damage the product Improper use also may cause dangers such as short circuit fire etc Read the operating instructions precisely and keep them Only pass the product on to any third parties together with the operating instructions All company names and product...

Page 27: ... from inadvertent use Secure operation is no longer warranted if the product has visible damage no longer works properly was stored under detrimental ambience conditions for an extended period or was subjected to considerable transport strain Handle the product with care Impact blows or falls from even a low height will damage the product Also observe the safety notes and operating instructions of...

Page 28: ... only take place if the traffic situation permits and you are not unduly distracted by operating the system Do not listen to excessively loud music over an extended period of time This may damage your hearing 6 Features and Functions FM radio unit USB and microSD card reader Preamp output for the connection of a power amplifier Connection for external audio sources at the control panel Exact elect...

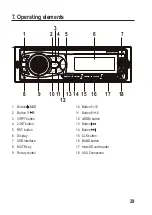
Page 29: ...15 16 17 18 1 Button MOD 2 Button 1 3 3 RPT button 4 2 INT button 5 RST button 6 Display 7 USB interface 8 MUTE key 9 Rotary control 10 Button 5 10 11 Button 6 10 12 4 RDM button 13 Button 14 Button 15 CLK button 16 BAND button 17 microSD card reader 18 AUX Connection 29 ...

Page 30: ...e necessary for the installation of the car radio or other components must be carried out in such a way that neither traffic security nor the stability of the car are affected With many cars the type approval will lapse if you merely saw out a section of the sheet metal Since the device creates heat during operation the place of installation must be heat resistant Before drilling the attachment ho...

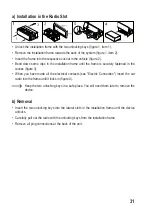
Page 31: ...is securely fastened in the recess figure 3 When you have made all the electrical contacts see Electric Connection insert the car radio into the frame until it locks in figure 4 Keep the two unlocking keys in a safe place You will need them later to remove the device b Removal Insert the two unlocking keys into the lateral slots in the installation frame until the device unlocks Carefully pull out...

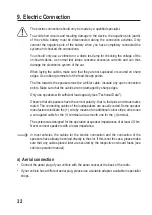
Page 32: ...t damaged by sharp edges Only use speakers with sufficient load capacity see Technical Data Observe that all speakers have the correct polarity that is that plus and minus marks match The connecting cables of the loudspeakers are usually coded Some speaker manufacturers indicate the wire by means of an additional colour stripe others use a corrugated cable for the terminal and a smooth one for the...

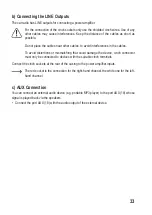
Page 33: ... To avoid distortions or mismatching that could damage the device cinch connector must only be connected to devices with the suitable cinch terminals Connect the cinch sockets at the rear of the casing to the power amplifier inputs The red socket is the connection for the right hand channel the white one for the left hand channel c AUX Connection You can connect an external audio device e g portab...

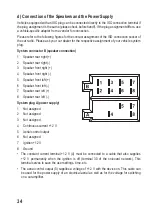
Page 34: ...r right 2 Speaker rear right 3 Speaker front right 4 Speaker front right 5 Speaker front left 6 Speaker front left 7 Speaker rear left 8 Speaker rear left System plug A power supply 1 Not assigned 2 Not assigned 3 Not assigned 4 Continuous current 12 V 5 Aerial control output 6 Not assigned 7 Ignition 12 V 8 Ground The constant current terminal 12 V 4 must be connected to a cable that also supplie...

Page 35: ...metal part is a suitable earthing point 10 Operation Only take the device into operation after familiarising yourself with its functions and these operating instructions Check all the connections again When you have done so reconnect the negative pole of the car battery a General Operation Button MOD 1 This button switches the radio on and off and selects the source Push the button briefly with th...

Page 36: ...ting the Time Press button 9 DISP 15 until the hour for the time flashes in the display Set the hours by turning the rotary control 9 Briefly push the rotary control 9 and adjust the minutes by turning the rotary control 9 Press button CLK 15 to save the setting Time display Briefly press button CLK 15 to display the time for a few seconds RESET function This function resets all settings to factor...

Page 37: ...scan stops only at very strong stations In areas with many transmission stations and good radio reception it may be useful to set the option This will skip weak stations in the automatic station scan that could only be received with interferences Stereo mono changeover for radio reception Radio playback in stereo Radio playback in mono If FM reception is poor it may be useful changing the radio re...

Page 38: ...ion Briefly pushing a button starts the automatic station search The auto scan only stops at the next station that can be received well By pushing a button longer you activate manual station scan The display indicates In this mode the frequency is changed until you release the corresponding button again Brief pushes of this button changes the frequency step by step If buttons are not pressed for a...

Page 39: ... player to the AUX 18 Due to the great variety of USB and SD storage media and their different functions some of which are very producer specific we cannot guarantee that all media will be recognized and that all the operational functions are available on this device If the storage medium is not recognised remove it and insert it again Connect your USB storage medium with the USB port 7 The displa...

Page 40: ...ction forward or back Only push the buttons briefly to jump to the next or previous track Push the buttons longer to search a certain section within one track Buttons 5 10 10 and 6 10 11 These buttons are used to quickly jump forward or back 10 tracks Button 5 10 10 jumps back 10 tracks Button 6 10 11 jumps forward 10 tracks Button 2 INT 4 Push this button to play each track approx for 10 seconds ...

Page 41: ...this button again to repeat all tracks basic setting The display 6 indicates Button 4 RDM 12 Push this button to play all tracks at random order The display 6 indicates To de activate this function push the button again Playback continues in normal order from here The display 6 indicates 41 ...

Page 42: ...ation hardly any stations can be received The aerial is not pulled out completely Pull out the aerial to its full length The aerial connection has come loose Remove the device and check the connection The aerial is defective Check the connection earthing and the aerial itself Interferences in radio and USB or SD card operation Interferences reach the car radio via the positive line Install an addi...

Page 43: ... ensure that you only use fuses of the specified type and rated current see Technical Data as a replacement Never repair fuses or bridge the fuse holder When the power supply has been disconnected disconnect ISO plug carefully remove the fuse from the fuse holder next to the ISO plug Replace it with a fuse of the same type After this you can reconnect the car radio to the board mains and take it i...

Page 44: ... following Internet address www conrad com downloads Choose a language by clicking a flag symbol and enter the item number of the product into the search field then you may download the EU declaration of conformity in the PDF format 14 Disposal Electronic devices are recyclable and should not be disposed of in household waste Dispose of the product according to the applicable statutory provisions ...

Page 45: ...mpedance 4 8 Ohm Reception range FM 87 5 108 0 MHz Station memories 18 Interfaces USB and microSD card reader Media formatting FAT32 Current load capacity USB interface max 500 mA microSD memory card max 32 GB USB storage media max 32 GB Mounting slot 1 DIN 182 x 53 mm Mounting depth 75 mm Weight 275 g 45 ...

Page 46: ......

Page 47: ......

Page 48: ...blikation entspricht dem technischen Stand bei Drucklegung Copyright 2019 by Conrad Electronic SE Legal notice This is a publication by Conrad Electronic SE Klaus Conrad Str 1 D 92240 Hirschau www conrad com All rights including translation reserved Reproduction by any method e g photocopy microfilming or the capture in electronic data processing systems require the prior written approval by the e...

Reviews: