background image

Technical Data  


150145   


9 / 22 

EN 


4.2


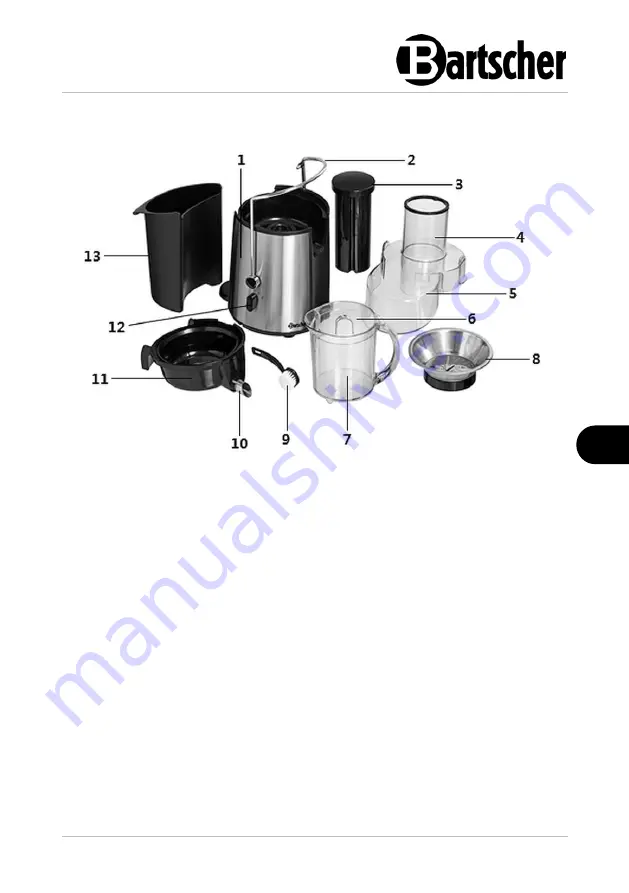
List of Components of the Appliance 


Fig. 1 

1.  Base unit / motor block 

2.  Locking bow with safety element 

3.  Pusher 

4.  Filling shaft 

5.  Lid 

6.  Splash-guard 

7.  Plastic beaker 

8.  Sieve basket 

9.  Cleaning brush 

10. Juice spout pipe 

11. Sieve base 

12. Speed level switch (0

–1–2) 

13. Pulp container 


Summary of Contents for Top Juicer 150.145

Page 1: ...Top Juicer 150145...

Page 2: ...scher GmbH Franz Kleine Str 28 D 33154 Salzkotten Germany Phone 49 5258 971 0 Fax 49 5258 971 120 Technical Support Hotline 49 5258 971 197 www bartscher com Version 2 0 Date of preparation 2020 12 14...

Page 3: ...ght Protection 6 2 3 Declaration of Conformity 6 3 Transport Packaging and Storage 7 3 1 Delivery Check 7 3 2 Packaging 7 3 3 Storage 7 4 Technical Data 8 4 1 Technical Specifications 8 4 2 List of Co...

Page 4: ...ng of the appliance Additionally accident prevention occupational health and safety and legal regulations in force in the area the appliance is used apply Before you start using the appliance especial...

Page 5: ...the mains voltage To avoid short circuit the appliance should be kept dry If there are malfunctions during operation disconnect the appliance from the power supply Do not touch the appliance s plug wi...

Page 6: ...remain in an immediate vicinity of the appliance Improper Use Unintended or prohibited use may cause damage to the appliance The appliance may only be used when its technical condition is flawless and...

Page 7: ...ay lead to personal injuries or property damages caused by hazardous voltage fire or high temperature The appliance may only be used to perform tasks described in this instruction manual The following...

Page 8: ...troduced by the user usage of unapproved spare parts We reserve the right to introduce technical modifications to the product intended for improvement of the appliance and its performance 2 2 Copyrigh...

Page 9: ...used to store the appliance when relocating or when shipping the appliance to our service point in the case of any damages The packaging and its elements are made of recyclable materials Particularly...

Page 10: ...kW 230 V 50 60 Hz Dimensions W x D x H in mm 210 x 310 x 400 Weight in kg 4 4 We reserve the right to implement technical modifications Version Characteristics Designed for both hard and soft fruit a...

Page 11: ...f the Appliance Fig 1 1 Base unit motor block 2 Locking bow with safety element 3 Pusher 4 Filling shaft 5 Lid 6 Splash guard 7 Plastic beaker 8 Sieve basket 9 Cleaning brush 10 Juice spout pipe 11 Si...

Page 12: ...g oranges or watermelons High speed level 2 is ideal for hard and fibrous fruit and vegetable e g apples ginger celery carrot 2 littler pulp container makes it possible to produce high amounts of jui...

Page 13: ...nt Be careful not to damage the rating plate and warning labels fixed on the appliance Never place the appliance in humid or wet environment Place the appliance in a way making the connections easily...

Page 14: ...aste use only fresh fruit or fresh vegetables For processing with juicer particularly suitable are apples pineapples oranges grapes melons carrots celery roots beets and tomatoes Some food products du...

Page 15: ...Bananas Remove skin Mangos Remove skin and stones Pineapples Remove skin and cut into pieces Citrus fruit oranges lemons mandarins grapefruit Peal the skin off of all citrus fruit Oranges and lemons m...

Page 16: ...first or second in the line Thanks to blending with other juices the banana nectar may drip a bit easier Though there may be frothing present in the process When squeezing juice from small fruit for...

Page 17: ...ainer easier you may fit it with a foil bag 4 Insert the sieve base 11 onto the base unit motor block 1 so that the pulp discharge is located over the pulp container 5 Insert the sieve basket 8 carefu...

Page 18: ...no food products inside 1 Place the plastic beaker 7 with splash guard 6 under the juice spout pipe 10 Fig 1 2 Connect the appliance to a single grounded socket 3 Rotate the speed level switch 12 to...

Page 19: ...ontainer ATTENTION Overfilled pulp container may cause the appliance cease to operate correctly The pulp excess that gets into the motor housing may be the cause of damage Observe the condition of the...

Page 20: ...nce after each use 2 Immediately after use disassemble the removable components for cleaning purposes observing the order of disassembly remove the pulp container and remove the pulp release the locki...

Page 21: ...y in open air or dry with a linen free cloth NOTE All detachable elements of the appliance are dishwasher safe WARNING Never attempt to immerse the base unit motor block in water neither wash it under...

Page 22: ...ppliances must be disposed of and recycled in a correct and environmentally friendly manner You must not dispose of electric appliances with household waste Disconnect the appliance from the power sup...

Reviews: