Bartscher SV G25L Manual Download Page 14


- 37 - 


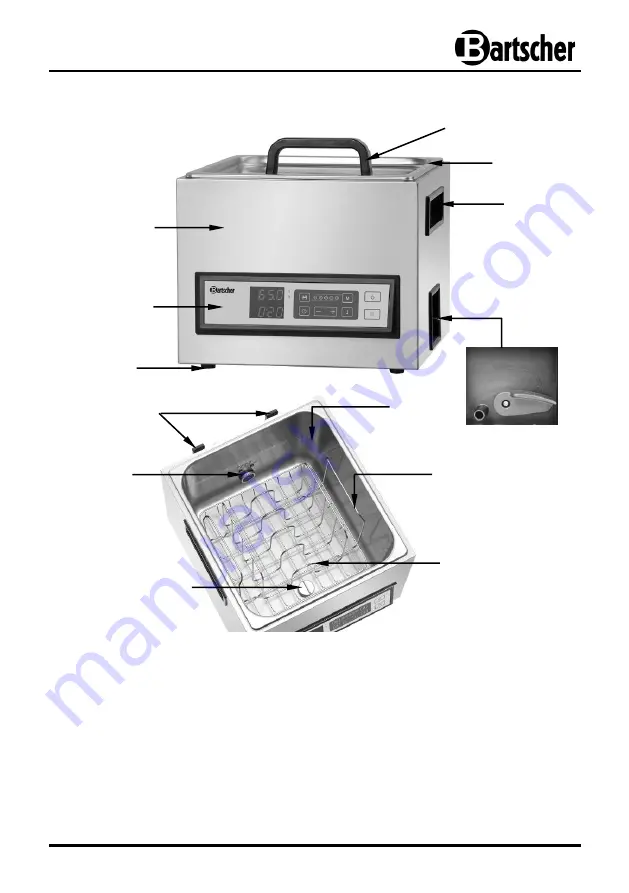
4.2 Overview of parts 


1


Lid handle 

Cable holders / drain hose 

2


Lid 

Basin 

3


Handle (2) 

10 

Handle 

4


Water drain with valve 

11 

Frame for vacuuming bags 

5


Feet (4) 

12 

Water outlet 

Control panel 

13 

Water inlet 

Body 


11 

12 

9


10


8


13


Summary of Contents for SV G25L

Page 1: ...SV G25L 115130 SV G16L 115131 Original Gebrauchsanleitung V2 0318...

Page 2: ...34 4 Technical data 35 4 1 Technical specification 35 4 2 Overview of parts 37 5 Installation and operation 38 5 1 Installation 38 5 2 Operation 39 5 2 1 Preparation of the device 39 5 2 2 Control pa...

Page 3: ...essible for anyone carrying out the installation servicing maintenance or cleaning Please keep these instructions and give them to future owners of the device 1 Safety This device is designed in accor...

Page 4: ...ical or mental disabilities insufficient experience and or insufficient knowledge unless such persons are under the care of a person responsible for their safety or have received instructions regardin...

Page 5: ...ANGER Electric shock hazard To avoid the hazard results please follow the safety instructions below Never allow the power cable to come into contact with heat sources or sharp edges The power cable sh...

Page 6: ...nds or standing on wet floor Remove the plug from its socket when the device is not used in case of anomalies during operation before cleaning HOT SURFACE Risk of burns Follow the safety instructions...

Page 7: ...evice near the flammable materials such as alcohol spirits petrol etc High temperature may cause their evaporation and due to contact with the ignition sources the explosion may occur and it may resul...

Page 8: ...the edge of the working surface Use the device only when it is positioned on an even and stable surface Do not use the device with the external timer or remote control Use the device only to heat up...

Page 9: ...ide cooker is designed for cooking the vacuum packed food products in the water bath CAUTION Any use going beyond the intended purpose and or any different use of the device is forbidden and is not co...

Page 10: ...by violation of advice concerning operation and cleaning use other than designed alterations made by user use of inadequate spare parts We reserve the right to make technical changes for purposes of...

Page 11: ...er The outer and inner packing material should be removed completely from the device before installation If you liked to dispose the packing consider the regulations applicable in your country Supply...

Page 12: ...grammable timer Acoustic timer Basin Number of basins 1 Basin size W 300 x D 500 x H 200 mm basin capacity 25 litres Temperature range 25 C to 90 C Temperature control in 0 1 C steps Time setting 0 mi...

Page 13: ...imer Basin Number of basins 1 Basin size W 300 x D 330 x H 200 mm basin capacity 16 litres Temperature range 25 C to 90 C Temperature control in 0 1 C steps Time setting 0 minutes 99 hours intervals t...

Page 14: ...ts 1 Lid handle 8 Cable holders drain hose 2 Lid 9 Basin 3 Handle 2 10 Handle 4 Water drain with valve 11 Frame for vacuuming bags 5 Feet 4 12 Water outlet 6 Control panel 13 Water inlet 7 Body 7 6 5...

Page 15: ...e device at the edge of a table to avoid tilting or falling Never put the device in a moist or wet area Do not place the device near open flame electric heaters or other heat source Place the device s...

Page 16: ...5 2 Operation 5 2 1 Preparation of the device The device should be thoroughly cleaned before the first use Follow instructions in section 6 Cleaning and maintenance Fill the device with water before...

Page 17: ...Save key That key allows for saving the entered settings 5 Digital temperature display Shows current water temperature in the basin 6 Digital time display Shows time remaining to the cooking end 7 Tim...

Page 18: ...setting key 10 until the digital display shows F Cooking time It is preset to 02 00 hours by default It is possible to set the cooking time in range 0 minutes 99 00 hours To set the required cooking...

Page 19: ...he temperature indicator blinks keys 8 or 9 allow for setting the required temperature in range from 25 C to 90 C Finally press Save key 4 The LED indicator for program M1 is on and the cooking time m...

Page 20: ...rame Fig on the right CAUTION Pay attention that the vacuum bags in the basin are fully immersed in water Otherwise press them with use of pliers Put the lid back on the basin Press the Start Stop key...

Page 21: ...1 second Unless specified otherwise each key must be pressed for longer than 0 5 second to use it When the water level in the basin is above the MIN mark and the digital display shows error code E001...

Page 22: ...the soft cloth o Pay attention to keep the water inlet and outlet clean Realization of the cleaning cycle o Periodically once a month realize the cleaning descaling process Proceed in the following w...

Page 23: ...amages 3 Check the socket by connecting another device 4 Check if the ON OFF key is illuminated If so make sure it was pressed for longer than 1 second 5 The digital is on but the device does not star...

Page 24: ...circulation system Error in the electronic system Contact the service company E003 Error in the electronic system Contact the service company E004 The lid is not placed correctly Place the lid correct...

Page 25: ...r community WARNING To exclude any abuse and the dangers involved make the waste device unfit for use before disposal For that purpose disconnect device from mains supply and remove mains connection c...

Reviews: