background image


   239 of 285


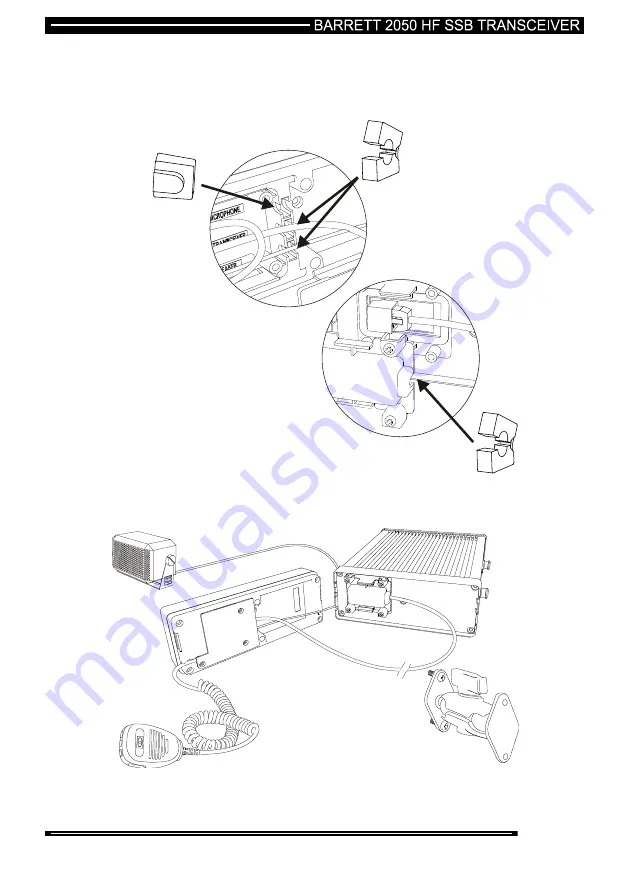
Place  the  cable  grommets  around  the  cables  on  the  remote  head  and  push  the 

cables into the grooves on the remote head. Place the blanking grommet into the 

unused slot. Replace the plastic cover on the remote head. If required, this cover, 

whilst  having  clips,  can  then  be  secured  with  M3  screws  to  provide  a  solid  cable 

clamp. 


Attach  the  RAM  mount  using  the  2  x  M5  screws  provided  to  the  centre  of  the 

remote head. 


Summary of Contents for 2050

Page 1: ...ommunications Head Office Barrett Communications Pty Ltd 47 Discovery Drive Bibra Lake WA 6163 Australia Tel 61 8 9434 1700 Fax 61 8 9418 6757 Email information barrettcommunications com au www barrettcommunications com au ...

Page 2: ...With a PIN 20 Switching Off the Transceiver 20 Display 21 Receive Mode 21 Transmit Mode 21 Secure Mode 22 Channel Attributes 22 Adjusting the Audio Volume 23 Selecting a Channel 23 Using Channel Up Down Keys 23 Direct Channel Number Entry 24 Using the Microphone 25 Barrett Selective Calling System 26 General 26 International 26 OEM 1 26 CCIR 26 ALE FED STD 188 MIL STD 188 141B option 26 Selective ...

Page 3: ... History 53 Scanning Channels 55 Selcall Scan 55 Signal Strength Scan SSL Scan 55 Voice Syllabic Scan 55 Selecting a Scan Table 56 Initiating Scan 56 Clarifier 57 Noise Reduction Selection 58 Mute Squelch Selection 59 Mode Selection 60 Tune 60 Advanced Selective Call Functions 61 Requesting Another Station s GPS position 61 Sending Your GPS Position to Another Station 63 Text Messaging Pagecall SM...

Page 4: ... 111 Setting the Date 112 B I T E Test 113 Option Installation 114 Hopping PIN number entry 115 Secure call code 116 Security Level 117 Upload pack 118 Internal Modem 119 Scan Tables 120 Adding Channels to a Scan Table 120 Editing Channels in a Scan Table 121 Erasing Entries in a Scan Table 123 Changing Scan Table Labels 124 Scan Settings 125 Scan Rate 125 Scan Dwell 126 Scan Resume Time 127 Scan ...

Page 5: ...Adjust 164 Frequency Hopping Option Export Permit Required 165 Selecting the Hop Band 165 Entering the Security Code 165 Security Codes and Bandwidths 165 To Enable Hopping Mode 166 To Disable Hopping Mode 166 Security Code Management 167 Changing the Hop Code 167 Code Distribution 167 Network Planning and Contingencies 167 Automatic Link Establishment ALE Option 168 ALE System Overview 168 Operat...

Page 6: ...l 217 Transmit and Receive Frequencies 217 Channel Use Labels 218 Operating Mode 218 Transmitter Power Setting 219 Antenna Socket Selection 219 Selcall Format 220 Cloning Programming from Another Transceiver 221 2050 Transceiver in the 2040 Manpack Adaptor 223 Fitting the 2050 Into the 2040 Manpack Adaptor 224 Removing the Battery Cartridge 224 Powering and Charging the Barrett Manpack 225 Chargin...

Page 7: ...t 2019 Automatic Tuning Mobile HF Antenna 262 Antenna Assembly 264 Mounting the Base Spring 264 Mounting the Whip Sections 265 Testing the Barrett 2019 Automatic Tuning Mobile HF Antenna 266 910 Automatic Tuning Mobile Antenna 267 Marine Installations 274 Connectors 278 Overview of HF Operation 280 Limited 3 Year Warranty 284 Warranty Registration and Customer Support 285 ...

Page 8: ...r and the Barrett 2050 HF Transceiver have been tested and comply with the Federal Communications Commission FCC RF exposure limits for the General Population Uncontrolled exposure environment In addition it complies with the following Standards and Guidelines FCC 96 326 Guidelines for Evaluating the Environmental Effects of Radio Frequency Radiation FCC OET Bulletin 65 Edition 01 01 2001 Suppleme...

Page 9: ...rmal voice communication For FCC compliance when the 2050 transceiver is used at a power level of 100 watts PEP the antenna s used with this transceiver should be located at least 3 metres from the operator and should not be co located or operating in conjunction with any other antenna or transmitter For FCC compliance when the 2040 transceiver is used at a power level of 30 watts PEP the antenna ...

Page 10: ...ards Scroll Keys This manual refers to Scroll keys these keys are to scroll Up to scroll Left to scroll Down to scroll Right Abbreviations and Acronyms This term Means ALE Automatic Link Establishment Call history A list containing details of the last thirty calls you have received Station ID The ID of the station being called the receiving station s self ID GPS Global Positioning System HF High F...

Page 11: ...acknowledgement signal automatically transmitted from a station receiving a Selcall RF Radio Frequency Rx Receive Scan Table A list of channels used when scanning for incoming calls Selcall Selective Calls Telcall Telephone calls via the Selective Call protocol Self ID The programmed address identification number of your station Used by other stations to call you SSB Single Sideband a transmission...

Page 12: ...ications by providing a comprehensive data modem interface port high speed transmit to receive switching a high stability frequency standard and an efficient cooling system option The Barrett 2050 transceiver can be operated in either a local desktop configuration for base station applications or with the addition of an inexpensive mobile pack in a remote control trunk mount configuration for mobi...

Page 13: ...ption LCD Screen Keypad Alert Button The Alert button is used to send Emergency Selcalls or tone calls Power On Off Button The Barrett 2050 transceiver is turned on by pressing the green power button The transceiver is turned off by again pressing the green power button ...

Page 14: ...key is pressed Key functions are listed below followed by a detailed description of their functions Key Key Primary function Secondary function Power on off None Channel up General scroll key Channel down General scroll key Volume up None Volume down None Make a call None Enter Lock Unlock Keypad Emergency call None Enter menus None Transmitter tune mode Change case HELP Enter clarifier tune mode ...

Page 15: ... scrambler on off Alpha tuv Numeric key 8 Enter program mode None Mute squelch selection Alpha space Numeric key 0 Mode select USB LSB AM CW AFSK Alpha pqrs Numeric key 7 Start scan hold for 2 seconds for scan table selection Alpha wxyz Numeric key 9 Scroll left Numeric key 1 Scroll up Alpha abc Numeric key 2 Scroll right Alpha def Numeric key 3 Scroll down Alpha jkl Numeric key 5 ...

Page 16: ...o lock the keypad press and hold down the key The display will show the following Once the key has been held down long enough the Keypad Locked message will be displayed The Keypad Locked message will be shown whenever a key is pressed To unlock the keypad press and hold down the key The display will show the following ...

Page 17: ...17 of 285 Once the key has been held down long enough the Keypad Unlocked message will be displayed The keypad will automatically unlock when a Selcall or ALE call is received ...

Page 18: ...tted If using the 2050 in the remote control trunk mount configuration refer to the section Installing the Barrett 2050 transceiver Transceiver Socket When used in a base station configuration one piece unit as supplied the small remote head interface cable supplied in the kit is plugged in here with the other end into the front of the main transceiver module When used in the remote control trunk ...

Page 19: ...nd marine automatic antenna tuners Power input and speaker output for use with 2022 power supply Auxiliary antenna socket channels can be programmed to use this socket or the main antenna socket when using different antennas Main antenna socket Auxiliary interface connector Input for CW key Barrett P N BCA20014 Output for loudspeaker Barrett P N BCA20015 Chassis earth connection Serial number Inte...

Page 20: ...ct PIN number was entered the following is displayed This display will time out and allow the re entry of the PIN number If however the PIN number is entered 10 times incorrectly the transceiver will not allow PIN number entry for a period of one hour displaying the following Note The power on PIN number would have been loaded into the transceiver during programming if the function is in use Refer...

Page 21: ...se reduction activated 5 Missed Selcalls received 11 Receive signal strength 6 Selective Call mode 12 ALE active Transmit Mode In transmit mode the LCD display shows 1 Channel number 7 Antenna in use 2 Time 8 Power setting 3 Transmit frequency 9 Mode 4 Channel use 10 Noise reduction activated 5 Missed Selcalls received 11 Transmit power 6 Selective Call mode 12 ALE active ...

Page 22: ...ceived 10 Receive signal strength 5 Selective Call mode 11 ALE active 6 Antenna in use Channel Attributes Pressing and holding down the key for more than 2 seconds will reveal more details about the currently selected channel Using the Scroll keys to scroll down will reveal further details Note When in Secure mode the channel attributes do not show frequencies ...

Page 23: ... key will select respectively the next higher or lower programmed channel Holding down either of the keys will cause the rate of the channel change to increase The channel up down keys on the microphone have the same function as the channel up down keys on the keypad Channel up Channel down Note The microphone up down buttons needs to be configured for channel change function either when programmi...

Page 24: ... 1 to 9999 inclusive Note Channel zero cannot be selected example selects channel 99 press the key twice press the key If the channel selected had not been previously programmed then the following is displayed Note Empty channels can only be accessed by direct channel selection and are not displayed when scrolling through channels ...

Page 25: ...de with the PTT transmit switch for a set time period after which the transceiver switches to receive until the PTT transmit button is released and re keyed This facility prevents the transmitter transmitting for long periods of time if for instance the microphone becomes jammed between seats in a vehicle causing the PTT transmit switch to be held down Note Enabling disabling and changing the time...

Page 26: ...tion fitted with the GPS option and receiver Telcalls for direct dial telephone number calling using base stations with telephone interconnect facilities Person to person secure calls OEM 1 A four and six digit Selective Call system compatible with other major HF manufacturers including those using encryption Includes Selcall Telcall Beacon Call Emergency call Pagecall and GPS call CCIR A four dig...

Page 27: ...ctive Call Protocol All six digit OEM 1 protocol calls will only be decoded by other Barrett transceivers fitted with OEM 1 Selcall protocol or other manufacturers transceivers using encryption OEM 1 protocol four digit calls will be decoded by Barrett 950 transceivers Barrett 2050 transceivers using International four and six digit Selcall and other manufactures transceivers with similar CCIR 493...

Page 28: ...nd International Selcalls on any channel programmed as a Selcall channel Calls for each format type will only be decoded if there is at least one self id of that format programmed into the transceiver self id group Selcall Transmit Selcall formats in transmit are channel specific only call types programmed for the channel are permitted This means International and CCIR format calls can only be sen...

Page 29: ...lcall address book entry being used does not have a self ID attached to it These IDs are also used when making calls via the RS232 control command set Setting Default Self IDs then press the key Use the scroll keys to select the self id to attach to the default ID in this case the four digit OEM default ID then press the key Repeat the steps above for each default ID ...

Page 30: ...ault Self IDs Detaching an ID from the default IDs will force the operator to select a self ID when making a Selcall then press the key press the key until the Detach Self ID screen appears Use the scroll keys to select the option required ...

Page 31: ...31 of 285 then press the key ...

Page 32: ... IDs station names and telephone numbers to be easily entered This section describes how to enter station Selcall IDs and telephone numbers both manually and by using use the address and telephone books Note Also see section Address and phone books adding editing and deleting entries When Asked to Enter a Station ID Either enter the station ID using the numeric keys the number of the station you w...

Page 33: ... enter the first letter of the name you want to call using the alpha keypad then use the Scroll keys or use the Scroll keys to find the name of the station you want to call example r entered then press the key Or press the key and the last station called will be called again ...

Page 34: ...tton is pressed and held for 2 seconds then the option of changing the self ID of the call will become available If the destination address is a fixed address entry then the operator cannot change self IDs during the call press the key Use the scroll keys to select the address required press and hold the key for 2 seconds this address book entry ID is fixed so the self ID cannot be changed ...

Page 35: ...Use the scroll keys to scroll to a non fixed address book entry press and hold the key for 2 seconds Use the scroll keys to select the new self ID to be transmitted then press the key to continue the call process ...

Page 36: ...X0 will be received by stations XXX0 XXX9 up to 9 stations In six digit format Allcall A station sending XXX000 will be received by stations XXX000 XXX999 up to 890 stations Group call A station sending XXXX00 will be received by stations XXXX00 XXXX99 up to 89 stations Sub group call A station sending XXXXX0 will be received by stations XXXXX0 XXXXX9 up to 9 stations If using the group call syste...

Page 37: ...se the Scroll keys to find the name and number you want to call Or if you know the name associated with the telephone number in the phone book press the key and either enter the first letter of the name you want to call using the alpha keypad and use the Scroll keys or use the Scroll keys to find the name you want to call Or press the key and the last phone number called will be called again ...

Page 38: ...distinctive tone Using Beacon Calls on several available channels will determine which channel is best to use subsequent Selcalls or Telcalls Note both stations must be programmed for Selcall or Telcall operation Sending a Beacon Call select the channel you think will be best to use Refer to section Overview of HF operation listen for traffic on that channel if no traffic is heard then continue th...

Page 39: ...en continue then press the key select Selcall with the scroll keys then press the key enter the station ID of the station you wish to call see Entering station IDs and using the address and telephone books then press the key wait for the Selective Call to be sent listen for revertive tone from the called station that indicates the call was successful If no revertive tone is heard or it was difficu...

Page 40: ... alarm is sounded the mute squelch if selected opens and the display shows the call as follows The audible alarm will sound for thirty seconds and then time out To cancel the alarm before the time out period and to acknowledge the call press PTT or any key When the audible alarm times out the call received Envelope icon is displayed in the bottom right hand side of the display and a periodic audio...

Page 41: ...X0 XXX9 up to 9 stations In six digit format Allcall A station sending XXX000 will be received by stations XXX000 XXX999 up to 890 stations Group call A station sending XXXX00 will be received by stations XXXX00 XXXX99 up to 89 stations Sub group call A station sending XXXXX0 will be received by stations XXXXX0 XXXXX9 up to 9 stations If using the group call system stations cannot be programmed to...

Page 42: ... In all group calls the audible alarm will sound for thirty seconds and then time out To cancel the alarm before the time out and to acknowledge the call press PTT or any key When the audible alarm times out the call received envelope icon is displayed in the bottom right hand side of the display For details of previously received Selcalls enter Call History by holding the key down for two seconds...

Page 43: ... on each press of the button If a GPS receiver is fitted and enabled the GPS position is also sent in the call Selective Call alarm that transmits and automatically changes to a selection of channels Transmits the emergency Selcall sequence twice on each channel programmed as an emergency channel repeating this sequence until the transceiver is switched off If a GPS receiver is fitted and enabled ...

Page 44: ...alarm will continue transmitting for 10 seconds even if you have released the button To cancel the RFDS alarm press the key or the button Note A momentary press of the button initiates RFDS alarm test mode which emits the audio tones but does not transmit them Another momentary press of the button or the key cancels the RFDS alarm test mode Note Emergency call settings are set during transceiver p...

Page 45: ...ett transceivers that receive the emergency Selcall emit a distinctive audio alarm and display the following If the transceiver sending the emergency Selcall is fitted with a GPS receiver the position will also be displayed as illustrated below ...

Page 46: ... section for details Making a Direct Dial Telephone Call Sending a Telcall select the channel you want to send the Telcall on Beacon Call can be used to select the best channel listen for traffic on that channel if no traffic is heard then continue press the key select Telcall with the scroll keys then press the key enter the station ID of the station you wish to make the phone call through see En...

Page 47: ...led station that indicates the call was successful If no revertive call is heard try another channel and repeat the process When the call is successful wait for telephone connection to be made and proceed with call When the call is complete or if the line is busy send a Hang Up call Last Number Redial press the key twice the last telephone number sent will is displayed then press the key and the T...

Page 48: ...s then press the key select the ID of the telephone interconnect that you are connected through then press the key When the hang up Selcall has completed transmitting listen for hang up revertive signal confirming the hang up was successful if not heard repeat the above procedure Note If the hang up call is un successful for any reason the telephone interconnect will time out and hang up itself ...

Page 49: ...annel you want to send the hang up call on Beacon Call can be used to select the best channel listen for traffic on that channel if no traffic is heard then continue press the key select Selcall with the scroll keys enter the Selcall number representing the preset abbreviated number as described below Preset abbreviated Selcall numbering then press the key wait for the Selective Call to be sent li...

Page 50: ... station with a four digit Selcall ID of 45XX to call preset abbreviated number stored as 23 in the telephone interconnect Entering 342547 will instruct a telephone interconnected base station with a six digit Selcall ID of 3425XX to call preset abbreviated number stored as 47 in the telephone interconnect Note When using preset abbreviated number dialling your network supervisor will issue you wi...

Page 51: ...which self ID is to be used when calling a specific address book entry In other words the self ID attached to the address book entry will always be used and can only be changed via the 2000 Series Programming Software Making a Call to a Fixed Address Book Entry press the key Use the scroll keys to select the address required press the key if the address entry is a fixed entry then holding down the...

Page 52: ...e 2000 Series Programming Software This means that the operator only needs to know which preset number 01 to 98 has the required phone number set Making a Call to a Fixed Preset Address Book Entry press the key use the scroll keys to select an address which has preset capabilities This is shown when the last two digits of the destination station ID are shown as XX Then press the key enter the two ...

Page 53: ... to 30 entries Call history can be entered as follows Either Press and hold the key for 2 seconds Or Select Call history in the Standard Menu section Note A full description of navigating the call history section is described in the Standard Menu section of this manual Erasing Calls From History Individual or all entries can be deleted from the Outbox Inbox or New Calls section of the Selcall hist...

Page 54: ...f 285 Hold the key until the Erase Entry screen is shown press the key and the entry will be deleted To delete all entries from a Selcall history section scroll to the All Entries screen then press the key ...

Page 55: ...mute type is selected the transceiver will stop scanning and decode the Selcall The transceiver will only stop scanning when a Selcall is detected Signal Strength Scan SSL Scan If the signal strength mute squelch is active and a signal with a level greater than the pre set threshold is received the scan will halt Scan will remain halted while the signal level stays above the preset threshold Once ...

Page 56: ...er key to jump to a label directly then press the key Note If no scan tables are programmed the following is displayed Initiating Scan Momentarily press the key Alternatively scan may be programmed as a default condition so when the transceiver is switched on and after a period of inactivity i e no key presses the transceiver returns to scan ...

Page 57: ...equencies up to 1 kHz and 1 kHz of the assigned channel frequency depending on programming see note below to enter clarifier tune mode or tune clarifier up or tune clarifier down Note There are five clarifier ranges available these ranges can be set either when programming the transceiver or in the RF Settings section of the protected menu Note The clarifier value is set to zero when the channel i...

Page 58: ...stem is selected the display shows a small icon to the left of the mode indication notated NR as below The DSP noise reduction system is disabled by momentary pressing the key Note There are three levels of noise reduction available these levels can be set either when programming the transceiver or in the Audio Settings section of the protected menu ...

Page 59: ...has been received and decoded successfully Signal Strength Level SSL mute squelch the receiver audio is enabled when the received signal strength exceeds the nominated threshold level Note The signal strength mute level can be set to three levels these levels can be set either when programming the transceiver or in the Mute Settings section of the protected menu The current mute squelch state is d...

Page 60: ...off Press the key repeatedly to select the required mode Note If the IF filter option is physically fitted and enabled in software it will automatically be selected when CW and AFSK mode is selected Tune Press and hold down the key to tune When tuning the transceiver will transmit at the power level selected a carrier on the channel selected at 1 6 kHz above the Suppressed Carrier Frequency SCF di...

Page 61: ...con Call can be used to select the best channel listen for traffic on that channel if no traffic is heard then press the key select GPS Request with the scroll keys then press the key enter the identification of the station you want to request the GPS position from see Entering station IDs and using the address and telephone books then press the key ...

Page 62: ... after which the following will be displayed The station called GPS position Or the following error messages The GPS unit is not providing data to the remote transceiver There is no GPS receiver fitted to the remote transceiver There was no response from the remote station ...

Page 63: ...station you want to send your GPS position to see Entering station IDs and using the address and telephone books then press the key Your GPS position will is now be transmitted wait for a revertive tone from the remote station to confirm the call was received if no revertive tone is heard repeat the process or change to another channel and repeat the process Note The GPS interface option BCO205004...

Page 64: ...64 of 285 Note If the display indicates that the GPS is unavailable as shown below you cannot select the Selective Call function GPS data ...

Page 65: ...lities Sending a Pagecall SMS select the channel you want to send the Pagecall on Beacon Call can be used to select the best channel listen for traffic on that channel if no traffic is heard then continue press the key select Pagecall with the scroll keys then press the key enter the identification of the station you want to send the Pagecall to see Entering station IDs and using the address and t...

Page 66: ...66 of 285 then press the key type in your messages using the alpha numeric keys then press the key ...

Page 67: ...ll sound for thirty seconds and then time out To cancel the alarm before the time out period and to acknowledge the call press PTT or any key When the audible alarm times out the call received Envelope icon is displayed in the bottom right hand side of the display For details of previously received Pagecalls enter Call History by holding the key down for two seconds or more ...

Page 68: ...These special characters are and To get the new characters to display properly the transceiver front panel unit needs to be fitted with V14 or later firmware press the key select Pagecall with the scroll keys then press the key enter the identification of the station you want to send the Pagecall to see Entering station IDs and using the address and telephone books then press the key ...

Page 69: ...or later front panel firmware is not fitted then a will be shown in place of the Use the up down scroll keys to select the character required Pressing the key again will exit the Special Characters Mode without saving the character to the message To save the character to the message press the or keys Once the special character has been saved continue on with the Pagecall as per normal ...

Page 70: ...ceive state battery voltage Last transmit state battery voltage Signal strength indication of received status request Selcall Forward power output level VSWR of antenna Requesting Another Station s Status select the channel you want to send the Status request call on Beacon Call can be used to select the best channel listen for traffic on that channel if no traffic is heard then continue Then pres...

Page 71: ...atus data which sounds like the remote station sending a Selcall to you after which the following will be displayed use the or keys to move through the pages Or the following error messages There was no response from the station you requested the status from repeat the process or change the channel and repeat the process ...

Page 72: ...ffic on that channel if no traffic is heard then continue press the key select Secure Selcall with the scroll keys press the key enter the station ID of the station you wish to call see Entering station IDs and using the address and telephone books Note To make a secure call to multiple stations use a group call ID encompassing the required stations press the key wait for the Selective Call to be ...

Page 73: ...Hz up to 10 MHz Press the key to enter the tuning receiver mode To tune the receiver move the cursor over the digit representing the frequency increment required in the receiver frequency display you wish to tune using either the or keys then use or to tune up in frequency or to tune down in frequency press the key to return to the previous operating channel ...

Page 74: ...e frequency scan parameters enter the tuning receiver mode then Press the key for two seconds until the following is displayed Enter a new frequency using the numeric keys to set the lower scan limit boundary example below shows the lower limit set to 12 MHz then press the key The newly entered frequency will be displayed then press the key The last entered upper frequency will be displayed ...

Page 75: ... upper limit set to 14 MHz then press the key The newly entered frequency will be displayed then press the key The last scan step increment entered is displayed If required use the scroll keys to select the step increment required in Hz Steps available 100 Hz 0 1 kHz 250 Hz 0 25 kHz 1000 Hz 1 kHz 2500 Hz 2 5 kHz example shown 2500 Hz ...

Page 76: ...w be scanning using the entered parameters Start Receiver Scanning Manually To start receiver scanning enter the tuning receiver mode then press the key The receiver will now be scanning using the last entered parameters The transceiver will halt scanning for the following reasons Signal Strength Level SSL mute is selected and a signal with a level greater than the pre set threshold is received Au...

Page 77: ...ting the Menus All sections of the Menus are operated using the similar key press sequences In this section when describing the functions available in the Menu system it is assumed the operator is familiar with the following press the key to enter the Standard Menu section press the key for more than 2 seconds to enter the Protected Menu section use the Scroll keys to select the menu item you requ...

Page 78: ...on about the transceiver Use the and keys to scroll back and forth through the identification pages This screen shows the transceiver type the transceiver serial number and options fitted to the transceiver This screen shows the transceiver software versions ...

Page 79: ...s OEM2 is the default six digit ID for OEM programmed channels If N A is shown then that particular ID has not been set as yet In the screen below neither OEM Selcall self id has been set This screen shows the battery voltage in receive the battery voltage during the last transmit cycle and the PA temperature Transceiver GPS coordinates are also shown if a GPS is fitted and has acquired satellites...

Page 80: ...ht Level Allows the backlight level on the LCD display to be adjusted to one of three viewing levels High Medium or Low Use the Scroll keys to select the level required example Medium when the level required is displayed press the key ...

Page 81: ...ime from the last key press for a long time from the last key press or so that the backlight is permanently on or off Note Having the backlight off reduces the transceiver s power consumption Use the Scroll keys to select the required setting example Always on When the setting required is displayed press the key ...

Page 82: ... not been viewed before are held in a section called New Calls received calls that have been viewed are held for future viewing in the Inbox all transmitted calls are stored in the Outbox Each history buffer can store up to 30 entries New Call This section lists all types of Selcalls that have been received but not yet viewed Inbox This section lists all types of Selcalls that have been received a...

Page 83: ... that have been transmitted Navigation when in the New calls Inbox and Outbox is always the same as shown in the New Calls example below Either Use the Scroll keys to select the required record Or enter a record number using the numeric keys and press the key ...

Page 84: ...ansceiver Selcall ID book associating it with a name the following will be displayed If the channel the incoming Selcall was received on has been deleted since the Selcall was received the following is displayed Where calls have data associated with them Pagecall Telcall GPS data call pressing the key again will show the data details for that call ...

Page 85: ...85 of 285 Address Books Selcall ID Book Add a New Entry then press the key press key if uppercase is required enter name to be associated with Selcall ID then press key ...

Page 86: ...valid message will be shown otherwise the Input Link Status message is shown If a self ID is linked to the Selcall ID then that Selcall ID can only be called on a channel that is programmed for the Selcall type of the linked self ID In the example below whenever a call to Perth 2060 is made the transceiver self ID 9876 will be used and can only be sent on an OEM enabled channel If a non OEM channe...

Page 87: ...87 of 285 If Yes is selected use the scroll keys to select the self ID to be associated with the Selcall ID then press key add the new entry ...

Page 88: ...88 of 285 Selcall ID Book Edit an Entry then press the key Scroll to the Selcall ID required then press the key Enter in the new Selcall ID then press the key ...

Page 89: ...he key Select the Linked to Self ID option then press the key If Linked to Self ID is set to Yes then the original self id is displayed Use the scroll keys to select the new self ID to link to if required then press the key ...

Page 90: ...se entry verification screen will appear unless the address book entry is fixed If this is the case then an error will be displayed on the screen The address book entry is fixed To delete this address book entry it must be modified in the 2000 Series Programming Software so that the fixed option is unchecked ...

Page 91: ...91 of 285 use the Scroll keys to select Yes to erase the address book entry then press the key ...

Page 92: ...92 of 285 Phone Book Add a New Entry press the key if uppercase required enter the name to be associated with telephone number then press the key ...

Page 93: ...93 of 285 enter the telephone number using the numeric keys up to 16 digits then press the key ...

Page 94: ...roll though the phone book to find the entry you want to edit Or enter the first letter of the name you are looking for using the Alpha keys for example looking for the name Patrick Key in p using alpha keys then use the Scroll keys to find the name then press the key ...

Page 95: ...95 of 285 then press the key Press the key to delete the original number enter the new telephone number using the numeric keys up to 16 digits then press the key ...

Page 96: ...96 of 285 Phone Book Erasing an Entry select the entry you want to erase using the Scroll keys press the key for more than two seconds use the Scroll keys select Yes then press the key ...

Page 97: ...ALE section of the manual for more information on the auto fill function If no auto fill calls have been received and the ALE auto fill is enabled then the display will show Or if auto fill calls have been received and the ALE auto fill is enabled then the display will show If the ALE auto fill option is disabled then the display will show ...

Page 98: ...ing auto fill call into the transceivers ALE network the alias needs to be reassigned Once auto fill calls have been received press the key to search through the received calls then press the key again use the scroll keys to scroll through the received auto fill calls Once the desired auto fill id has been reached press the key to reassign the alias of the received call enter the new alias to be a...

Page 99: ...99 of 285 then press key to save the new alias ...

Page 100: ...o fill id go to the Auto fill book menu item then press the key use the scroll keys to scroll through the received auto fill calls Once the correct ID has been selected press the key for more than two seconds Use the scroll keys to select yes then press the key ...

Page 101: ...e Transcrypt scrambler BCA20054 the scramble code is set using this option All stations using the scramblers require the same scrambler code to be entered press the key press the key then use the scroll keys to select the required setting The code can be selected between 1 and 16 for the Transcrypt scrambler BCA20054 or 1 and 32 for the audio inversion scrambler BCA20031 press the key ...

Page 102: ...102 of 285 Note If using the internally fitted rolling code audio scrambler accessory PCB BCA20054 the code is set on the unit before installation using an external programmer ...

Page 103: ...re than two seconds the Scrambler Enabled screen will be shown While the transceiver is in scrambled mode the Scrambler On message will be displayed To Disable Scrambled Mode Press the key for more than two seconds the Scrambler Disabled screen will be shown ...

Page 104: ... When an un tuned antenna such as the whip or a long wire is to be used Whip Long wire is selected This enables the automatic antenna tuner If a 50 ohm broadband antenna or a tuned dipole is to be used select 50 ohm The automatic tuner is disabled and the BNC socket on the 2040 is used Use the Scroll keys to select the setting required example Whip L Wire press the key ...

Page 105: ...u General Microphone Up Down keys The keys on the top of the microphone can be assigned for two different functions either as channel up down keys or as volume control keys or they can be disabled Use the Scroll keys to select the setting required example Mic keys disabled press the key ...

Page 106: ...er transmits a short tone when the PTT is released It provides an audible indication to the operator at the remote station that the local station has stopped transmitting Use the Scroll keys to select the setting required example Tx Over Beep enabled press the key ...

Page 107: ...microphone is held on for more than the time limit set below i e if the microphone is inadvertently jammed under a seat Releasing the PTT will reset the transmitter Settings available are Disabled 1 minute 2 minutes 3 minutes Use the Scroll keys to select the setting required example 2 minutes When the setting required is selected press the key ...

Page 108: ...ng channel programming to indicate what particular channels are used for i e UNHCR Geneva Edit Labels Either use the scroll keys to scroll through to the label you want to edit Or search for label you want to edit by entering the first letter of the label and using the scroll keys to select it to edit the label press the key ...

Page 109: ... is complete press the key Delete a Label Enter edit mode as shown above and select the label you want to delete press the key until the display below appears Use the scroll keys to select Yes you want to delete the entry then press the key ...

Page 110: ...110 of 285 Add an Entry press the key type in a new label using the Alpha keys then press the key ...

Page 111: ...111 of 285 Setting the Clock press the key Use the Scroll keys and as shown on the screen to set the current time for example 9 41 AM When time is set press the key ...

Page 112: ...112 of 285 Setting the Date press the key Use the Scroll keys and as shown on the screen to set the current date for example 28 July 2010 When date is entered press the key ...

Page 113: ...he transceiver checks vital transceiver functions and reports the results as shown below press the key then press the key to continue press the key to repeat the test or press the key to finish Note The Audio and Signal strength mutes must not be selected when running the B I T E test or it may fail ...

Page 114: ...mber is provided depending on the option or combination of options required to be fitted Most options are fitted in the factory before dispatch press the key Enter the option PIN number supplied by the manufacturer using the numeric then press the key For example if the PIN number supplied is for all eight options after entering the PIN number the following is displayed If an incorrect PIN number ...

Page 115: ...PIN number entry Using the numeric keypad enter an eight digit hopping security code then press the key Note Refer to the Frequency Hopping section of this manual for details of PIN entry and Frequency Hopping in general ...

Page 116: ...6 of 285 Secure call code When using the person to person voice scrambler both stations require the same scrambler code to be entered Using the numeric keypad enter a four digit number then press the key ...

Page 117: ...anges the number of hops per second used by the encrypting algorithm There are 2 choices High 25 hops second in Frequency Hopping mode 15 hops second in Secure Call mode Standard 5 hops second in Frequency Hopping mode 4 hops second in Secure Call mode Use the Scroll keys to select the required Security level then press the key ...

Page 118: ...118 of 285 Upload pack See section Cloning programming from another transceiver ...

Page 119: ...ansceiver use the scroll keys to select the required setting then press the key press the key Note Once the Internal Modem option is enabled transceivers cannot be controlled or programmed via RS232 communications The Internal Modem must be disabled to allow re programming or control of the transceiver through RS232 communications ...

Page 120: ...120 of 285 Scan Tables Adding Channels to a Scan Table Use the Scroll keys to select the channel you wish to add When the channel required is displayed press the key ...

Page 121: ...285 Editing Channels in a Scan Table Either Use the Scroll keys to select the channel you wish to edit Or Select the channel you wish to edit by entering the channel number example channel 1 then press the key ...

Page 122: ...122 of 285 Then press the key to edit the channel number Use the Scroll keys to select the new channel for the scan table slot press the key to enter the new setting ...

Page 123: ...ntry you wish to erase is selected press the key until the following is displayed Use the Scroll keys to select Yes when you are sure you want to erase the entry then press the key Note All channels are displayed in numerical order within the scan table with respect to the entry number there are a maximum of 30 entries in each table ...

Page 124: ...124 of 285 Changing Scan Table Labels press the key Use the key to clear the old label using the alpha numeric keypad enter the new label then press the key ...

Page 125: ...lects the scan rate applicable to non Selcall scan channels selectable between 300 mS and 5 seconds per channel Use the Scroll keys to select the scan resume time required example 700 mS When the setting required is selected press the key ...

Page 126: ...scan has been stopped by signal strength level if signal strength level mute is set or voice activity if audio mute is set The dwell time can be set from 1 to 10 seconds Use the Scroll keys to select the scan dwell time required example 5 seconds When the setting required is selected press the key ...

Page 127: ...iver will automatically resume scanning from the last operation i e key press or PTT The scan resume time period can be set between 1 and 30 minutes or it can be disabled Use the Scroll keys to select the scan resume time required example 5 minutes When the setting required is selected press the key ...

Page 128: ...hose with channels entered will be displayed Note Channels can be added removed and edited and scan tables named in the Scan table section Use the Scroll keys to select the scan table required example scan table 1 When the scan table required is displayed press the key If none of the Scan tables have any channel entries the following is displayed Note Direct entry into this section is available by...

Page 129: ...r hardness of the syllabic mute squelch is set by this section The mute can be set between low medium and high sensitivity to voice activity on a channel Use the Scroll keys to select the setting required example High When the setting required is selected press the key ...

Page 130: ...pens Levels available are low medium and high When set to low the mute will open on a relatively low level of received signal When set to high the mute will open on a relatively high level of received signal Use the Scroll keys to select the setting required example High When the setting required is selected press the key ...

Page 131: ...elf IDs for the transceiver Up to 10 self IDs can be assigned Any combination of four and six digit ID is permitted Any combination of International or OEM Selcall type is also permitted Adding Self IDs then press the key enter Selcall ID number four or six digits then press the key ...

Page 132: ...132 of 285 enter name to be associated with the Selcall ID press key if uppercase required then press key Use the scroll keys to select the Selcall ID format then press the key ...

Page 133: ...133 of 285 Modifying Self IDs then press the key Scroll to the ID required then press the key Change the ID name if required ...

Page 134: ...134 of 285 then press the key Change the Selcall format associated with the ID if required then press the key ...

Page 135: ... select the entry you want to erase press the key for more than two seconds The erase entry verification screen will appear unless the ID is set as a default ID or is attached to a fixed address book entry If this is the case then an error will be displayed on the screen ...

Page 136: ...e address book entry must be modified in the 2000 Series Programming Software to have the self ID detached from it The self ID is set as one of the 4 default self IDs To delete this self ID it must be removed from the default ID list use the Scroll keys to select Yes to erase the ID then press the key ...

Page 137: ...IR WA2 in Australia self ID when sending calls Selcall INT 2 Setting Default International Six Digit Selcall Self ID Selcall INT2 Used as the default six digit International self ID when sending selective calls Selcall OEM 1 Setting Default OEM Four Digit Selcall Self ID Selcall OEM1 Used as the default four digit OEM self ID when sending calls ...

Page 138: ...Used as the default six digit OEM self ID when sending selective calls Note We recommend that the self ID should not be set to X000 XX00 or XXX0 as these are reserved Selcall numbers for Allcall group call or sub group call use Setting Selcall MMSI GMDSS Selcall self ID for future use ...

Page 139: ...rned on or off using this function This is useful when the transceiver is used in covert operations Reception of the Selcall continues to be displayed visually on the display Use the Scroll keys to select the setting required example shows selection of alarm On press the key ...

Page 140: ... transceiver loudspeaker In certain situations this is not required or the tone volume requires adjusted This section allows the Selcall audio to be disabled or set to two volume settings Low or High Use the Scroll keys to select the setting required example Selcall volume Low When the setting required is selected press the key ...

Page 141: ...n how many channels are used in the scan table being used Allow 500 mS for each Selcall channel to be scanned plus one second E g to scan 8 Selcall channels 500 mS x 8 1 sec 5 seconds Use the Scroll keys to select the Selcall pre amble length required example 5 seconds When the setting required is selected press the key ...

Page 142: ... is being used illegally The lock call will be made on the channel selected before entering this function The channel number is shown on the TXCVR display Before proceeding if the channel presently selected is not a Selcall channel the following is displayed Select a channel that you expect the transceiver you want to lock is on and that has Selcall programmed press the key enter the Selcall numbe...

Page 143: ... want to lock the transceiver with Selcall ID entered use the Scroll keys to select Yes press the key The transceiver will now send the lock call A revertive call from the transceiver being locked will confirm the action A transceiver that has been locked by this process can only be unlocked by using the Barrett programming software See the programming software for details ...

Page 144: ... done by using either the privacy key programmed by the programming software or if no privacy key is programmed the default value of 9999999 Selecting On will encrypt calls selecting Off will send plain text calls Use the Scroll keys to select the setting required example shows selection OEM Privacy key On press the key ...

Page 145: ...tailored to an operator s comfort requirements Settings available are full bandwidth 300 Hz 1 5 kHz 300 Hz 2 0 kHz 300 Hz 2 5 kHz 300 Hz 3 0 kHz Use the Scroll keys to select the audio bandwidth required example 300 Hz to 2 5 kHz When the audio bandwidth required is displayed press the key ...

Page 146: ...sociated with key presses In covert operations these can be disabled in other operations these are set for operator comfort Settings are Off Low or High example shown beep tones High Use the Scroll keys to select the beep volume level required example shown beep tones level High When the beep level required is displayed press the key ...

Page 147: ...his case the transceiver s receiver provides the unprocessed audio When used with a remote receiver in split site operations it can be set to external in this case unprocessed receive audio from the remote site can be input into the auxiliary sockets 600 ohm balanced audio port Use the Scroll keys to select setting required example shows External audio press the key ...

Page 148: ...is is set to internal in this case the transceiver s microphone provides the transmitter audio When used with a remote site operation it can be set to remote in this case the transmit audio is input into the auxiliary sockets 600 ohm balanced audio port Use the Scroll keys to select setting required example shows Remote press the key ...

Page 149: ...tput can be set to Un Muted or Follows Mute When set to Follows Mute the line output is muted in the same manner as the speaker output and follows the mute condition currently in use The line output is usually set to Un Muted when using data modems Use the Scroll keys to select the noise reduction depth required example Follows Mute press the key ...

Page 150: ...rt requirements Settings available are Weak Medium and Strong It should be noted that as the depth is increased the processed human voice gets a more metallic quality press the key Use the Scroll keys to select the noise reduction depth required example Medium When the noise reduction required is displayed press the key ...

Page 151: ...er is used in some data transmission applications Two options are available Narrow or Wide When Narrow is selected the filter bandwidth is 500Hz If Wide is selected then the filter bandwidth is 3 kHz Use the Scroll keys to select the setting required example shown Wide press the key Note This setting is only available if the narrow filter setting is enabled via the 2000 series programming software...

Page 152: ...reamplifier provides an additional receiver gain of 5 dB Generally the RF pre amplifier is switched off when an automatic mobile antenna is in use as these antenna have an inbuilt RF pre amp Use the Scroll keys to select the setting required example shown Enabled press the key ...

Page 153: ...s the user to set the clarifier range or disable the clarifier the range can be set to 50 Hz 150 Hz or 1 kHz Use the Scroll keys to select the clarifier range required example shown 1 kHz When the clarifier limit required is displayed press the key ...

Page 154: ...in vehicles with petrol engines Note The noise blanker will not be effective in situations where external power line noise etc is blanketing the receiver Use the Scroll keys to select the setting required example shown On press the key Note In certain situations noise blankers can cause Intermodulation in receivers in these cases the noise blanker should be disabled ...

Page 155: ...er level required example shown 125W When the RF output power required is displayed press the key Note When the 2050 is deployed in the 2040 manpack adaptor the power is automatically reduced to 10 W and 30 W These power settings corresponding to the channels programmed power setting Low Power LP representing 10 W and Medium Power MP and High Power HP representing 30 W ...

Page 156: ...the receiver environment and should be set for optimum receiver performance In the presence of high static and sporadic noise the function of the hang AGC may result in gaps in the received signal due to the slow AGC recovery Use the Scroll keys to select the AGC Hang example shown Hang Off When the AGC Hang required is displayed press the key ...

Page 157: ...ector Use the Scroll keys to select the setting required example shown Enabled When the setting required is displayed press the key Note This command does not allow RS 232 control of the transceiver as enabled when the RS 232 option is fitted It is used to control the output of Selcall information used by some external programs such as vehicle tracking ...

Page 158: ...his menu option allows the operator to select the RS232 Baud rate Options available are 9600 or 115200 Use the Scroll keys to select the setting required example shown 9600 When the setting required is displayed press the key ...

Page 159: ... is received by the transceiver It can be set to either a pulse output for use with a horn where the output is activated 15 seconds on 15 seconds off or a constant output for use with a rotating beacon Both are reset by pressing the clear key or action of the PTT button Use the Scroll keys to select the setting required example shown Pulsed press the key ...

Page 160: ...014 manual tapped whip 910 Mobile Antenna Select when using a Barrett 910 automatic tuning mobile antenna 911 Automatic Tuner Select when using a Barrett 911 automatic tuner Linear Amplifier Select when using the 2050 with a Barrett 2075 series linear amplifier 2019 Mobile Antenna Select when using a Barrett 2019 automatic tuning mobile HF antenna Loop Antenna Select when using the 2018 Mobile mag...

Page 161: ...161 of 285 Use the Scroll keys to select the type of antenna or a linear amplifier example shown 2019 Mobile antenna When the setting required is displayed press the key ...

Page 162: ...put example disabled Use the Scroll keys to select the setting required example shown Enabled press the key Note An external GPS receiver is required for GPS functions If this option is enabled and a GPS is not connected to the 2050 a warning message will appear on the display GPS Unavailable ...

Page 163: ...ts the output level of the auxiliary 600 ohm balanced audio output port The level can be set to 6 dBm 3 dBm 0 dBm 3 dBm 6 dBm and 9 dBm Use the Scroll keys to select the level required example shown 3 dBm When the level required is displayed press the key ...

Page 164: ...e input level sensitivity of the auxiliary 600 ohm balanced audio input Sensitivity can be adjusted to 24 dBm 18 dBm 12 dBm 6 dBm and 0 dBm Use the Scroll keys to select the level required example shown 12 dBm When the level required is displayed press the key ...

Page 165: ... simply determines which of the preset hop bands are selected Entering the Security Code For hopping PIN code entry refer to the General section of the Protected Menu in the subsection Hopping PIN select the security PIN code based on the information below Security Codes and Bandwidths Security codes 00000000 to 19999999 are used for hopping 2 kHz Security codes 20000000 to 49999999 are used for h...

Page 166: ... shown you can start communicating with other stations using the same channel frequency and having the same hopping code entered To Disable Hopping Mode Press the key for more than two seconds Note The external ESU must be connected and providing valid data for the frequency hopping system to operate ...

Page 167: ...ibution will be the same as for any other direct entry crypto devices i e this is a logistics issue for the person organisation administering the hop network Network Planning and Contingencies As the Barrett 2000 series frequency hopping system has a GPS based synchronisation system that requires no master station allocation operating the system requires the minimum of communications strategies Th...

Page 168: ... LQA information 100 channel configurations and a combination of 100 address configurations self address and other address Plus it has the ability to save unknown station information in an Auto fill queue this allows new stations to join the ALE network without having to manually re program the network settings of each transceiver in the network There are 11 slots available for ALE Auto fill addre...

Page 169: ...nsceiver will now be ALE scanning and ready to accept ALE calls receive Soundings and transmit Soundings If Sounding is enabled on your transceiver During ALE scanning the following messages may be displayed This occurs when your station receives an ALE sounding from another station in the network This is displayed when your station transmits a sounding Note Your station would have to have Soundin...

Page 170: ...he scroll keys then press the key select the station ID of the station you wish to call the To ID see the section below Selecting ALE Station IDs then press the key select the station ID you are calling from your self ID can be varied the From ID see the section below Selecting ALE station IDs ...

Page 171: ... an audible alarm will sound after which you can start communication with the station you called Or if you already had a link established The following error messages may be displayed For various reasons the link attempt failed i e no response from the called station or the link was rejected by the called station ...

Page 172: ...172 of 285 If the operator attempts to change channels while linked the following screen is shown ...

Page 173: ... consist of up to 15 ALE stations press the key select ALE Netcall with the scroll keys then press the key select the network you wish to call the To ID see the section below Selecting ALE Station IDs then press the key select the station ID you are calling from your self ID can be varied the From ID see the section below Selecting ALE station IDs ...

Page 174: ... an audible alarm will sound after which you can start communication with the network you called Or if you already have a link established The following error messages may be displayed For various reasons the link attempt failed i e no response from the called station or the link was rejected by the called station ...

Page 175: ...175 of 285 If the operator attempts to change channels while linked the following screen is shown ...

Page 176: ...sage with the scroll keys then press the key select the station ID of the station you wish to call the To ID see the section below Selecting ALE Station IDs then press the key select the station ID you are calling from your self ID can be varied the From ID see the section below Selecting ALE station IDs ...

Page 177: ...177 of 285 then press the key use the Scroll keys to select either Or If you selected New Message then press the key Enter the message using the alpha numeric keypad ...

Page 178: ...178 of 285 If you selected Preset Message press the key Use the keys to view the rest of the message Or use the or keys to select other preset messages ...

Page 179: ...ew Message is entered press the key the ALE call sequence will now commence linking in progress the link is established an audible alarm will sound after which you can start communication with the station you called Or if you already have a link established ...

Page 180: ...ges may be displayed For various reasons the link attempt failed i e no response from the called station or the link was rejected by the called station If the operator attempts to change channels while linked the following screen is shown ...

Page 181: ...t ALE Phone with the scroll keys then press the key select the station ID of the station you wish to call the To ID see the section below Selecting ALE Station IDs then press the key select the station ID you are calling from your self ID can be varied the From ID see the section below Selecting ALE station IDs ...

Page 182: ...l keys to find the name and number you want to call Or if you know the name associated with the telephone number in the phone book press the key and either enter the first letter of the name you want to call using the alpha keypad and use the Scroll keys or use the Scroll keys to find the name you want to call Or press the key and the phone number previously called will be called again ...

Page 183: ...ALE call sequence will now commence linking in progress the link is established an audible alarm will sound after which you can start communication with the station you called Or if you already have a link established ...

Page 184: ...ges may be displayed For various reasons the link attempt failed i e no response from the called station or the link was rejected by the called station If the operator attempts to change channels while linked the following screen is shown ...

Page 185: ...te The same method is used to select the To and From ID the To ID is shown below Either enter the station ID using the numeric keys the number of the station you wish to call see Station ID ranges Or all the stations are in the address book use the scroll keys to find the station you want to call then press the key Or if the station name is known press the key At this point the operator can use th...

Page 186: ...186 of 285 Press the key and the first address that matches or the closest match the prefix entered is selected ...

Page 187: ... normal call and conversation can now commence Or An address has matched an incoming Wildcard address Wildcard addresses have special characters question marks in them that do not require an exact match with the local address to link E g FIELD will link with any station that has a self address starting with FIELD and ending in a single additional character fOrexample FIELD1 OrFIELDA A station that...

Page 188: ...espond to Allcalls Since the station which initiated the call does not receive any link acknowledgements it cannot determine which station s have accepted the link With all the above calls an alarm will sound fOr60secs After pressing a key the following pages appear If the 60sec alarm times out the system blips periodically 5sec intervals Shows the address called i e one of your addresses Pressing...

Page 189: ...189 of 285 Pressing the key displays the link status Or if you already have a link established ...

Page 190: ...our station is now linked and has received an ALE message an audible alarm sounds If after 60 seconds no key has been pressed the alarm will stop and regular blips will be heard indicating a call was received in your absence Pressing any key will display the message received use the keys to scroll through the message Pressing the key shows the address that the station called i e one of your addres...

Page 191: ...191 of 285 Pressing the again shows the address of the station that called you Pressing returns you to the previous screen etc Pressing the key or using PTT will return you to the main screen ...

Page 192: ...in the ALE net is attempting to establish a link to your station Your station is now linked and has received an ALE phone number an audible alarm sounds If after 60 seconds no key has been pressed the alarm will stop and regular blips will be heard indicating a call was received in your absence Pressing any key will display the received message Pressing the key shows the address that the station c...

Page 193: ...en using this ALE telephone number function the receiving transceiver is connected to a automatic telephone interconnect unit such as the Barrett 960 or Barrett 2060 in this case the RS 232 output is enabled the receipt of an ALE telephone call request is not displayed as above and the telephone interconnect takes control of the transceiver ...

Page 194: ...audible alarm sounds Your address has matched an incoming Netcall a call to a number of stations in one call Each station must respond to confirm the Netcall is established with the calling station Each station responds in pre determined slots If after 60 seconds if no key has been pressed the alarm will stop and regular blips will be heard indicating a call was received in your absence Pressing a...

Page 195: ...195 of 285 Pressing the again shows the address of the station that called you Pressing returns you to the previous screen etc Pressing the key or using PTT will return you to the main screen ...

Page 196: ... ALE link Or if more than one ALE link is in progress example 2 links hold the key until the screen showing status of the current links appears use the Scroll keys to select link you wish to close example shown a link with a station not in your ID book then press the key ...

Page 197: ...E text message to another station in an ALE network or you can terminate the link To terminate the link use the Scroll keys to select Terminate Link press the key The link is now terminated and unless you are linked to more than this station then your station will return to ALE scanning or manual mode ...

Page 198: ...inks You must be linked to close an ALE link Or if more than one ALE link is in progress example 2 links press the key select Terminate All Links with the scroll keys then press the key The ALE system now terminates all open links ...

Page 199: ...tion Closes the ALE Link If the station you are linked to closes the link the following will be displayed Your station will then return to ALE scanning assuming your station was in ALE scan mode before the ALE link occurred ...

Page 200: ...elected the required scan list before you commence scanning refer to the section ALE scan list select in the ALE protected menu Press the key the 2050 transceiver will now be ALE scanning and ready to accept ALE calls receive Soundings and transmit Soundings If Sounding is enabled on your transceiver The 2050 transceiver will also be able to decode incoming Selcall as long as 2 channels per second...

Page 201: ...ransmitting an ALE Call Please refer to the Linking to Another Station in an ALE Network section Receiving an ALE Call Please refer to the Receiving an ALE link request section Receiving and Transmitting a Selective Call Selcall Please refer to the Contacting another station using Selective Call Selcall and Telcall section ...

Page 202: ...285 ALE Configuration Menus ALE State This feature enables or disables the ALE system Use the Scroll keys to select the setting required example ALE Enabled When the setting required is selected press the key ...

Page 203: ...ve to individually re configure each station in the network with the new stations ID The Autofill queue is a first in first out queue where up to eleven new stations can be added after this the next received unknown station will overwrite the first ID in the Autofill queue To avoid this happening the operator must reassign the Autofill station ID alias Use the Scroll keys to select the setting req...

Page 204: ... select section by holding down the key for more than two seconds To select the ALE scan list required press the key Use the Scroll keys or press the first letter of the scan list you want to use example shown s to select the scan table required then press the key ...

Page 205: ...t to Disabled the ALE system will not be able to transmit any ALE calls including automatic soundings and responses to incoming ALE calls Use the Scroll keys to select the setting required example Enabled When the setting required is selected press the key ...

Page 206: ...ave all automatic responses enabled disabled or it can be set on an individual preset channel basis The individual preset setting is set in the 2000 series programming software Use the Scroll keys to select the setting required example Individually Preset When the setting required is selected press the key ...

Page 207: ...t soundings under any circumstances in this case Sounding Control is set to Disable Sounding is limited to certain channels pre programmed by the ALE fill program The ALE system will however continue to make and respond to calls depending on the Response Control settings Use the Scroll keys to select the setting required example Enable When the setting required is selected press the key ...

Page 208: ...omatic sounding Sounding Control must be set to Global On If sounding control individual preset basis the address used is dependent on the active channel Use the Scroll keys to select the setting required example BASESTATION When the setting required is selected press the key ...

Page 209: ... Analysis LQA Exchange This option enables or disables the exchange of LQA information with other stations Use the Scroll keys to select the setting required example Enabled When the setting required is selected press the key ...

Page 210: ... station it can be set to Current LQA which is a reading taken during the ALE burst just received or it can be set to Averaged LQA which uses the long term averaged value taken from memory Use the Scroll keys to select the decay time or disable example Averaged LQA When the setting required is selected press the key ...

Page 211: ...with different weighted averages of the old values and new readings Averaging reduces the effect that one bad reading might otherwise have on a perfect channel If a new reading is better than an old value the old value is replaced by the reading There are 4 different averaging formulas available No averaging replace the old values with new values old new 2 3 old new 4 7 old new 8 Use the Scroll ke...

Page 212: ...tching the sounding off and setting a decay rate of two hours would result in the recording of a perfect channel 100 channel quality decaying to an unusable channel 0 channel quality over a period of two hours The decay rate can be disabled set to 1 2 4 8 24 and 48 hours Use the Scroll keys to select the decay time or disable example 8 hours When the setting required is selected press the key ...

Page 213: ... select which type of threshold test is used to determine what quality ALE channel is acceptable for communication Either Sinad BER Both or None can be selected Use the Scroll keys to select the test required example BER press the key ...

Page 214: ...d This option sets the SINAD threshold at which an ALE channel is considered usable This can be set to between 0 and 30 dB press the key using the numeric keys enter the SINAD threshold required example 12 dB then press the key ...

Page 215: ...process is rejected Depending on the retry setting the link establishment would continue on another link It can be set between 0 30 selecting 30 effectively means that all links are allowed press the key using the numeric keys enter the BER threshold required example 7 then press the key ALE Fill Mode The ALE is configured with its entire network data using the Barrett 2000 Series PC based program...

Page 216: ...on the auxiliary socket on the 2050 transceiver Programming Using the Barrett Cable P N BCA90023 BCA204020 To program the transceiver using the RS 232 port of your PC or Laptop plug one of the cables mentioned above depending on whether you are programming a 2050 or a 2050 in the manpack adaptor into the PC or laptops serial port The other end should be plugged it the accessory socket of the trans...

Page 217: ...sary to have this function enabled To enter the programming mode first select the channel you want to program then press the key Transmit and Receive Frequencies Use the numeric keypad to enter the receive frequency then press the or key Use the numeric keypad to enter the transmit frequency then press the or key ...

Page 218: ...ntered in the General section of the protected menu then press the or key Operating Mode Use the Scroll keys to select the required operating mode USB LSB AM CW or AFSK then press the or key Note If the 500 Hz or narrow filter hardware option is enabled this filter is automatically selected in CW mode and AFSK mode ...

Page 219: ...ket Selection Each channel can be directed to use either the default antenna socket or the auxiliary antenna socket This is useful if two antennas are used for different frequency ranges Note The default antenna socket is ANT 1 the Auxiliary antenna socket is ANT 2 Use the Scroll keys to select the required antenna socket 1 or 2 then press the or key ...

Page 220: ...nning of this manual Use the Scroll keys to select the required Selcall format then press the or key This last key press displays the following screen indicating the channel programming is complete The channel program sequence can be aborted at any stage in the programming sequence by pressing the key after which the following is displayed ...

Page 221: ...transceiver fitted in the manpack adaptor to another using a cable Barrett P N BCA90024 or BCA204020 connecting both transceivers together via their auxiliary connectors using the RS 232 connection Before uploading commences it is necessary to enter the Selcall IDs of the transceiver that will be loaded press the key Using the numeric keypad enter Self ID 1 and press the key Using the numeric keyp...

Page 222: ...222 of 285 Using the numeric keypad enter Six digit ID and press the key then press the key to proceed with cloning If there are any problems with the cloning then an error screen is shown ...

Page 223: ... MP and High Power HP are both 30 Watts The Barrett 2040 Manpack Adaptor Comprises An automatic antenna tuner for operation with a collapsible whip or long wire A removable 10Ah Lithium Ion battery cartridge An inbuilt battery management system that charges and operates the manpack with DC input voltages between 22 V DC and 26 allowing operation from 24 V vehicle sources 24 V solar panels and 24 V...

Page 224: ...224 of 285 Fitting the 2050 Into the 2040 Manpack Adaptor Removing the Battery Cartridge ...

Page 225: ...nput of between 22 V DC and 26 V DC is supplied to the unit This DC power supply can be generated in several ways 1 From a 24 V vehicle power source using DC power cord Barrett P N BCA204006 2 24 V DC Tactical solar panel Barrett P N BCA204010 3 24 V DC Hand crank generator Barrett P N BCA204011 4 From a mains AC supply between 100 VAC and 254 VAC or DC supply between 11 and 18 V DC using the Barr...

Page 226: ... the AC DC input universal power adaptor P N BCA204007 Alternatively the external battery management unit can be powered without the use of the AC DC input universal power adaptor by a 24 V source such as the following 1 From a 24 V vehicle power source using DC power cord Barrett P N BCA204006 2 24 V DC Tactical solar panel Barrett P N BCA204010 3 24 V DC Hand crank generator Barrett P N BCA20401...

Page 227: ...rogress of the charge process If no battery charging icon is visible it indicates the charging device is not connected or connected but not providing charge or is connected but switched off The battery icon with a moving line running from left to right indicates that the battery is charging The battery icon stationary and filled black indicates that the battery is charged and the charger is now tr...

Page 228: ... the Barrett manpack while walking in the backpack configuration it is suggested that while in receive standby mode the collapsible antenna be only extended to half height and secured using the Velcro tab When a call is received extend the antenna to full height before transmission Note When using an un tuned antenna such as the whip or the long wire the section 2040 Antenna Select in the standard...

Page 229: ...e available and as high as possible Note When using an un tuned antenna such as the whip or the long wire the section 2040 Antenna Select in the standard menu should be used to enable the automatic tuner i e select Whip Long wire operation When this is selected the in built tuner automatically tunes the whip or long wire whenever the unit transmits after a channel change ...

Page 230: ...or the long wire antenna efficiency can be increased by the use of the counterpoise supplied This is connected to the 2040 via the BNC connector connected to the counterpoise The three radials should be spread out on the ground as indicated in the diagram below ...

Page 231: ... 2040 manpack adaptor Both ESU s acquire satellite timing information so must be in view of the sky i e cannot be operated inside buildings This is why one version of the ESU has an extension lead to enable the ESU to be positioned outside if operating within a building Both ESU s can be used to supply position information for position tracking operations To operate the manpack in frequency hoppin...

Page 232: ...dband antenna from the winding bobbin supplied Push the earth stake into the ground Clip the short wire from the balun box with the coaxial connector on it to the earth stake using the crocodile clip supplied Hang the wire section of the antenna in any configuration convenient as indicated in the diagrams below Note the higher from the ground the more efficient the antenna will be Connect the coax...

Page 233: ...d secure the cable into the slots provided on the bobbin The nylon halyard should then be unwound and laid out if required Push the earth peg into the ground The radiating end of the end fed dipole is now ready to be elevated into a working position either on a tree or some elevated natural object using the lead weight and nylon halyard If you have a mast available the antenna may be slung from th...

Page 234: ... Balanced audio in 1 600 Ω 24 dBm to 0 dBm E Bal Audio In 2 Balanced audio in 2 600 Ω 24 dBm to 0 dBm F Aux PTT PTT in Active low 0 V G RS 232 Tx RS 232 Tx data True RS 232 levels H RS 232 Rx RS 232 Rx data True RS 232 levels J Scan Stop Scan stop input Active low 0 V K PTT Out PTT output to external equipment Active low 0 V L Aux Dig Out 2 Auxiliary digital output future use Active low 0 V M Gnd ...

Page 235: ... D CW key CW key input Active low 0 V E Gnd Ground Ground 0 V F N C Not connected Handset Socket 6 pin waterproof panel mounted socket Pin Name Description of function Level A Handset PTT PTT input from handset Active low 0 V B Handset audio in Handset mic audio C Speaker mic PTT PTT input Active low 0 V D Speaker audio out Loudspeaker output 0 10 V E Speaker mic audio in Unbalanced audio in F Gnd...

Page 236: ...el mounted socket Pin Name Description of function Level A VIn External supply input positive 22 to 28 V DC B VIn External supply input positive 22 to 28 V DC C Gnd External supply input negative 0 V DC D Gnd External supply input negative 0 V DC ...

Page 237: ...0 Transceiver Changing the 2050 transceiver from a desktop unit to a remote control trunk mount unit using the Mobile Pack P N BCA20501 Use a flat bladed screwdriver to gently lever the side clip open and pull the remote head unit forward ...

Page 238: ...d transceiver body and replace with the long interface cable Insert the speaker cable into the correct socket on the remote head Replace the cover on the transceiver body taking care to place the cable grommet around the interface cable If required this cover whilst having clips can then be secured with M3 screws to provide a solid cable clamp ...

Page 239: ...s on the remote head Place the blanking grommet into the unused slot Replace the plastic cover on the remote head If required this cover whilst having clips can then be secured with M3 screws to provide a solid cable clamp Attach the RAM mount using the 2 x M5 screws provided to the centre of the remote head ...

Page 240: ...pment for any transit damage If damage has occurred notify your supplier immediately and gain their advice on further action Failure to do this could affect the warranty covering the equipment Fixed Station Installations Transceiver Position The following should be considered when choosing a position for the transceiver Operating Convenience The transceiver should be placed so that the operator is...

Page 241: ...nsumption of the transceiver is low but during transmission of voice peaks high current is needed for short intervals This means that the power supply cable must be heavy enough to supply these short duration current peaks without excessive voltage drop Preferably use only the power cable supplied with the transceiver If extra cable is required use a cable with a conductor square area of no less t...

Page 242: ...ration the major radiation direction is broadside to the antenna When mounted in the inverted V configuration the antenna becomes fairly Omni directional In the horizontal configuration the minimum distance between the masts is 49 metres and the recommended mast height is 15 metres In the inverted V configuration the recommended mast height is 15 metres and at this height the 2 metre stub masts ar...

Page 243: ... eye on the top of the balun is used to attach the support halyard As with all antenna installations ensure the antenna is as far from sources of electrical interference as possible and in a position that makes it impossible for the antenna to come in contact with high voltage overhead mains wiring ...

Page 244: ... In the horizontal configuration the minimum distance between the masts is 32 metres and the recommended mast height is 15 metres In the inverted V configuration the recommended mast height is 15 metres and at this height the 2 metre stub masts are each installed at a minimum of 19 metres from the mast base In this configuration the mast must have an offset or out rigger bracket at least 0 8 metre...

Page 245: ...sed to attach the support halyard In the horizontal configuration the balun hangs below the antenna As with all antenna installations ensure the antenna is as far from sources of electrical interference as possible and in a position that makes it impossible for the antenna to come in contact with high voltage overhead mains wiring ...

Page 246: ...mounted on top of a mast or tower Make sure that the site selected for the antenna is as far from any source of electrical interference as possible and that under no circumstances it can come in contact with high tension power lines After mounting the helical dipole hub on the mounting pole remove the front circular cover pass the coaxial cable through the hole at the bottom of the hub Screw the U...

Page 247: ...ency the helical dipole was manufactured for at what frequency the best VSWR is obtained If this occurs at a frequency below the required frequency then the tips will have to be shortened on the pair of elements corresponding to that frequency If the best VSWR occurs on a frequency higher than the required frequency then the tips will have to be lengthened Adjust both ends by an equal amount and r...

Page 248: ... only one mast As a guide when installing the masts the length between insulators of a half wave wire dipole is 142 frequency of dipole in MHz metres To this an allowance should be made for extra insulators and halyards i e a 3 7 MHz dipole length between the insulators 142 3 7 38 38 metres Wire dipoles supplied by Barrett are pre cut to a specified frequency but have adjustable ends These adjusta...

Page 249: ... than the required frequency then the dipole is too short Drop the dipole and adjust both ends by an equal amount and repeat the above sequence until an optimum VSWR is obtained If a tunable transmitter is not available use a method of trial and error shortening or lengthening the dipole ends a little at a time until optimum VSWR is obtained Remember to always adjust each end by the same amount as...

Page 250: ... and as close to the ground earth point as possible The interconnect cable supplied with the antenna tuner should be routed away from other cables back to the transceiver and connected as indicated in the diagram The maximum interconnect cable should be less than 25 metres Ground earth System The ground earth system is a key part of the overall antenna system and consequently the system operation ...

Page 251: ...ated by the clattering of the tuner relays After a few seconds the relay noise will cease the transceiver should indicate a successful tune and the watt meter reflected power should indicate a low value consistent with a VSWR of better than 2 1 Now select the lowest desired frequency on the transceiver and repeat the above procedure The result should be the same except that the tune cycle may take...

Page 252: ...na Microphone Manual circuit breaker P N FU 04823 6 metre power cable supplied with transceiver 2050 transceiver body Extension speaker supplied with 2050 transceiver External GPS receiver option Connection for external fan unit Auxiliary connector Coaxial Control Cable P N BCA90032 Optional 6 or 10 metre extension cable with connectors P N BCA90032 40 ...

Page 253: ...behind the seat under the dash board if safe Where a remote controlled transceiver is used only the control head need be mounted convenient to the operator The transceiver may be mounted under a seat in the luggage compartment or any other out of the way place within the vehicle which allows for sufficient cooling All equipment should be positioned in such a way that convenient access for maintena...

Page 254: ... of the battery Do not connect to the ignition switch or internal fuse panels as vehicle wiring to these points is of insufficient current capacity causing voltage drop and possible noise interference fit a suitable manual circuit breaker P N FU 04823 as near as practicable to the battery connection in the positive red wire route the power cable away from high tension ignition wiring secure the po...

Page 255: ...ol head Cable with RJ45 connectors P N BCA29995 Microphone Manual circuit breaker P N FU 04823 supplied in mobile pack 6 metre power cable supplied with transceiver 2050 transceiver body Extension speaker supplied with 2050 transceiver Connection for external fan unit Coaxial Control Cable P N BCA90013 Auxiliary connector External GPS receiver option ...

Page 256: ...na To obtain maximum radiation the antenna base must be well bonded electrically to the vehicle chassis Paint dirt rust etc should be removed from the respective fixing points The mounting point must provide a low resistance electrical path to the main vehicle metallic structure Antenna Feed Cables Antenna feed cables should be run as far as possible away from other vehicle wiring and especially a...

Page 257: ...rs P N BCA29995 Microphone Manual circuit breaker P N FU 04823 supplied in mobile pack 6 metre power cable supplied with transceiver 2050 transceiver body Extension speaker supplied with 2050 transceiver Connection for external fan unit Coaxial Control Cable P N BCA90032 Auxiliary connector External GPS receiver option Optional 6 or 10 metre extension cable with connectors P N BCA90032 40 ...

Page 258: ...CA29995 Microphone Manual circuit breaker P N FU 04823 supplied in mobile pack 6 metre power cable supplied with transceiver 2050 transceiver body Extension speaker supplied with 2050 transceiver Connection for external fan unit Interface cable integral coaxial control and optional GPS connection Auxiliary connector External GPS used if optional internal 2019 GPS unit is not required or fitted Ear...

Page 259: ...hat with motor and accessories off If a detectable difference does exist turn off all accessories one by one until a change in noise results Continue noting each contributing unit until there is no detectable difference from the all off noise level For accessories such as alternator motors instruments etc a wire or drive belt may have to be temporarily removed for this assessment After identifying...

Page 260: ...ay result Separate the wire from all other wiring keep it as short as possible and if longer than about 300mm it should be shielded as described above Other Regulator Wires These are normally adequately suppressed using good low inductance bypass capacitors To be effective these capacitors must connect to the wires to be suppressed and to chassis with very short leads For this reason the pigtail s...

Page 261: ...or generator may only be troublesome over a limited range of engine speed and can also be influenced by the state of charge of the battery The noise from instrument regulators may depend on the battery voltage the reading of the instrument and the length of time the system has been switched on For this reason the search for noise sources must be done thoroughly to prevent noise from apparently rea...

Page 262: ...enna installation guide and a pre terminated 6 metre control cable to suit the Barrett 2019 antenna to transceiver A 6 metre Barrett P N BCA201904 or 10 metre Barrett P N BCA201902 extension cable for the control cable is also available The control cable should be routed into either the engine compartment or boot trunk of the vehicle If the joint between the antenna control cable and the extension...

Page 263: ...nd vibration to military specifications on tyred vehicles some mounting positions on large prime movers particularly front mounted bull bars are subject to vibration that far exceeds this specification Do not mount the 2019 antenna in positions such as these as damage to the antenna may result ...

Page 264: ...264 of 285 Antenna Assembly Mounting the Base Spring The base spring should only ever be hand tightened if a tool is used it may damage the spring base ...

Page 265: ...itable tool i e a spanner can be used to tighten the section a further 10 to 20 degrees clockwise while holding the antenna body with a free hand To mount 2 whip sections together the unattached whip section should be hand tightened fully then a suitable tool i e a spanner can be used to tighten the section a further 10 to 20 degrees clockwise while holding the already screwed on whip section with...

Page 266: ... Barrett 2019 antenna tunes to maximise whip current not minimise VSWR but the displayed VSWR value should generally be between 1 0 1 and 2 0 1 However if the display shows Autotune Fail accompanied by low pitched beeps at any point the Barrett 2019 antenna has failed tune Confirm the Antenna Type is selected as either 910 Mobile Antenna or 2019 Mobile Antenna in the transceiver Protected Menu I O...

Page 267: ...ed in the diagrams below Select a position free from excessive vibration A bracket fabricated to withstand the forces and vibration that can be expected during off road driving should be used to mount the antenna to the vehicle When locating the mounting position for the antenna ensure that the antenna body when flexing on its vibration mount cannot come into contact with other parts of the vehicl...

Page 268: ...ed to withstand vibration to military specifications on tyred vehicles some mounting positions on large prime movers particularly front mounted bull bars are subject to vibration that far exceeds this specification Do not mount the 910 antenna in positions such as these as damage to the antenna may result ...

Page 269: ...l joints to bare metal and use copper braid earth straps if any non metallic joints are encountered After mounting the main body of the antenna screw the black coil onto the antenna body followed by the stainless steel whip Note Some models of the 910 antenna have a one piece spring and a stainless steel whip in place of the coil and whip ...

Page 270: ...e To test the antenna attach a VSWR meter in line with the coaxial cable at the transceiver Select any channel on the transceiver and activate PTT or use the tune function on the transceiver The antenna should tune indicated by the sound of relays clattering within 2 seconds Use the tune function to check the VSWR of the antenna it should be less than 2 1 If the tune sequence does not occur check ...

Page 271: ... the chassis of the vehicle via a very low resistance path i e clean all joints to bare metal and use braid earth straps if any non metal joints are encountered Use only good quality coaxial cable and water proof UHF connectors such as those supplied by Barrett Communications Do not use PL 259 UHF connectors When running the coaxial cable from the antenna to the transceiver avoid sharp corners and...

Page 272: ...ens when the antenna is mounted too far away from the body of a vehicle Either re site the antenna closer to the vehicle or remove any tuning rings which are already on the antenna If the VSWR gets worse when following the above procedure then too much capacity is already present this is frequently encountered when mounting the antenna too low on a vehicle bumper bar or when mounting close to body...

Page 273: ... 8199 kHz Channel 7 9134 kHz Channel 8 9145 kHz Channel 9 10567 kHz Channel10 14567 kHz When using Channel 1 frequency 4030 kHz the jumper lead should be removed from the bottom antenna socket and stored in the vehicle On all other channels the jumper lead is required For Channel 2 frequency 4760 kHz the jumper is plugged into the bottom socket then wound tightly around the antenna and the other e...

Page 274: ...00 mm from the mast and the bottom insulator should be at eye level above the deck The distance between insulators should be greater than 10 metres and less than 35 metres A whip antenna is generally used on small to medium sized power vessels There are different length whips to suit the vessel length Transceiver and tuner mounting Select a suitable position in the vessel to mount the transceiver ...

Page 275: ... E plate Barrett P N BCA91700 If the vessel is yet to be constructed then in the case of fibreglass vessels a thin copper sheet with an area of not less than 4 square metres should be moulded into the hull during lamination A suitable heavy strap should be connected to the sheet and left free for earth connection Should neither of these methods be available it will be necessary to bond as many lar...

Page 276: ...01 Antenna Manual circuit breaker P N FU 04823 6 metre power cable supplied with transceiver 2050 transceiver body Extension speaker supplied standard with 2050 transceiver External GPS receiver option Connection for external fan unit Auxiliary connector Coaxial Control Cable P N BCA90032 Optional 6 or 10 metre extension cable with connectors P N BCA90032 40 Microphone ...

Page 277: ...an 2 1 If the cover of the tuner is removed the PCB mounted tuned LED should be illuminated Now select the lowest desired frequency on the transceiver and repeat the above procedure The result should be the same except that the tune cycle may take somewhat longer If the above procedure does not give the results as indicated check that the antenna length and connections are correct and re check all...

Page 278: ...5 1PPS 1 PPS timing pulse TTL level from GPS 6 GPS RX GPS TTL data input Fan connector Automatic antenna 1 13 8 V DC 1 Preamp active low 910 2019 2 Fan control active low 2 13 8 V DC interrupted for 910 2019 tune initiate 3 Tuned tune successful low going pulse 4 Ground 0 V Power connector 1 Fan control out Active low 0 V 2 Speaker out External speaker 0 10 V 3 N C 4 N C 5 N C A1 13 8 V DC input 1...

Page 279: ...232 Gnd RS 232 Ground 0 V 8 ALC In Ext ALC from Linear Amp 0 10 V 9 PTT In Auxiliary PTT input Active low 0 V 10 Aux dig in 1 Scan stop input from external modem Active low 0 V 11 Bal Tx Audio In Balanced Tx audio input with pin 24 600 Ω 24 dBm to 0 dBm 12 Bal Rx Audio Out Balanced Rx audio output with pin 25 600 Ω 6 dBm to 9 dBm 13 Ground Ground 0 V 14 Aux dig out 0 Linear LPF select Active low 0...

Page 280: ...e transceiver there are usually two components The ground wave which travels directly from the transmitting antenna to the receiving antenna following the contours of the earth The sky wave which travels upward and at an angle from the antenna until it reaches the ionosphere an ionised layer high above the earth s surface is refracted back down to earth to the receiving antenna Generally speaking ...

Page 281: ...ove the ground Propagation from Station A to C and D however is by sky wave and as the diagrams illustrate the sky wave is significantly affected by the time of day and the height of the ionosphere above the ground Under each diagram there are recommended working frequencies listed Please note that these will vary according to time of year and other factors They are intended only as a guide and ar...

Page 282: ... function built into the Barrett transceiver makes finding the correct frequency to use easy Beacon Call is based on the network transceivers all having a selection of frequencies that will accommodate most ionospheric conditions When in standby the network transceivers scan these frequencies waiting for a call Selcall or Beacon Call from another transceiver The transceiver wishing to check for th...

Page 283: ...terference may cause a continuous or intermittent increase in the level of background noise System Configuration and Installation The method in which your system is configured and installed will also affect the success of your HF SSB communications Your choice of antenna system and power supply is critical Correct installation is also extremely important An HF SSB transceiver is generally installe...

Page 284: ...arranty shall not cover any abuse accident improper installation connection adjustment or use other than in accordance with the instructions issued by the company In addition this warranty shall not cover the distance which transceiver products will operate over or quality of transmission or reception as a result of unfavourable environmental conditions Nor shall this warranty cover the quality of...

Page 285: ...pment Barrett Communications will provide you with direct access to a support telephone contact line manned from 0000hrs GMT to 1600 Hrs GMT 7 days a week The registration forms can be returned by mail no postage stamp required in Australia or by facsimile 08 9418 6757 International 618 9418 6757 If you have access to the Internet you can use the warranty registration page in the support section o...

Reviews: