background image

3

2

EN

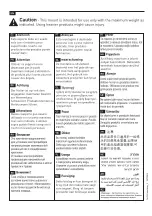
Caution!! Ignoring the safety instructions may lead to the falling of the mount/

shelf and/or the electrical appliance. If you are not able to/or lack the experience 

to carry out wall or ceiling installation, contact a suitable professional installer 

or contact the store of purchase for further advice. If installed by an appropriate 

professional, please, make sure he/she has the necessary experience in 

assembling mounts and has read and understood the safety and assembly 

instructions.

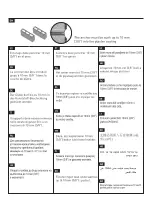
1. Wall/ceiling installation surface – The supplied screws and bolts are only suitable for 

attaching to walls and ceilings made of: concrete, standard 10 cm or more concrete blocks, 

wood studs/ joists of  minimum depth 10 cm.  (Standard 7cm concrete blocks are suitable for 

the installation of fixed mounts or movement mounts carrying electrical appliances weighing 

a maximum of 25 kg). Do not install on walls and ceilings made of: gypsum board, drywall, 

light processed blocks, Silicate boards/bricks, dry, weak or very old blocks or wooden panel! 

For installation on gypsum or light processed blocks please call an authorized installer or 

appropriate building specialist to install the product.

2. Position and height of the installed product -


Install in such a place where collision with 

the product will not lead to injuries. Do not install in hallwaysor above beds and chairs.

3. Keep children and unnecessary bystanders away from the assembly area.

4. Tightening of bolts and screws -


Carefully tighten all bolts and nuts of 6mm / 1/4 inch         

        diameter or less, in order to avoid breakage.

5. Installation strength check -


After installing the mount/shelf to the wall or 

         ceiling, perform a strength test of the weight load as indicated in the assembly ins. 

6. Checking the electrical component attachment to the mount -


Following the installation 

of   your home entertainment component, check that it is well  connected, securely attached 

(per instructions) and can not slip off or disconnect. If unsure regarding the connection of 

the component to the mount, consult either the store of purchase or visit our website at 

www.barkanmounts.com and open the FAQ (frequently asked questions) page or contact us 

through the site.

7. Mounts with quick connect/disconnect mechanism -


After connecting your home 

entertainment component to the mount, make sure it is well connected by pulling slightly on 

the connection.  When disconnecting the component- whilst holding the component firmly, 

remove the security bolt (if one present), press the disconnect mechanism and remove the 

component carefully according to the assembly instructions.

8. Periodic maintenance checks -


One month after installation, please check that A. The 

mount is tight against the wall/ceiling. B. The home entertainment component is well attached 

to the mount/shelf. C. The nuts, bolts and belts (CRT models) have not loosened. Repeat the 

maintenance checks every six months following installation. If any faults are found, remove 

the home entertainment component from the mount and reassemble the mount as per the 

assembly instructions.

9.  Movement mounts -


oil slightly all pivot points on installation (except the pivot points 

inside the LCD/Plasma tilt mechanism) and afterwards once a year or whenever movement 

becomes difficult. A. TV (CRT)/VCR mounts – To adjust the viewing angle of the componen– 

push or pull the mount only. Do not push or pull your home entertainment component. B. 

LCD/Plasma/Projector mounts can be turned and tilted by moving the actual screen or 

projector. Be careful to carry out all movements gently.

Barkan Mounts Ltd is not responsible for the installation.

Please ask your installer for an installation warranty certificate.

PRODUCT LIABILITY - product warranty years appears on product packaging as 

well as in company website www.barkanmounts.com

Dear Customer - Thank you for purchasing Barkan's high quality product.  We wish 

you many hours of pleasant viewing and listening. Barkan Mounts Ltd. warrants that 

it will replace or repair this item, free of charge, according to Barkan's discretion 

if it should prove defective in materials or workmanship. If a claim is made under 

this guarantee, the product should be returned prepaid freight, with the original 

purchasing document to your dealer or to Barkan distributor. This warranty does 

not apply to: 1. Ignoring of safety & assembly instructions. 2. Coating defects. 3. 

Normal wear. Friction damages. 4. Installing other products to the mount/ shelf, 

not manufactured by Barkan. 5. Modification or repairs not made by Barkan. 6. 

Damage caused by accident or force majeure 7. Damage caused by misuse or abuse 

or harm to the product. 8. Mounting the product to the wall/ ceiling. Installing the 

electrical appliance to the product. 9. Breakage of the plastic covers.

SAFETY INSTRUCTIONS & WARRANTY

Summary of Contents for E410

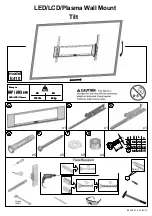
Page 1: ...as s s sm m m ma a a a US US US US EU EU EU EU 1 1 1 13 3 3 32 2 2 2 l ll lb b b bs s s s 6 6 6 60 0 0 0 k k k kg g g g A A A A C C C C x1 D D D D x5 E E E E x1 B B B B x1 model E410 F F F F x9 No 2 3...

Page 2: ...Page 2 of 4 H F I F J 1 1 1 1 1B 1A 1 1 1 1A A A A 1 1 1 1B B B B 2 2 2 2 G H F I F J G B C B C...

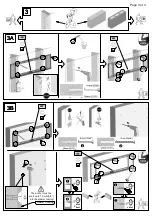
Page 3: ...Page 3 of 4 4 3 3 3 3A A A A 3 3 3 3B B B B 4 A A D 3 3 3 3 3B 3A The anchor must be sunk up to 10 mm 3 8 into the plaster coating Plaster Coating x Min 2 Min 4 Max 9 X E F A D E F...

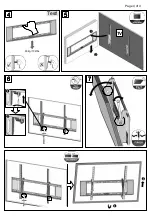
Page 4: ...Page 4 of 4 Test 4 4 4 4 5 5 5 5 6 6 6 6 7 7 7 7 60kg 132lbs TV...

Page 5: ......

Page 6: ......

Page 7: ......

Page 8: ......

Page 9: ...07 PT 08 NL 09 EL 10 BG 11 PL 12 CS 13 SL 14 DA 15 HU 16 TR 17 RO 18 S 19 SK 20 KZ 21 LV 22 CN 23 AR 24 HE 25 For further information visit us at WWW BARKANMOUNTS COM SAFETY INSTRUCTIONS WARRANTY Eur...

Page 10: ...omponent to the mount make sure it is well connected by pulling slightly on the connection When disconnecting the component whilst holding the component firmly remove the security bolt if one present...

Page 11: ...informaci n Si la instalaci n la realiza un profesional calificado asegurese por favor que tiene la necesaria experiencia en instalar soportes y que ha le do y entendido las instrucciones de seguridad...

Page 12: ...puyant doucement sur la connexion D connexion du mat riel Otez l crou de s curit s il est present faite jouer le m canisme de d connexion et retirer l cran soigneusement en vous conformant aux instruc...

Page 13: ...aben versichern Sie sich durch leichtes Ziehen an der Verbindung ob es fest genug ist Bei Trennung des Zubeh rs schrauben Sie w hrend das Zubeh rfest gehalten wird den Sicherheitsbolzen falls vorhande...

Page 14: ...gato il componente di spettacolo domestico alla montatura assicurarsi che sia ben fissato tirando leggermente Staccando il componente tenendolo con fermezza rimuovere il bullone di sicurezza se c prem...

Page 15: ...7 RU C 1 10 10 7 25 2 3 4 6 1 4 5 6 www barkanmounts com 7 8 9 LCD Plasma LCD LED Plasma www barkanmounts com 1 2 3 4 5 6 7 8 9...

Page 16: ...o seu componente de home entertainment montagem certifique se de que est bem conectado puxando ligeiramente a conex o Quando desconectar o componente ao segurar o componente com firmeza remova o paraf...

Page 17: ...angesloten zorgt u ervoor dat deze goed is aangesloten door zachtjes aan de verbinding te trekken Als u de component afsluit houdt u de component stevig vast verwijdert u de veiligheidsgrendel als die...

Page 18: ...a este bine prins tr g nd u or de conexiune Deconectarea componentei n timp ce ine i componenta ferm scoate i cuiul de siguran dac exist ap sa i pe mecanismul de deconectare i ndep rta i componenta cu...

Page 19: ...11 1 82 10 10 7 25 2 3 4 6 1 4 5 6 www barkanmounts com FAQ 7 8 LCD TV CRT VCR LCD 9 LCD BG LCD www barkanmounts com 1 2 3 4 5 6 7 8 9...

Page 20: ...czeniu komponentu Twojego kina domowego upewnij si e jest pod czony pewnie delikatnie ci gn za z cze Przy roz czaniu komponentu chwy delikatnie komponent wyjmij ko ek zabezpieczaj cy je li obecny naci...

Page 21: ...n va ich prvk syst mu dom c z bavy k dr ku se ujist te e je spojen pevn m rn m zata en m P i odpojov n sou sti kdy dr te sou st pevn odstra te bezpe nostn roub pokud je p tomn stiskn te rozpojovac mec...

Page 22: ...hiter vklop izklop ko boste priklju ili komponento za doma i zabavni sistem na podstavek zagotovite da je dobro priklju ena tako da rahlo povle ete za povezavo Ko boste eleli kompo nento izklju iti ko...

Page 23: ...beslaget kontrolleres at det er korrekt monteret ved at tr kke let Ved demontering af komponenten holdes den fast mens en evt sikringsbolt fjernes og demonteringsmekanismen trykkes ned og komponenten...

Page 24: ...sa ut n az install ci ba ellen rizze hogy helyesen van e csatlakoztatva gy hogy enyh n megh zza a csatlakoz st Az elem lecsatlakoztat sa sor n mik zben er sen fogja az adott elemet t vol tsa el a bizt...

Page 25: ...ba lant dan hafif e ekerek iyi ba land ndan emin olun Bile enin ba lant s n kesti inizde bile eni s k ca tutarken sabitleme c vatas n kar n varsa ba lant y kesme mekanizmas na bas n ve bile eni monta...

Page 26: ...nectare Dup conectarea componentei sistemului la suport asigura i v c aceasta este bine prins tr g nd u or de conexiune Deconectarea componentei n timp ce ine i componenta ferm scoate i cuiul de sigur...

Page 27: ...genom att dra n got i anslutningen N r du fr nkopplar komponenten samtidigt som du h ller i komponenten ordentligt ta bort s kerhetsbulten om en s dan finns tryck p fr nkopplingsmekanismen och ta bor...

Page 28: ...y do in tal cie skontrolujte i je spr vne pripojen jemn m potiahnut m za spojenie Pri odpojen komponentu pri om pevne dr te dan komponent odstr te bezpe nostn z str ku ak je pr tomn stla te odp jac me...

Page 29: ...21 1 10 10 7 25 2 3 4 6 5 6 7 8 CRT KZ 9 CRT VCR Barkan Mounts Ltd www barkanmounts com www barkanmounts com Barkan Mounts Ltd Barkan 1 2 3 4 Barkan 5 Barkan 6 7 8 9...

Page 30: ...s ar interneta m jas lapas pal dz bu 7 Stiprin s ar tru savienojuma atvienojuma meh nismu P c m jas izklaides centra da as pievieno anas pie stiprin juma p rliecinieties par to ka tas ir stingri pievi...

Page 31: ...23 CN...

Page 32: ...24 1 10 7 10 25 2 3 6 4 4 1 5 6 www barakanmounts com 7 8 AR 9 www barkanmounts com 1 4 3 2 6 5 7 9 8...

Page 33: ...25 1 10 7 10 25 www ytong co il 2 3 6 4 5 6 www barkanmounts com 1 800 227 526 7 8 HE 9 LCD LCD www barkanmounts com 2 1 3 4 5 6 7 8 9...

Page 34: ...1 800 BARKAN 227526 03 5590096 03 5505696 18 e mail sales il barkanmounts com web site www barkanmounts com 1 2 3 4 5 www barkanmounts com...

Reviews: