


4. Getting Started
To restart the image projection:
•
Press
PAUSE
key
4.10 Quick lens adjustment
Overview
•
Lens Adjustment via Control Buttons on Projector
•
•
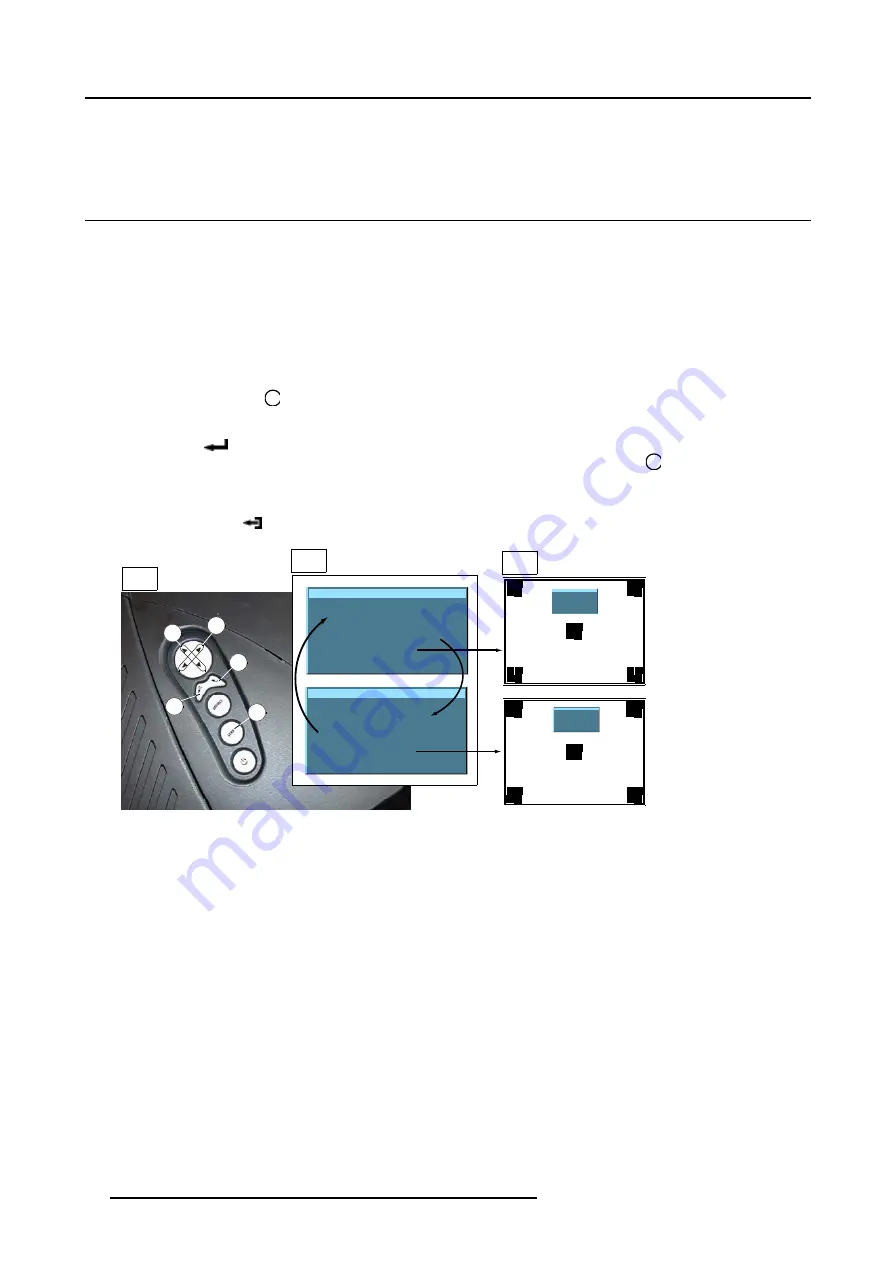
4.10.1 Lens Adjustment via Control Buttons on Projector
How to enter the adjustment menu.
1. Press the control button
Lens
(C).
The lens adjustment menu appears on the screen, requesting for ZOOM/FOCUS alignment.
2. Press button
(B) to toggle between ZOOM/FOCUS and Vert. Hor. SHIFT menu.
Note:
For the alignment, a lens adjustment test pattern can be activated: toggle control button
Lens
(C) to activate or deactivate
the lens adjustment test pattern.
3. Press the corresponding arrows (A1) or (A2) on the adjust button, as indicated in front of the menu items, for alignment.
4. Press control button
(D) to leave the lens adjustment menu. (image 4-12)
Lens adjustment
Use
↑
and
↓
for zoom
Use
←
and
→
for focus
Press <enter> for SHIFT mode
Press <LOGO> or <LENS>
for test pattern
Lens adjustment
Use
↑
and
↓
for vertical shift
Use
←
and
→
for horizontal shift
Press <enter> for ZOOM/FOCUS
Press <LOGO> or <LENS>
for test pattern
A2
B
C
D
A1
1
2
3
Lens adjustment
Use
↑
and
↓
for zoom
Use
←
and
→
for focus
Press <enter> for SHIFT mode
Press <LOGO> or <LENS>
for test pattern
Lens adjustment
Use
↑
and
↓
for vertical shift
Use
←
and
→
for horizontal shift
Press <enter> for ZOOM/FOCUS
Press <LOGO> or <LENS>
for test pattern
Image 4-12
Lens Adjustment
1
Button panel on projector
2
Menu Zoom/Focus and Vertical & Horizontal shift
3
Same menus inserted in lens adjustment test pattern
4.10.2 Lens Adjustment via Menu Bar
How to enter the adjustment menu.
1. Press the
MENU
button (A) on the Remote Control.
The menu bar (1) appears on top of the image. (image 4-13)
2. Press
→
(A1) on adjust button to select menu item
Installation
.
A text box appears with the first item
Lens adjustment
selected (reversed text)
3. Press
ENTER
button (B) to activate the lens adjustment menu (2).
The lens adjustment menu appears on the screen, requesting for ZOOM/FOCUS alignment.
4. Press
ENTER
button (B) to toggle between ZOOM/FOCUS and Vert. Hor. SHIFT menu (2).
Note:
For the alignment, a lens adjustment test pattern can be activated: toggle button (C) to activate or deactivate the lens
adjustment test pattern (3).
5. Press the corresponding arrows (A1) or (A2) on the adjust button, as indicated in front of the menu items, for alignment.
44
R5976816 RLM R6+ PERFORMER 21/12/2005
Summary of Contents for RLM R6+ Performer
Page 1: ...RLM R6 Performer Owners manual R9010270 R5976816 02 21 12 2005...
Page 4: ......
Page 8: ...Table of contents 4 R5976816 RLM R6 PERFORMER 21 12 2005...
Page 14: ...1 Packaging and Dimensions 10 R5976816 RLM R6 PERFORMER 21 12 2005...
Page 54: ...5 Getting used with the menu structure 50 R5976816 RLM R6 PERFORMER 21 12 2005...
Page 60: ...6 Source selection 56 R5976816 RLM R6 PERFORMER 21 12 2005...
Page 64: ...7 General Menu Image 7 7 60 R5976816 RLM R6 PERFORMER 21 12 2005...
Page 91: ...8 Image Menu Image 8 46 Image 8 47 R5976816 RLM R6 PERFORMER 21 12 2005 87...
Page 92: ...8 Image Menu 88 R5976816 RLM R6 PERFORMER 21 12 2005...
Page 102: ...9 Tools Menu 98 R5976816 RLM R6 PERFORMER 21 12 2005...
Page 122: ...12 Image Files Menu 118 R5976816 RLM R6 PERFORMER 21 12 2005...
Page 144: ...14 Installation menu 140 R5976816 RLM R6 PERFORMER 21 12 2005...
Page 156: ...A Standard Image Files 152 R5976816 RLM R6 PERFORMER 21 12 2005...
Page 160: ...C Specifications 156 R5976816 RLM R6 PERFORMER 21 12 2005...


