


5. Getting started
The outline of the selected window gets a colored rectangle to indicate the selection. For the main window, the color is blue. For the
picture in picture window, the color is orange.
Once the desired window is activated (main window or picture in picture window) all keys on the remote control or local keypad can
now control that selected window.
To select the source for the picture in picture window, press Window button until PiP window is activated and then select the desired
source with the digit keys.
To select the source for the main window, press Window button until the main window is activated and then select the desired source
with the digit keys.
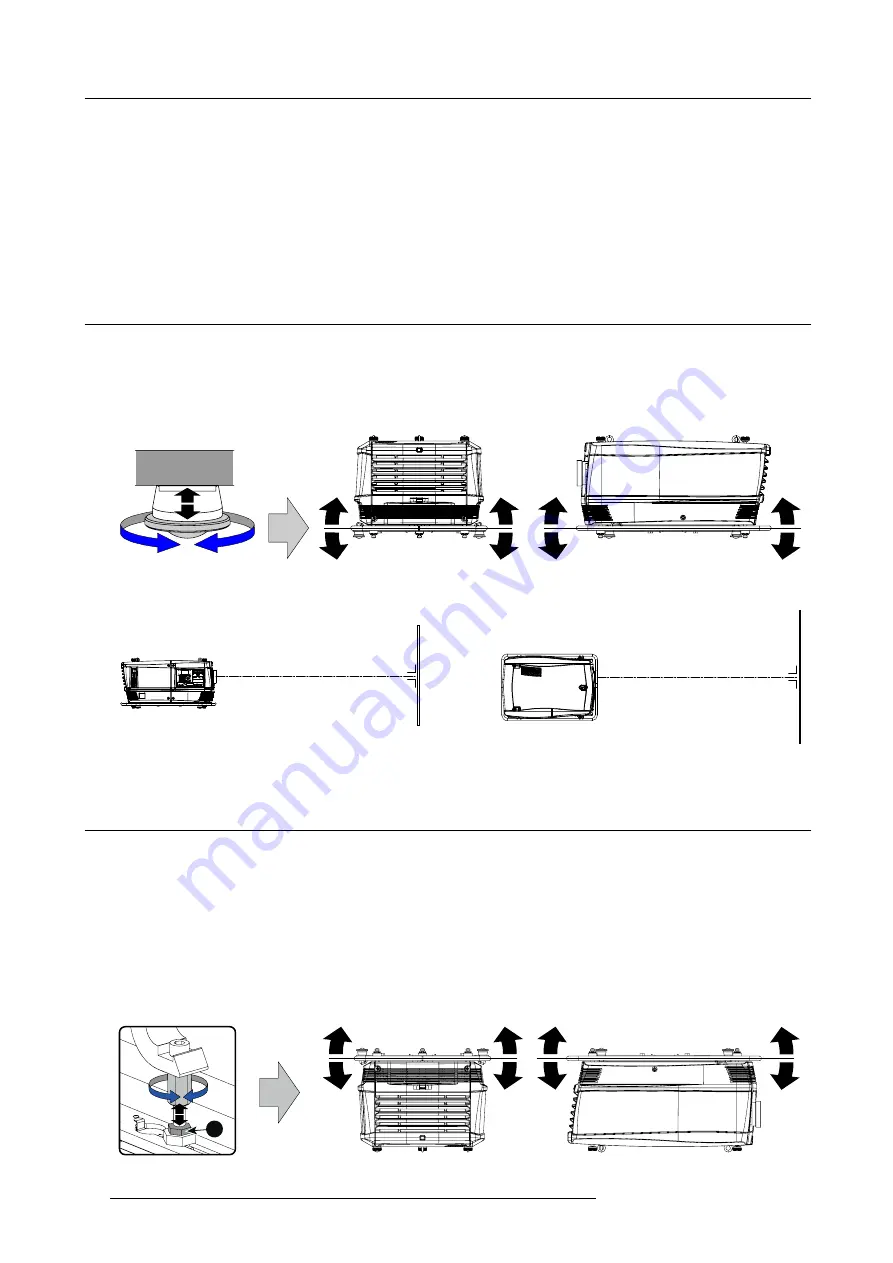
5.10 Alignment of a table mount HDF series projector
How to align a table mount HDF series projector ?
Place the projector in the desired location. Take into account the zoom range of the used lens and the size of the screen.
Project one of the internal hatch patterns on the screen.
Turn the adjustable feet in or out until the projected hatch pattern is perfectly rectangle shaped and leveled.
Image 5-9
When this is achieved, the projector is set horizontal and vertical at right angles to the screen.
SCRE
EN
SCR
EEN
Image 5-10
5.11 Alignment of a ceiling mount HDF series projector
Necessary tools
17 mm open ended spanner.
How to align
Install the projector in the desired location. Take into account the zoom range of the used lens and the size of the screen.
Project one of the internal hatch patterns on the screen.
Release the lock nut (ref B image 5-11) of the rigging clamps.
Adjust the height of the rigging clamps with respect to the projector, until the projected hatch pattern is perfectly rectangle shaped
and leveled.
B
B
Image 5-11
58
R5905158 HDF SERIES 16/06/2015
Summary of Contents for HDF W series
Page 4: ......
Page 10: ...Table of contents 6 R5905158 HDF SERIES 16 06 2015...
Page 44: ...3 Physical installation 40 R5905158 HDF SERIES 16 06 2015...
Page 52: ...4 Input Communication 48 R5905158 HDF SERIES 16 06 2015...
Page 64: ...5 Getting started 60 R5905158 HDF SERIES 16 06 2015...
Page 70: ...6 Quick set up adjustment 66 R5905158 HDF SERIES 16 06 2015...
Page 131: ...9 Image Image 9 103 Time out input R5905158 HDF SERIES 16 06 2015 127...
Page 132: ...9 Image 128 R5905158 HDF SERIES 16 06 2015...
Page 156: ...11 Lamp Image 11 30 Current light output 152 R5905158 HDF SERIES 16 06 2015...
Page 278: ...15 Maintenance 274 R5905158 HDF SERIES 16 06 2015...
Page 304: ...C Standard source files 300 R5905158 HDF SERIES 16 06 2015...
Page 308: ...D DMX chart 304 R5905158 HDF SERIES 16 06 2015...
Page 314: ...E Stacking HDF series projectors 310 R5905158 HDF SERIES 16 06 2015...
Page 318: ...F Environmental information 314 R5905158 HDF SERIES 16 06 2015...


