6. Random Access
6.5.7.4.4
Vertical Linearity adjustment
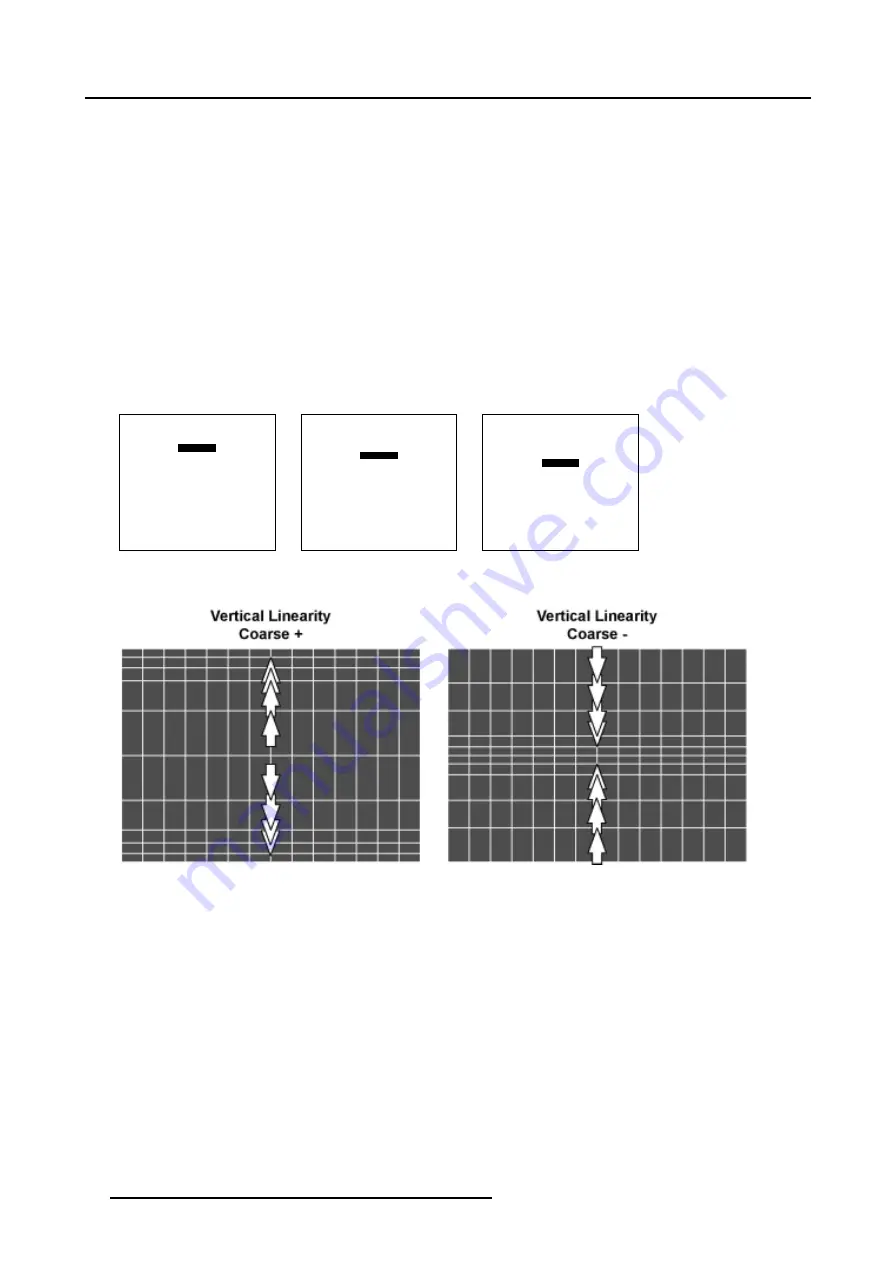
How to adjust the Vertical Linearity ?
A correct Vertical Linearity is achieved when the distances between the horizontal lines of the hatch pattern are equal or almost
equal from top to bottom.
1. Is
Vertical
Linearity selected ?
If yes, go to step 2
If no, Push the cursor key
↑
or
↓
to highlight
Horizontal
and press
ENTER
to toggle to
Vertical
.
2. Push the cursor key
↑
or
↓
to highlight
coarse
. (menu 6-72)
3. Push the cursor key
←
or
→
to perform a coarse linearity correction of both sides of the image. (image 6-30)
4. Push the cursor key
↑
or
↓
to highlight bottom. (menu 6-73)
5. Push the cursor key
←
or
→
to correct the linearity of the bottom side of the image. (image 6-31)
6. Push the cursor key
↑
or
↓
to highlight
center
7. Push the cursor key
←
or
→
to correct the linearity of the center of the image. (image 6-32)
8. When finishing the Linearity adjustments, press
EXIT
to return to the
Guided Geometry Map
menu.
LINEARITY
vertical
coarse 0
bottom 0
center 0
Menu 6-72
LINEARITY
vertical
coarse 0
bottom 0
center 0
Menu 6-73
LINEARITY
vertical
coarse 0
bottom 0
center 0
Menu 6-74
Image 6-30
Vertical Linearity coarse adjustment
82
R5976755 BARCO GALAXY WARP™ 7 HC 05/04/2004
Summary of Contents for Galaxy WARP 7 HC
Page 1: ...Barco Galaxy WARP 7 HC Owner s Manual R9040325 R5976755 00 05 04 2004...
Page 4: ......
Page 8: ...Table of contents 4 R5976755 BARCO GALAXY WARP 7 HC 05 04 2004...
Page 36: ...4 Connections 32 R5976755 BARCO GALAXY WARP 7 HC 05 04 2004...
Page 43: ...5 Getting Started Image 5 6 RCU to IR Sensors R5976755 BARCO GALAXY WARP 7 HC 05 04 2004 39...
Page 122: ...6 Random Access 118 R5976755 BARCO GALAXY WARP 7 HC 05 04 2004...
Page 150: ...9 Standard Source Files 146 R5976755 BARCO GALAXY WARP 7 HC 05 04 2004...


