


FSN Series • User’s Guide
211
5. Menu Orientation
System Menu
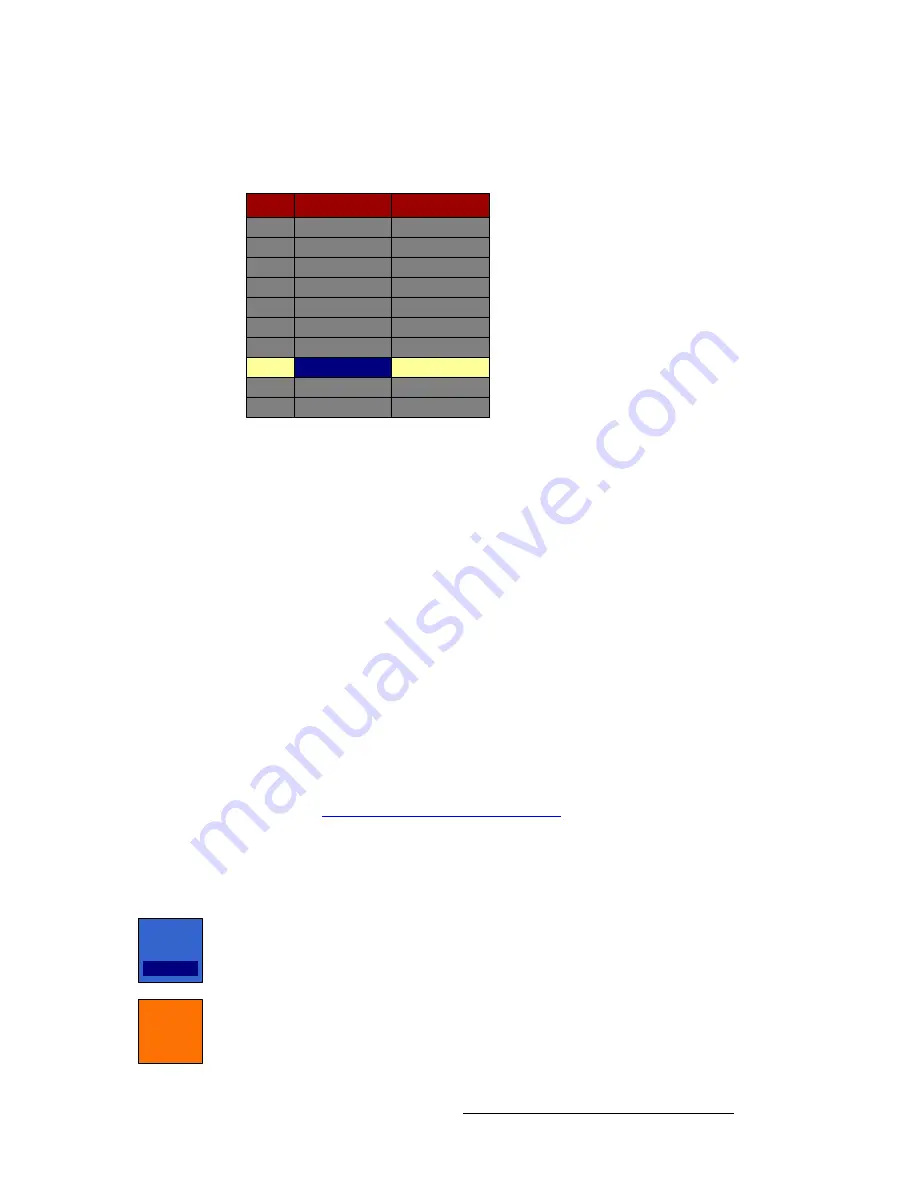
_ìííçå=j~é=q~ÄäÉ
The figure below illustrates the
Button Map Table
:
Figure 5-100.
Button Map Table (sample)
On the
Palette
, the
Button Map Table
lists the current mapping for all shifted and un-
shifted buttons. Please note:
•
The yellow highlight indicates the selected shifted or unshifted button to which a
source can be mapped. The highlight tracks the selection that is made with the
{Panel Button}
knob.
•
The blue highlight indicates whether you are mapping a source/cut or a linear key
fill. This highlight tracks the two button selections in the
Tool Bar
—
{Map
Source/Cut}
and
{Map Linear Key Fill}
.
The following columns of information are provided in the table:
•
Button
— indicates the selected shifted or unshifted button. Press
{SHIFT}
to
change the column labels from
1
-
10
to
11
-
20
.
•
Source/Cut
— displays the source (or linear key “cut” signal) that is mapped to
the selected panel button. Press
{Map Source/Cut}
to select and highlight the
field in blue.
•
Linear Key Fill
— displays the linear key “fill” signal that is mapped to the
selected panel button. Press
{Map Linear Key Fill}
to select and highlight the
field in blue.
Refer to the “
Mapping Luma Keys and Linear Keys
” section on page 213 for additional
information.
j~é=_ìííçåë=jÉåì=cìåÅíáçåë
The following adjustments are provided in the
Map Buttons Menu
:
•
Press
{Panel Button}
(or use the knob) to select the button that you wish to map.
Note that selecting buttons in this manner automatically affects the state of the
{SHIFT}
button.
•
Press
{SHIFT}
to switch between mapping un-shifted buttons and shifted buttons
on the panel:
~
When
{SHIFT}
is off, you can map buttons
1
-
10
,
and the labels in the
Button
column read
1
-
10
.
Button
Source / Cut
CAM1
CAM2
CAM3
CAM4
VT-1
1
2
3
4
5
8
VT-2
DO-1
6
7
Linear Key Fill
CHY1
CB-1
9
10
CHY2
Panel
Button
8
SHIFT


