background image

95

601–426 /15

F70 Series

The DICOM function is used to simulate DICOM gammas at a few selected max light outputs, and assumes
that both ambient light and the projector black is 0 cd/m2.

How to select the optimal DICOM Gamma

1.

Enter the menu

Image/Gamma

2.

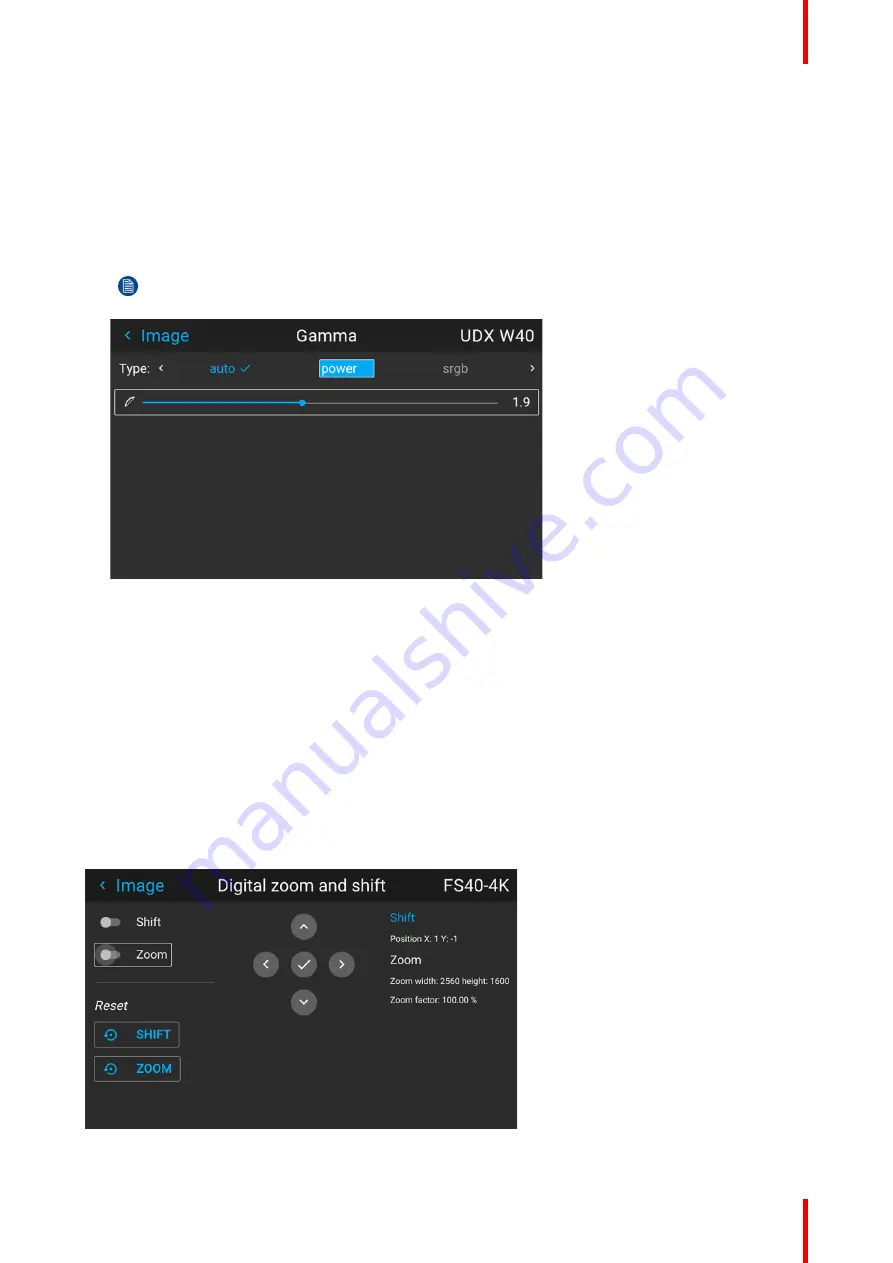
Scroll horizontally in the menu and select a DICOM value that is closest to the value from the source. (If
the source is set up with a value of 270, select DICOM 250 from the drop down menu). Higher numeric
value represent a brighter environment.

Note:

The Gamma slider in the Gamma menu will be disabled when DICOM, SIM or SRGB values

is selected.

Image 7–2

3.

Verify that the selected value gives a proper rendering of the image. If not, select another value.

7.7 Digital Zoom Shift

About

The digital zoom and Digital Shift functions are both entered from the same menu. The menu shows how to
toggle between zoom and shift adjustment.

Enter the menu shown below, either via the Remote control or the keypad.

The combined menu is showed below.

The symbols on the lower part of the menu are symbols showing how to operate the keypad / remote control
for the digital shift / digital zoom modes..

Image 7–1

Image menu

Summary of Contents for F70 Series

Page 1: ...ENABLING BRIGHT OUTCOMES User Manual F70 Series...

Page 2: ...Registered office Barco NV President Kennedypark 35 8500 Kortrijk Belgium www barco com en support www barco com Barco NV Beneluxpark 21 8500 Kortrijk Belgium www barco com en support www barco com...

Page 3: ...riate period If this measure proves to be impossible or unsuccessful the purchaser can demand a reduction in the purchase price or cancellation of the contract All other claims in particular those rel...

Page 4: ...tly or indirectly Any liability of the seller will be exclusively limited to replacement of the product or refund of purchase price Patent protection Please refer to www barco com about barco legal pa...

Page 5: ...D panel general 26 2 5 2 LCD touch panel 26 2 5 3 LCD Status screens 26 2 5 4 Dashboard page symbols 29 2 5 5 OSD Menu mode 29 2 5 6 LCD functionality in Ready Mode 29 2 6 Local keypad 29 2 7 Shortcut...

Page 6: ...uction 69 4 9 Scheimpflug adjustment procedure 70 5 Getting started 73 5 1 Projector source and control connections 74 5 1 1 Making connections 74 5 1 2 Connector specifications 74 5 1 2 1 Specificati...

Page 7: ...Status 105 7 8 8 Night vision 105 8 Installation menu 107 8 1 Lens 108 8 1 1 Zoom Focus 108 8 1 2 Shift 108 8 1 3 Shift to center 109 8 1 4 Iris 110 8 2 Orientation 111 8 3 Scaling modes 112 8 4 Warpi...

Page 8: ...2 IG Pixelshift Night Vision 139 8 8 3 AutoStereo 3D Setup 140 9 GUI Profiles 141 9 1 Profiles introduction 142 9 2 Profiles setup parameters 142 9 3 Saving settings to a new profile 143 9 4 Deleting...

Page 9: ...ction 188 B 2 Latency 188 B 3 DMD display device 188 B 4 Image display 188 B 5 Image positioning 190 C DMX Chart 191 C 1 DMX chart Basic 192 C 2 DMX chart Extended 193 D Overview video timings for vid...

Page 10: ...601 426 15 F70 Series 10...

Page 11: ...amage to the projector while installing and using your projector ensure that you understand and follow all safety guidelines instructions and warnings included in this chapter and this manual Clarific...

Page 12: ...am This projector is Risk Group 2 RG2 according to IEC EN 62471 5 This projector may become Risk Group 3 RG3 when an interchangeable lens with throw ratio greater than 4 7 is installed Refer to the ma...

Page 13: ...garding precautions Refer to the user manual for the lens list and hazard distance before operation Such combination of projector and lens are intended for professional use only and are not intended f...

Page 14: ...ing an approved ceiling mount It is hazardous to operate without lens or lens cap Lenses or shields shall be changed if they have become visibly damaged for example with cracks or deep scratches to su...

Page 15: ...or If this does happen switch off and unplug the mains supply immediately Do not operate the projector again until it has been checked by Barco authorized service personnel Do not block the projector...

Page 16: ...rmitted Operators shall control access to the beam within the hazard distance or install the product at a height that will prevent eye exposure within the hazard distance See table below for a definit...

Page 17: ...rs within the HD For example a sufficiently large separation height may be achieved by mounting the image projector on the ceiling or through the use of physical barriers For applications installed in...

Page 18: ...al clearances shall be increased to prevent exposure to the hazard distance zone The LIP shall be installed by Barco or by a trained and Barco authorized installer or shall only be transferred to lase...

Page 19: ...type of setup 3 different HD shall be considered HD as discussed in High Brightness precautions Hazard Distance HD page 6 relevant for intrabeam exposure HDreflection the distance that has to be kept...

Page 20: ...HDdiffuse can be neglected if the measured light at the screen surface is below 5000 cd m or 15000 LUX 1 6 HD in function of the lens Throw Ratio TR TR Throw Ratio The ratio of the distance to the scr...

Page 21: ...ions of projector and lens are intended for professional use only and are not intended for consumer use Ce projecteur peut devenir un projecteur RG3 en cas d installation d un objectif interchangeable...

Page 22: ...adequate measures This device complies with part 15 of the FCC Rules Operation is subject to the following conditions 1 This device may not cause harmful interference and 2 this device must accept an...

Page 23: ...by button backlight indications 25 2 5 LCD Panel 26 2 6 Local keypad 29 2 7 Shortcut buttons 30 2 8 Basic remote control unit 31 2 9 Platinum remote control unit 32 2 10 Projector Address 37 2 11 Conn...

Page 24: ...ector Items Overview 7 6 3 5 1 5 2 4 9 8 Image 2 2 Item No Item Description 1 1 LED Warning Indicator 1 2 Adjustable Feet 1 3 Lens 1 4 Lens Holder 1 5 IR Receiver For receiving remote control signals...

Page 25: ...hen reconnected again If the reason for the error persist the projector will again go to critical error status By high temperature the projector can be restarted when it has cooled down and the temper...

Page 26: ...the menus with the touch functionality in the LCD panel Press the icons to select the functions Select switches to toggle Select and drag sliders to adjust slider value 2 5 3 LCD Status screens Discl...

Page 27: ...currently active If no messages are active this list will be empty Preview A preview pane of the projected image If no image is being projected a test image is displayed instead Image 2 1 Dashboard pa...

Page 28: ...in the information mode is useful for verifying the input signal connection without switching the projector light source on This function shows the output of the currently active source on the LCD pan...

Page 29: ...their own chapters in this manual Source menu Image menu Installation menu System Settings menu Status menu 2 5 6 LCD functionality in Ready Mode About When the projector is in Ready mode it is possib...

Page 30: ...to select and enable input 8 Shutter Enable and disable the lens shutter function This is not a mechanical shutter but it toggles the light source on and off Backlight is red when the shutter are enab...

Page 31: ...U is not available to you While this remote control has a more limited amount of available features it will be able to help you out with basic controls Battery placement replacement The wireless remot...

Page 32: ...ower between Ready and ON mode 9 OSD menu on off 10 Menu confirmation 11 Activate or deactivate the GUI menu Note If pressed while the projector is in stand by mode this will also power up the project...

Page 33: ...e 2 3 When replacing batteries the broadcast address of the RCU will be reset to its default value 0 CAUTION Replace with the correct battery type Use two AA size batteries 2 9 2 Remote control protoc...

Page 34: ...set 1 Remove the cover For more info on how to remove see Remote control battery installation page 32 2 Place the switch in the NEC position Image 2 4 Remark with RC5 protocol Not all buttons of the...

Page 35: ...full feature wireless remote control powered by two 2 standard AA batteries The battery compartment is on the back side of the remote control The remote control is backlit for use in dark environment...

Page 36: ...g this button multiple times you will have different active filters in the following cycle Red Green Blue default Red only Green only Blue only Red Green Green Blue Red Blue Red Green Blue etc After p...

Page 37: ...gram the remote control in wired mode Directly connected no sense in programming 2 10 Projector Address Projector address Address installed in the projector to be individually controlled Broadcast add...

Page 38: ...r Projector ControlThis is mainly used in multiple projector installations with requirement of synchronization between the units Trigger 3 one in front two on rear panel 12VDC 0 5A 6W Trigger Out Volt...

Page 39: ...ies Rigging Frame Item Number Item Description R9802224 F70 F90 Multifunctional Frame The F70 Rigging frame is a rugged easy to install frame designed to streamline the process of installing one or mo...

Page 40: ...a custom designed container that is suitable for shipping the projector including flight frame signal and power cords and up to two lenses The case is fully lined to protect the projector and lenses...

Page 41: ...lens 45 3 4 Lens calibration 47 3 5 Installing the lens safety cable 48 3 6 Preparing the FLDX lens 0 38 1 UST 51 3 7 Mounting the FLDX lens 0 38 1 UST lens with a lens support 55 3 8 Mounting a safet...

Page 42: ...FLD 0 28 1 EN58 approved R9801832 0 38 1 WUXGA 0 57 1 WQXGA This projector may become Risk Group 3 RG3 when an interchangeable lens with throw ratio greater than 4 7 is installed Refer to the manual c...

Page 43: ...2 1 6 5 1 45 33 2 48 1 2 0 15 FLD Lens 0 74 1 EN12 2 1 Yes 2 1 6 5 16 35 0 5 5 FLD Lens 1 24 1 6 1 EN13 2 1 2 22 Yes 2 1 6 5 1 3 25 59 33 24 1 0 15 FLD Lens 2 37 3 79 1 EN14 2 1 2 72 Yes 2 1 6 5 1 6 4...

Page 44: ...4 6 1 WQXGA R9801211 3 08 kg FLD Lens 0 75 1 13 1 EN45 0 75 1 13 1 WUXGA 0 8 1 21 1 WQXGA R9801220 3 04 kg FLD Lens 0 75 1 13 1 EN46 0 75 1 13 1 WUXGA 0 8 1 21 1 WQXGA R9801221 3 14 kg FLD NV Lens 0 8...

Page 45: ...ways activate the projector shutter before attempting to remove or install a lens To do this press the shutter button on the keypad or shutter Close on the remote to activate the shutter The keypad bu...

Page 46: ...bayonet into the projector lens mount and support in place with one hand 6 Slide the lens lever to the far right 7 Verify that the lens is firmly in place before removing your hand from the lens Imag...

Page 47: ...to calibrate Enter the menu Settings Maintenance Lens calibration The calibration menu shows up with a question mark for each of the functions that has to be calibrated Image 3 6 Focus iris and zoom...

Page 48: ...p 16x16 mm 4 mm 1 Image 3 8 How to install the lens safety cable 1 Ensure that the safety cable and its accessories are in good condition not damaged 2 Paste four cable clips on the lens body between...

Page 49: ...cable around the lens counterclockwise Click the cable into every clip it passes in this loop Note Make sure the cable passes between the lens and the cable bundle 5 Slide the cable through the loop e...

Page 50: ...s or rigging frame Caution The safety cable is mounted as backup so that the drop distance is as small as possible Keep the possible drop distance of the lens as short as possible How to mount the cab...

Page 51: ...he outgoing part of the safety cable are placed in the enclosure 6 Close the U bolt and tighten it Note Make sure the safety cable is tightened around the lens before tightening the U bolt nuts The re...

Page 52: ...th long shaft delivered with the kit How to prepare the lens 1 Place the lens on a table Turn out the 6 screws 1 Use an Allen key with a long shaft so that you do not damage the screw head These screw...

Page 53: ...3 20 1 Image 3 21 2 Slide the motor housing a few mm to the backside of the lens 2 to disengage focusing gear and motor gear Motor unit Focusing gear Motor gear Disengage Slide range 5mm max Image 3...

Page 54: ...esponds with the reference marking on the lens housing A B Image 3 24 A Project LEFT B Project UP 4 Slide the motor housing back to the front of the lens to re engage focusing gear and motor gear 5 Tu...

Page 55: ...view D Bottom view 3 7 Mounting the FLDX lens 0 38 1 UST lens with a lens support How to mount 1 Turn the projector on its side or on its top cover 2 Place the bottom support plate on the bottom plate...

Page 56: ...in both M6 screws and the M4 screw 4 Turn the projector back on its feet Slide the lens locking system to the left Insert the lens Make sure the electric contact points C on the lens match the contac...

Page 57: ...ns shift Note Shift cannot be adjusted anymore after full installation of the complete kit 7 Slide plate 2 on both threaded rods and turn a nut on each rod Do not fasten yet It must be possible to mov...

Page 58: ...sembled The projector is ready for use 3 8 Mounting a safety cable to the FLDX lens 0 38 1 UST lens When to use the safety cable While it is strongly recommended to use the specifically designed mount...

Page 59: ...e 2 5 Install an U bolt on the lens holder with the open ends oriented outwards 3 Make sure that both a part of the loop end and the outgoing part of the safety cable are placed in the enclosure 6 Clo...

Page 60: ...601 426 15 F70 Series 60 Lenses Handling and features...

Page 61: ...procedures required when installing the F70 projector It also describes the outlines and some of the considerations that should be taken in to account when designing and setting up the installation E...

Page 62: ...conditions Environmental Conditions Barco projectors are manufactured according to specific design standards which also include environmental conditions Failing to follow the terms and conditions out...

Page 63: ...th the shipping carrier immediately Notify the Barco Sales and Service office or your preferred Barco agent of the damage as soon as possible Box Contents Your projector box should contain the followi...

Page 64: ...he projector offset lens shift rather than physical angling to correct any off center positioning Minimize the source cable length as much as possible In general HDBaseT and 3G SDI are long haul inter...

Page 65: ...Multifunctional Frame Installation Manual WARNING Maximum tensile load for each of the anchor points is 62 5 kg This must be a major consideration when designing the brackets or other arrangements fo...

Page 66: ...ental specifications for vibration and shock It may also be necessary to use additional custom means to stabilize the projection lens to make sure that the projected image remains in position and prop...

Page 67: ...e 2 38 meters Calculation 2 4 x 0 99 2 38 The following graphs illustrate the image size W and projection distance D for each of the projector lenses Tolerances are typically 5 due to optical lens var...

Page 68: ...0 4 50 5 00 5 50 6 00 6 50 7 00 7 50 3 50 0 00 Image height F L D L e n s 0 8 1 E N 4 2 0 7 7 m FLD Lens 1 7 2 5 1 EN41 EN61 1 5 15m FLD Lens 2 5 4 6 1 EN44 2 5 25 m FLD Lens 1 2 1 7 1 EN43 EN63 1 5 1...

Page 69: ...g Boresight introduction What is Scheimpflug The lens holder has to be adjusted so that the sharp focus plane of the projected image falls together with the plane of the screen Fp1 Fp2 This is achieve...

Page 70: ...image differs from the rectangle shaped image In other words distortion of the projected image occurs Masking will be required to solve the distortion The disadvantage of Masking is loss of content Th...

Page 71: ...the Iris all the way up 4 Open the focus ring all the way up 5 Go to Main Menu Test Patterns Full Screen and select to display the Focus test pattern 6 Zoom the lens to its widest opening maximum imag...

Page 72: ...he bottom half of the screen is in focus Use a size 4 hex key to do this Note This process may cause the other areas of the image to slide out of focus This is totally normal 3 F Image 4 12 5 Continue...

Page 73: ...77 5 3 Power down the projector 78 5 4 Power mode transitions 78 5 5 Power modes 80 5 6 Customize projector settings 80 5 7 User interface 80 About this chapter This chapter describes how to set up an...

Page 74: ...ations 5 1 2 1 Specifications DVI I inputs Specifications Parameter Value Connector DVI I female digital RGB DVI D functionality Signal characteristics DVI 1 0 Digital TMDS Max cable length 25 m 24 AW...

Page 75: ...2082 10 standards SMPTE 424M 2006 10bit level A Connector Samtec BNC7T J P HN RA BH1 1x BNC 75 ohm type IEC 60169 8 Amendment 2 1997 A Bandwidth 12GHz 3 GHz Return loss 6dB 12GHz 10dB at 3GHz Impedanc...

Page 76: ...ector IR Extension Not Supported RS 232 Extension Not Supported 10 100Mbps Ethernet Pass Through Not Supported Fallback to 100BaseTx IEEE 802 3u Not Supported USB Over Centre Tap Not Supported Power O...

Page 77: ...e cable with XLR connector is used You can use the DMX input port to connect a DMX device DMX console to the projector This way you can control the projector from that DMX device console The DMX outpu...

Page 78: ...ower button backlight is steady blue the projector is ready for use 5 3 Power down the projector Power down using the keypad or remote 1 Depress and hold the power button on the keypad or remote for f...

Page 79: ...n off button on the projector for 4 seconds or press the Power Off button on the remote control The projector will power down through a cool down phase The Power on off button will BLINK WHITE during...

Page 80: ...st the OSD menu color 5 7 User interface 5 7 1 On Screen Display OSD About The projector on screen display OSD is the primary user interface UI From here you can review and adjust all projector and di...

Page 81: ...l warnings will be displayed Some menu options are reserved for Power or Service Users these will be grayed out and not available for selection when in standard user mode To access these features ente...

Page 82: ...601 426 15 F70 Series 82 Getting started...

Page 83: ...the Source menu This menu is used to select review and configure sources into the projector Enables either via the source menu or the shortcut key By navigate through the Source menu it will be visib...

Page 84: ...connectors The default selection of connectors displayed is HDMI Display Port 1 Display Port 2 Dual Display port Columns Dual Display port Sequential HDBaseT DVI 1 DVI 2 Dual DVI Columns Dual DVI Seq...

Page 85: ...6 3 Select source 2 Press OK The Source menu is displayed with the actual available sources filled out Image 6 4 Source menu 3 Scroll down to the bottom of the list of available sources and select Con...

Page 86: ...onnector select one of the options under EDID Note You cannot change the EDID for SDI connectors 6 3 Using dual inputs Dual Input For extended flexibility to connect high resolution sources with a pix...

Page 87: ...r to obtain a correct setup If the setup is wrong no picture will be visible in dual mode The resolution for each dual column channel can be up to 1920x2400 pixels The resolution for each dual sequent...

Page 88: ...601 426 15 F70 Series 88 Source menu...

Page 89: ...showing up for the LCD display and the OSD For the LCD display the menu is shown below The OSD menu is shown in the different topics below and is visible in the lower left corner of the screen The ope...

Page 90: ...creen below will show up in the LCD panel Use the arrow keys to select and adjust the values Image 7 2 When pressing enter on the value slider this icon will show up on the OSD depending which setting...

Page 91: ...u it is possible to change to the other image adjustments Brightness Saturation Sharpness and Gamma by using the up and down arrows on the remote control or keypad 7 2 Brightness About Image Brightnes...

Page 92: ...arpness adjustment amplifies the high frequency components in the picture meaning that by increase the sharpness the picture will be perceived as sharper and if decreased the picture will be perceived...

Page 93: ...s you change only the perceived brightness levels Different types of displays have different gamma factors that need to be corrected in order to look and be perceived the same For example an MS Window...

Page 94: ...ect the proper Gamma value Image 7 1 3 Select the gamma type that match the setup in the source to obtain an optimal rendering 7 6 2 DICOM Gamma This function is not intended for determination of medi...

Page 95: ...brighter environment Note The Gamma slider in the Gamma menu will be disabled when DICOM SIM or SRGB values is selected Image 7 2 3 Verify that the selected value gives a proper rendering of the imag...

Page 96: ...mbers on the right side of the menu represent the new resolution of the picture assuming that the whole picture should be visible in pixels The aspect ratio will not be affected by the zoom function T...

Page 97: ...age adjustments 7 8 1 P7 Realcolor Purpose When blending images from multiple projectors the perceived color coordinates of each projector can be altered to a desired common level so that the projecte...

Page 98: ...uropean color standard for broadcasting SMPTE C American color standard for broadcasting Rec 709 Color standard for high definition televisions HDTV Image 7 3 Note When choosing one of the presets All...

Page 99: ...Temperature Configure the white point via a color temperature slider The white point is specified on a Kelvin scale between 3200K and 13000K tracking along the black body curve You can reset all coor...

Page 100: ...s in Custom presets enter the Reset to native button when in Custom mode Image 7 6 Preset Native selected Image 7 7 Editable values 7 8 3 Output resolution 4K About With this function the projector ou...

Page 101: ...a Smear Reduction Process SRPTM that reduces this perceived rendering Select the option that give the best result Image 7 9 This menus are only valid for projectors with COLOR colorwheel For BRIGHT co...

Page 102: ...trix with COLOR colorwheel installed Valid when COLOR colorwheel is installed Mode SRP Brilliant Color WQXGA 60Hz SRP Off Off Native Video SRP Half Off Native SRP Full Off Native SRP Half Plus Native...

Page 103: ...choices of SRP and Brilliant Color matrix with BRIGHT colorwheel installed Mode SRP Brilliant Color WQXGA 60Hz Off Off Native WQXGA 120Hz 4K mode Off Off Native 4K 60Hz BSI Native Off SRP Off Native O...

Page 104: ...der to project the intended mastering on screen These changes are necessary because HDR content has been mastered specifically for HDR capable displays that are watched in living rooms These condition...

Page 105: ...an active source is HDR an icon is visible in the status menu The HDR icon will also be visible in the Source signal popup icon in the lower right corner on the screen Image 7 13 HDR Icon Image 7 14 S...

Page 106: ...nly available for the FS variants of the projector How to swap channels Select the Menu Image Advanced Night Vision menu Toggle the Swap channel function on off by pressing the OK button on the remote...

Page 107: ...Series 8 1 Lens 108 8 2 Orientation 111 8 3 Scaling modes 112 8 4 Warping 114 8 5 Blending 125 8 6 CLO feature 132 8 7 IR Night vision functionality 136 8 8 IG pixel shift 137 Menu overview Image 8 1...

Page 108: ...positions Not all lenses have zoom or iris control The matrix below shows what controls are available per lens E N11 E N12 E N13 E N14 E N15 E N16 E N33 E N41 E N42 E N43 E N44 E N45 E N46 E N47 Iris...

Page 109: ...e in order to avoid damage to the lens This limitation will be identified as an reduction in the output light from the projector when the shift position exceeds the defined range The output light will...

Page 110: ...is positioned somewhere between the open and closed position according to the number indicated Iris control is as for the zoom and focus control motorized and is operated by the remote control or loca...

Page 111: ...depending on the physical installatin of the unit There are four installationoptions as illustrated below Front table Front ceiling Rear table Rear ceiling Auto front Auto rear Default Table Front Ima...

Page 112: ...n the screen in an optimal way based on the desired rendering The examples below shows a screen format of 2 35 1 and a DMD format 16 10 WQXGA The scaling mode function has four different presets Fill...

Page 113: ...defined screen size and keeps the aspect ratio DMD Capacity 1 6 1 2560 x 1600 pixels Screen 2 35 1 Cinemascope Input signal Source 4 3 Image 8 9 Stretch This mode stretch the rendered picture to util...

Page 114: ...8 4 1 About warping About Image warping is the process of digitally manipulating an image to compensate for the distortion of the screen typically by non perpendicular alignment of the projector vers...

Page 115: ...1 8 4 2 Warping On Off About warping on off By toggling between on and off the warping functionality can be enabled or disabled How to toggle 1 In the main menu select Installation Warp Image 8 2 Ins...

Page 116: ...ontains not only the image information but also the black bars If we want to position e g the active left top corner exactly on the screen using 4 corner warp then it is very hard to do that as we are...

Page 117: ...der is a visual tool showing the result of the adjusted outline Image 8 8 Tip The value can also be entered by the numeric keys on the remote control Press to delete existing numbers and enter the new...

Page 118: ...s select and adjust the corners one by one 5 Adjust the value by the arrow keys The X value is adjusted by the left right arrows on the remote control and the Y vale is adjusted by the up down arrow i...

Page 119: ...ction 1 In the main menu select Installation Warp Image 8 13 Installation menu Warp 2 In the Warp menu select Bow Image 8 14 Warp menu Bow A check symbol at the bottom right corner indicates that the...

Page 120: ...use the arrow keys to adjust the angle and linearity length of the vectors The angle is adjusted by the up and down arrows on the remote control and the linearity is adjusted by the left and right arr...

Page 121: ...orrect correction The angle is adjusted by the up and down arrows on the remote control and the linearity is adjusted by the left and right arrows Image 8 18 Left vector of the upper side of the pictu...

Page 122: ...irectly via the curl program or some other tool that supports http upload For more information on uploading downloading Warp files using the Projector Toolset refer to the Projector Toolset user manua...

Page 123: ...files menu 8 4 7 Warping Latency control in a multi projector setup Transport latency The added delay in the image processing chain The value is the number of lines relative to the output resolution L...

Page 124: ...tus menu for each individual projector How to configure transport delay 1 Read out and note the latency of each projector in the multi projector setup You can find this latency under Transport delay i...

Page 125: ...two projectors The principle is that the light intensity in the blend zone from each projector will be adjusted individually so that the rendering on the screen are perceived as from one projector Th...

Page 126: ...s with the preset overlap on the screen There are different ways to do this depending on the source Refer to the source unit s manual for this issue Adjust the Blend for the projectors as described be...

Page 127: ...the blend mask Basic blend adjustment procedure Side by side configuration 1 In the menu select Installation Blend Basic blend The Basic blend menu is displayed Image 8 3 2 Starting with the left pic...

Page 128: ...black levels in the non overlapped areas with the black level in the overlapped areas Blend Zone This is a necessary function due to the fact that the black level will be brighter in the blend zones s...

Page 129: ...equals the level in the blend zone Note In addition to the black level itself it is also possible to adjust the color saturation in order to align the projectors in the layout see procedure Adjusting...

Page 130: ...black level menu for this projector and adjust the slider with the arrow keys to obtain a similarity in the rendering 5 Repeat for every projector and color until the desired result is achieved on scr...

Page 131: ...or download a custom Blend configuration file in png jpg or tiff format to from the projector This is a timesaving option when multiple projectors need an identical blending configuration To upload o...

Page 132: ...ture 8 6 1 Introduction Introduction The CLO Constant Light Output is a Barco Pulse software feature for maintaining a stable light output from the projector over time by automatically adjusting the l...

Page 133: ...enables the CLO while keeping the previous set point for the CLO 8 6 3 2 Notifications applicable for the CLO feature Info L8000b Illumination clo mode 0 Modes Enabled or Disabled L8000c Illumination...

Page 134: ...and does not represent real life data The time scale is only used as an example and does not represent real life data 8 6 4 CLO scale 8 6 4 1 CLO scale CLO scale The CLO scale feature enables linear d...

Page 135: ...ual light output from all 3 projectors Note that the CLO scale value must be sent separately to all 3 projectors 8 6 5 CLO stable signal Signal stability The light sensor providing the CLO feature wit...

Page 136: ...y As no max value is given Barco recommends using the CLO scale if different output power settings are needed when using the CLO The setpoint can be set and or monitored using the property illuminatio...

Page 137: ...ision rendering By mixing the intensity power of both the Desired power and the IR LED it is also possible to simulate other visibility scenarios such as evening early night vision Image 8 2 8 8 IG pi...

Page 138: ...DVI 1 2 or Displayport 1 2 Enable IG pixel shift 1 Enter the menu Installation 3D setup Image 8 2 Display setup Menu 2 Use the up down arrow keys on the remote control to move the cursor to the Displa...

Page 139: ...pixel shift module when one of the input channels are used for IR content visible through NV goggles This also includes a function of swapping visible light IR light between the two inputs This switch...

Page 140: ...601 426 15 F70 Series 140 Image 8 5 8 8 3 AutoStereo 3D Setup Enabling 3D mode See chapter 3D page 167 for 3D mode setup Installation menu...

Page 141: ...141 601 426 15 F70 Series 9 1 Profiles introduction 142 9 2 Profiles setup parameters 142 9 3 Saving settings to a new profile 143 9 4 Deleting a projector profile 145 GUI Profiles 9...

Page 142: ...m or cave Playing content from an old DVD versus playing the latest release from an HDR coded Blu Ray A rental projector that can be rented out for business presentations concerts and other events tha...

Page 143: ...d Black level settings top bottom left right RGB gain values Red Green and Blue values PQ HDR Screen luminance unit and value HDR Boost value DynaBlack mode Installation Lens parameters lens zoom focu...

Page 144: ...o preset slot A drop down menu will show up select the preferred value Note The function Assign to preset slot enables a shortcut to the actual profile from the remote control If assigned preset slot...

Page 145: ...he new profile is now created and saved 10 Repeat step 1 to 6 for creating of more profiles Recall a profile 1 Enter the Menu Profile The stored profiles will be visible in the menu Select the actual...

Page 146: ...u is displayed Image 9 9 Profile edit menu 2 Select the undesired projector profile and confirm to expand it Image 9 10 Example of a projector profile with available preset slots 3 Use the arrow keys...

Page 147: ...Trigger 153 10 6 Language 153 10 7 Themes 154 10 8 Units 154 10 9 Backlight 155 10 10 ECO mode 155 10 11 Power settings 156 10 12 Lens features 156 10 13 24 7 Mode 157 10 14 Maintenance 157 10 15 Len...

Page 148: ...mage 10 2 Manually set up the IP adress Go to the menu Settings Communication LAN Enable the Auto zone on the display and press enter The Auto zone will change to Manual Scroll down and modify the des...

Page 149: ...ctor can be installed in a room each projector should be separately addressable with an RCU or with a computer using serial communication Therefore each projector has its own address The factory defau...

Page 150: ...10 2 3 IR sensors What can be done Each IR sensor can be individually disabled or enabled When all sensors are turned off the projector will no longer respond to signals from the remote control To re...

Page 151: ...erent Host name 1 In the main menu select Settings Communication Host name Image 10 7 Communication menu Host name The Host name menu is displayed Image 10 8 Example of the host name menu 2 Press conf...

Page 152: ...onitor If a DMX device is connected the settings per channel can be displayed via the Monitor button Art Net DMX DMX can be sent via the Ethernet connector to the projector instead of the classic DMX...

Page 153: ...tor one in the front and two on the back panel These outputs can be used for controlling external equipment The trigger outputs can be individually set to active low or active high by entering the men...

Page 154: ...the default It is the Dark option that is shown in the menu screenshots in this manual as this gives a better rendering Image 10 13 Select theme dark or light 10 8 Units About Enter the menu Settings...

Page 155: ...bled the backlight on the LCD will be on during reboot and en power transition cycle on ready state to eco mode and back again Backlight Select the time delay for turning off the LCD backlight There a...

Page 156: ...activity the projector will go to standby after a defined time Set Power settings timeout In the power settings menu the standby timeout can be selected Enter the menu Settings Power settings Image 1...

Page 157: ...a re calibration of the Real Color P7 color coordinates How to set Enter the menu Settings 24 7 mode Toggle the 24 7 function on and off by pressing the OK button on the remote control or the keypad I...

Page 158: ...This function will calibrate the position of the iris and the horizontal and vertical lens shift The purpose is to have an accurate feedback to the system Calibration 1 Enter the menu Settings Mainte...

Page 159: ...unication LAN Automatic settings System Eco Mode if applicable Available Screen Screen luminance Unit nits Optics High Contrast Off Illumination Power 100 ImageConnector Color Space auto Signal Range...

Page 160: ...Ratio if applicable 16 9 How to reset all projector settings 1 In the main menu select Settings Reset 2 In the Reset menu select RESET ALL and click OK How to reset one or more projector settings 1 I...

Page 161: ...LCD the backlight of all the buttons of the keypad and the indication LEDs for the LAN and HDbaseT inputs will be disabled Stealth Mode is enabled and disabled by pressing the OSD button on the remot...

Page 162: ...601 426 15 F70 Series 162 System settings menu...

Page 163: ...163 601 426 15 F70 Series 11 1 Status menu overview 164 No settings can be modified in the status menu Its only for consulting GUI Status menu 11...

Page 164: ...e Status pages Image 11 3 Example of the second page of the Status menu What can be seen on the Status page Connected source and signal details Display settings e g display mode transport delay output...

Page 165: ...article number and registration status only if applicable for your device Mounted lens Lens type and Lens description if available Installation information Altitude pitch angle roll angle distance on...

Page 166: ...601 426 15 F70 Series 166 GUI Status menu...

Page 167: ...ynchronized through the whole signal path from the signal source to the picture viewed through the 3D goggles See instructions in this chapter to set up the projector for this feature Active stereo in...

Page 168: ...wn in the menu and select the Auto stereo selection in the Display mode menu Image 12 1 4 When a HDMI 3D source is detected it is shown in the source status that this is a 3D source Image 12 2 5 Enter...

Page 169: ...re also free to use a 3D emitter and active shutter glasses of your own choice Since glasses and emitter can have various specifications compared to the ones Barco can provide the 3D setup menu allows...

Page 170: ...601 426 15 F70 Series 170 3D...

Page 171: ...171 601 426 15 F70 Series 13 1 Upgrade procedure 172 Upgrade projector firmware 13...

Page 172: ...the projector in Ready mode status indicator is steady White Insert the USB Stick in to the rear USB port on the projector After a few seconds the status indicator will flash rate 3 Hz 180 FPM This s...

Page 173: ...173 601 426 15 F70 Series 14 1 Projector lenses 174 14 2 Projector cabinet 174 14 3 Filters 174 User maintenance Cleaning the projector 14...

Page 174: ...or cabinet exterior only Clean the housing of the projector with a damp cloth Stubborn stains may be removed with a cloth lightly dampened with a mild detergent solution 14 3 Filters General info rega...

Page 175: ...Series About The information in this section is subject to changes without any notice For current technical information visit the product website or contact your sales support representative Technical...

Page 176: ...r correction P7 RealColorTM CLO constant light output Yes Light source Laser phosphor Light source lifetime Up to 60 000 hours depending on mode of operation Sealed DLP core Yes Orientation 360 rotati...

Page 177: ...cNus Warranty Limited 3 years parts and labor Extendable up to 5 years 15 2 F70 W6 F70 W6 Brightness 5300 ANSI Lumens minimum Contrast ratio 1 800 1 sequential 50 000 1 dynamic IR for NVG no Brightne...

Page 178: ...0 3860 x 2400 Software tools Projector Toolset Control IR RS232 RJ45 Network connection IR RS232 RJ45 Power requirements 100 240V 50 60Hz Power consumption 743 W nominal 1100 W maximum BTU per hour Ma...

Page 179: ...h position memory on all lenses Color correction P7 RealColorTM CLO constant light output Yes Light source Laser phosphor Light source lifetime Up to 60 000 hours depending on mode of operation Sealed...

Page 180: ...rts and labor Extendable up to 5 years 15 4 FS70 W6 FS70 W6 Brightness 5300 ANSI Lumens minimum Contrast ratio 1 800 1 sequential 50 000 1 dynamic IR for NVG yes Brightness uniformity 90 Aspect ratio...

Page 181: ...twork connection IR RS232 RJ45 Power requirements 100 240V 50 60Hz Power consumption 743 W nominal 1100 W maximum BTU per hour Max 4 000 BTU h Noise level typical at 25 C 77 F 36 dB A Operating temper...

Page 182: ...601 426 15 F70 Series 182 Technical Specifications...

Page 183: ...15 F70 Series A 1 Introduction 184 A 2 How infrared is displayed 184 A 3 Default setup 184 A 4 Cloned image with full RGB input 185 A 5 Cloned inputs with only green content for IR 186 Color componen...

Page 184: ...R light is illuminating the DMD all the time The display device DMD itself do not know whether it is displaying IR or VL And this is causing problems when the actual image content is not carrying all...

Page 185: ...image connector displayport2 colorcomponent green GREEN_IN image connector displayport2 colorcomponent blue BLUE_IN A 4 Cloned image with full RGB input Cloned image with full RGB input In this setup...

Page 186: ...rated green and white image well suited for the IR channel In this setup a portion of the green image is extracted and applied to the red channel for visible light also Note that the power of the visi...

Page 187: ...187 601 426 15 F70 Series B 1 Introduction 188 B 2 Latency 188 B 3 DMD display device 188 B 4 Image display 188 B 5 Image positioning 190 Image settings and adjustments for optimal latency B...

Page 188: ...ync each projector has the possibility to add to the latency transport delay In a multi projector setup all projectors should be set to the same latency as the projector with the highest transport del...

Page 189: ...Non native image Image B 2 Consider this setup where the incoming image is smaller vertically than the DMD resolution To maintain correct aspect the image will be displayed by filling in black pixels...

Page 190: ...d calculated externally Always adjust the warp grid to position it as close to the bottom of the image as possible A curious effect of this is when applying keystone warp to an image smaller than DMD...

Page 191: ...191 601 426 15 F70 Series C 1 DMX chart Basic 192 C 2 DMX chart Extended 193 DMX Chart C...

Page 192: ...isplayPort Input If held for 1 second 4 104 111 Select input 3 SDI Input A If held for 1 second 4 112 119 Select input 4 SDI Input B If held for 1 second 4 120 127 Select input 5 HDBaseT Input 1 if he...

Page 193: ...for 1 second 88 95 Select input 1 HDMI Input If held for 1 second 4 96 103 Select input 2 DisplayPort Input If held for 1 second 4 104 111 Select input 3 SDI Input A If held for 1 second 4 112 119 Se...

Page 194: ...6 39 Set light source to 55 40 43 Set light source to 50 44 47 Set light source to 45 48 51 Set light source to 40 52 55 Set light source to 35 56 59 Set light source to 30 60 63 Set light source to 2...

Page 195: ...uts 200 D 5 Overview video timings HDBaseT input 201 D 6 Overview video timings DVI Inputs 203 About resolution in this chapter Resolutions and video timings indicated in the following sections are re...

Page 196: ...x 480 60 X X X X 720 x 480 60 X X 720 x 576 50 X X 800 x 600 60 X X X X 1024 x 768 60 X X X X 1280 x 720 24 X 1280 x 720 25 X 1280 x 720 30 X 1280 x 720 50 X X X X X 1280 x 720 60 X X X X X 1280 x 800...

Page 197: ...5 X X X X 4096 x 2160 30 X X X X 4096 x 2160 50 X X X 4096 x 2160 60 X X X D 2 Overview video timings SDI Inputs Overview The following standard video formats are available for the projector Video tim...

Page 198: ...nk 3840 x 2400 50 Single Link 3840 x 2400 59 94 Single Link 3840 x 2400 60 Single Link 4096 x 2160 50 12G SDI10 Single Link 4096 x 2160 60 12G SDI10 Single Link D 3 Overview video timings HDMI 2 0 inp...

Page 199: ...20 x 1080 50 Side by Side SbS progressive 1920 x 1080 60 Side by Side SbS progressive 1920 x 1200 50 1920 x 1200 60 2048 x 1080 24 2048 x 1080 25 2048 x 1080 30 2048 x 1080 48 2048 x 1080 50 2048 x 10...

Page 200: ...0 800 x 600 60 1024x 768 60 1280 x720 50 1280 x 720 60 1280 x 800 60 1280 x 960 60 1280 x1024 60 1280 x 1600 60 2 Column mode 2 x 1 layout 1280 x 1600 120 2 Column mode 2 x 1 layout Active 3D 1400 x 1...

Page 201: ...0 3840 x 2160 24 3840 x 2160 25 3840 x 2160 30 3840 x 2160 50 3840 x 2160 60 3840 x 2400 50 3840 x 2400 60 4096 x 2160 24 4096 x 2160 25 4096 x 2160 30 4096 x 2160 50 4096 x 2160 60 D 5 Overview video...

Page 202: ...king Top Bottom 1920 x 1080 25 1920 x 1080 30 1920 x 1080 50 Side by Side SbS progressive 1920 x 1080 60 Side by Side SbS progressive 1920 x 1200 50 1920 x 1200 60 1920 x 2160 50 1920 x 2160 60 2048 x...

Page 203: ...80 x 720 50 1280 x 720 60 1280 x 800 60 1280 x 960 60 1280 x 1024 60 1400 x 1050 60 1600 x 1200 60 1920 x 1080 24 1920 x 1080 25 1920 x 1080 30 1920 x 1080 50 1920 x 1080 60 1920 x 1200 50 1920 x 1200...

Page 204: ...pixels x active lines Vertical refresh rate Hz Available layout modes other than standard layout 1 x 1 layout 3840 x 2400 24 3840 x 2400 25 3840 x 2400 30 4096 x 2160 24 4096 x 2160 25 4096 x 2160 30...

Page 205: ...E 2 Turkey RoHS compliance 206 E 3 China RoHS compliance 207 E 4 Taiwan RoHS compliance 208 E 5 Contact information 209 E 6 Production address 209 E 7 Product Info 210 E 8 Disposal Information 210 E...

Page 206: ...FCC responsible Barco Inc 3059 Premiere Parkway Suite 400 30097 Duluth GA United States Tel 1 678 475 8000 UK Compliance UK This product is fit for use in the UK Authorised Representative Barco UK Lt...

Page 207: ...ent name Hazardous substances and elements Pb Hg Cd Cr6 PBB PBDE Printed Circuit Assemblies X O X O O O External Cables X O O O O O Internal wiring X O O O O O Lensholder X O O O O O Nuts bolts screws...

Page 208: ...chemical symbols Unit Lead Pb Mercu ry Hg Cadmi um Cd Hexava lent chromi um Cr6 Polybromi nated biphenyls PBB Polybromi nated diphenyl ethers PBDE Printed Circuit Assemblies O O O O External Cables O...

Page 209: ...rco s regional offices via the contact information given on Barco s web site www barco com Contact information Norway factory Barco Fredrikstad as Habornveien 53 N1630 Gamle Fredrikstad Norway Phone 4...

Page 210: ...ste disposal service For details please visit the Barco website at http www barco com AboutBarco weee WEEE Information This product conforms to all requirements of the EU Directive on waste electrical...

Page 211: ...ol unit 31 Battery Disposal 210 Black level adjustment 128 Blend 125 Blend mask setup 126 Blending Black level adjustment Files 130 Black Level Files 130 Blend files 131 Bore sight adjustment 70 Brigh...

Page 212: ...M Gamma 94 Digital Shift 96 Digital Zoom 96 Digital Zoom Shift 95 Display setup IG pixel shift 137 Displaying HDR content Perceptual Quantizer PQ 104 Disposal 210 Batteries 210 Battery 210 Disposal In...

Page 213: ...29 L LAN Ethernet 77 Language 153 Latency Image settings and adjustments for optimal latency 188 LCD 26 LCD functionality in Ready Mode 29 LCD information mode 26 LCD Panel 26 LED 25 Lens 108 change...

Page 214: ...S 232 76 S Safety 11 12 16 19 20 Servicing 15 Safety cable Lens 48 UST lens 58 Safety instructions 13 Safety symbols 21 Saturation 92 Scaling modes 112 Scheimpflug 69 Adjustment points 70 Lens 69 Sche...

Page 215: ...e 80 Using dual inputs 86 UST lens Mounting F70 55 Prepare 51 Safety cable 58 V Video timings DisplayPort Inputs 200 HDBaseT Inputs 201 HDMI Inputs 198 Video Timings SDI Inputs 197 Video Timings DVI I...

Page 216: ...601 426 15 F70 Series 216 Index...

Page 217: ......

Page 218: ...www barco com 601 426 15 2023 02 01...

Reviews: