

System Setup
For detailed installation instructions, refer to the
Event
Master devices
User’s Guide.
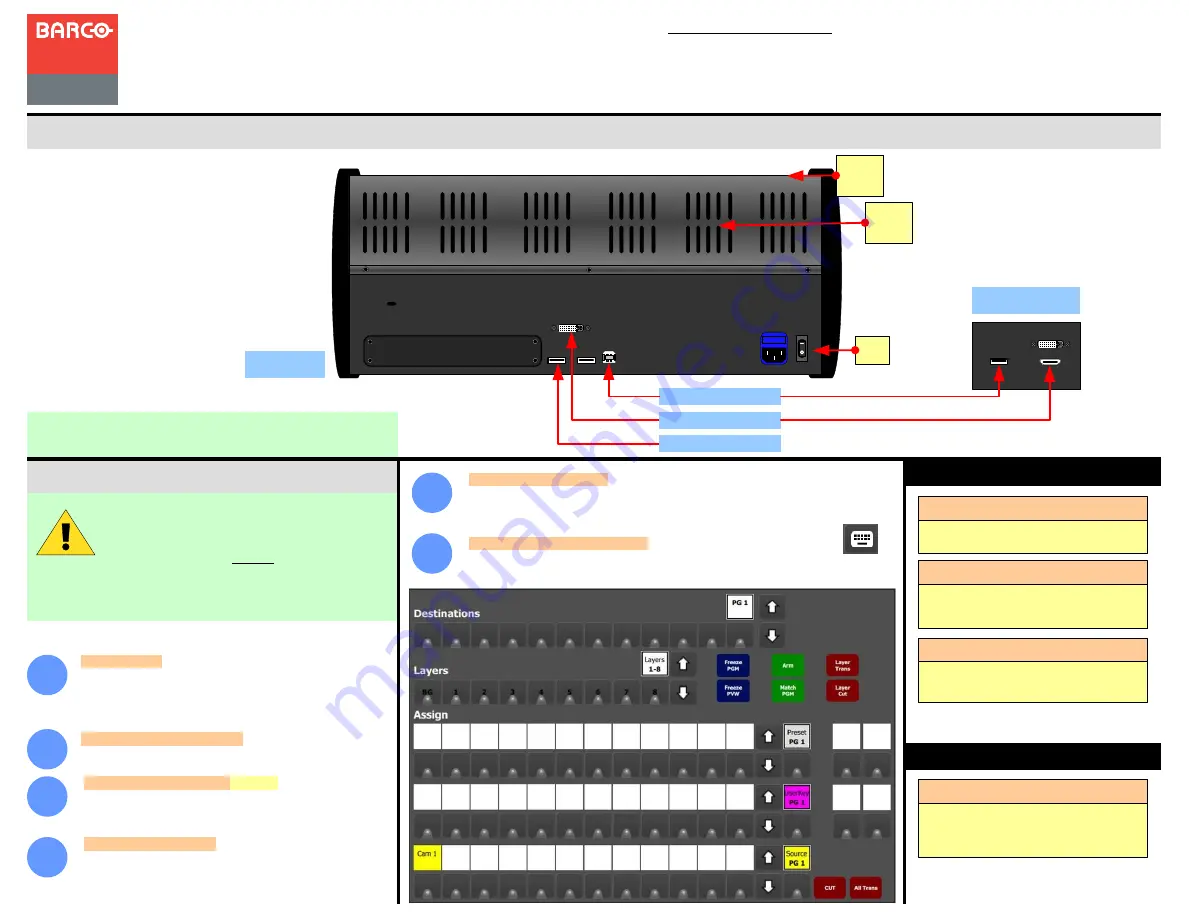
USB
DVI-D
EC-50 Event Controller
Eventsmaster Toolset
Host computer
EC-50 Rear
Panel
Event Master Series EC-50
Quick Start Guide - Setup
Visibly yours
P/N 60600332, Rev 00
Power Up and Status Check
— Power up the
EC-50 control panel, Host computer and peripherals.
1
Connections
— Connect the external screen and USB
communication from the host computer to the DVI and USB
B connector on the EC-50. Necessary cables are provided in
a new system. In the case that the original cables are
missing, simply use standard computer cabling to make
these connections.
2
3
4
5
6
System setup is comprised of sequences,
each of which includes many steps.
For error-free setup, always refer to the
associated sections in the
Event Master devices
User’s
Guide.
Event Master Series Controller Installation: System Connections
Touch Screen Calibration
— (Optional) The operating
system on the host computer provides this capability as it
would for any standard touchscreen. Refer to the OS manual
for the correct procedure.
USB B to Host
AC
Communications Setup
— During the Event Master Toolset
installation you are asked to add a driver, be sure to answer yes
to this question in order to use the EC-50 with your host
computer. If the driver is not installed the EC-50 will not work.
Startup state of the desk
— Once the desk is connected and started it will retrive the
button assignment of the configuration. If there is none it will have to be assigned.
Script
Light
DVI-D Screen Input to Host
2 x USB A
The Red backlight on the EC indicates power is
on. This light does not turn off.
Back light
LEDs
Back
light
White light under the hand rest is for reading show
scripts. Light can be turned on and off.
Front light
One flexible scriptlight connection and a LED
powered light adapter is supplied. Light can be
adjusted for brightness.
Scriptlight
Indications
If the Blue LED´s of the Destination buttons chase
back and forth they indicate that the
communication with the host controller is not
establisched.
Blue LEDs in Destination
Assigning resources to the desk
— In the Event Master Toolset, click on the
icon to open the controller menu setup page. Drag and drop the resources from the right
side onto the buttons corresponding to the ones on the console.
Barco Technical Support:
USA
: +1 (866) 374-7878
EMEA :
+32 (56) 36 8019
CHINA :
40088 22726
www.barco.com/support/eSupport.aspx