13. Display Setup
To enable the menus and dialog boxes again, press the TEXT button on the RCU.
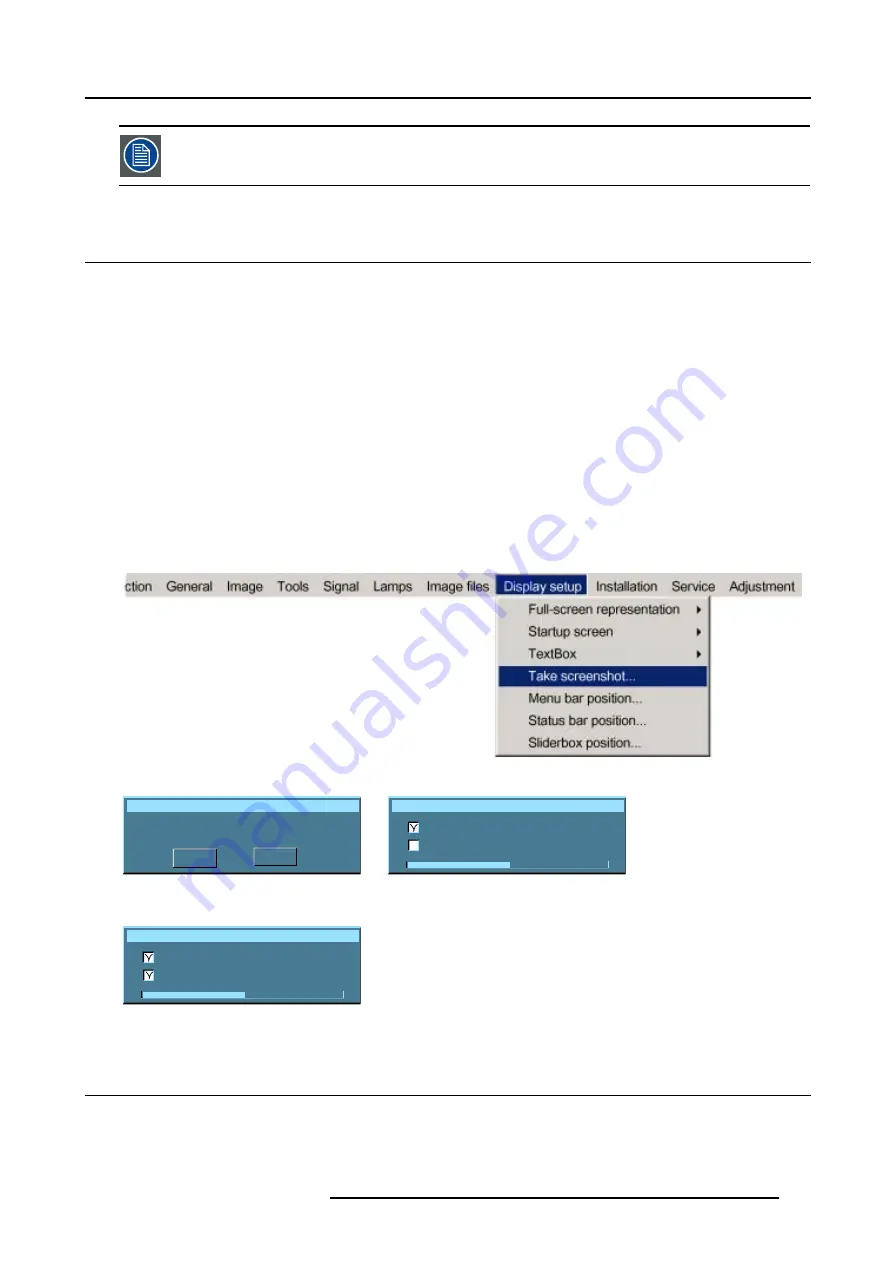
13.4 Take screenshot
What can be done ?
A screen-shot can be taken from the active projected image. This screen-shot is then saved in a 4 MB RAM and can be used as
background (logo).
Each new screenshot erases the previous one, therefore a warning message is displayed asking the user to confirm.
How to take a screenshot ?
1. Press
MENU
to activate the menu bar.
2. Press
→
to select the
Display setup
item. (image 13-4)
3. Press
↓
to pull down the
Display setup
menu.
4. Use
↑
or
↓
to select
Take screenshot.
5. Press
ENTER
.
A dialog box is displayed. (image 13-5)
6. Press
yes
to confirm.
A text box shows the evolution of the operation. (image 13-6, image 13-7)
Image 13-4
Take screenshot
This will erase your current logo
Are you sure to proceed?
YES
NO
Image 13-5
Override message
Screenshot
Erasing logo
Saving logo
Image 13-6
Screenshot
Erasing logo
Saving logo
Image 13-7
13.5 Menu bar position
What can be done ?
The menu bar can be centered vertically. The range is from the top of the screen to the middle of the screen.
This is useful in applications where the top image content is not displayed (e.g. due to blanking).
R5976697 CINEVERSUM™ 110 06012004
101
Summary of Contents for CineVERSUM 110 R9010120
Page 1: ...HOME CINEMA CINEVERSUM 110 R9010120 OWNER S MANUAL 06012004 R5976697 00...
Page 4: ......
Page 8: ...Table of contents 4 R5976697 CINEVERSUM 110 06012004...
Page 32: ...3 Connections 28 R5976697 CINEVERSUM 110 06012004...
Page 44: ...4 Getting Started 40 R5976697 CINEVERSUM 110 06012004...
Page 52: ...6 Source Selection 48 R5976697 CINEVERSUM 110 06012004...
Page 86: ...9 Tools Menu 82 R5976697 CINEVERSUM 110 06012004...
Page 116: ...13 Display Setup Image 13 34 112 R5976697 CINEVERSUM 110 06012004...
Page 128: ...A Standard Image Files 124 R5976697 CINEVERSUM 110 06012004...


