


13
USO DEL EQUIPO
DESCRIPCIÓN DE FUNCIONAMIENTO
DESCRIPCIÓN DE FUNCIONAMIENTO
El aparato incluye un sistema de ventilación de aire
caliente. Un ventilador distribuye el calor de la
resistencia calefactora de manera ideal por el interior
del cajón. El termostato permite definir y controlar la
temperatura deseada para las vajillas introducidas.
La circulación del aire calienta las vajillas de manera
uniforme y rápida. Una rejilla de protección impide
que se puedan tocar accidentalmente las resistencias
calefactoras y el ventilador.
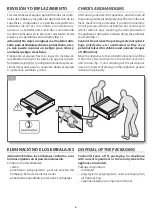
APERTURA Y CIERRE DEL CAJÓN
APERTURA Y CIERRE DEL CAJÓN
Abra el cajón presionando sobre el frente, agarre el
cajón y extráigalo hasta abrirlo completamente (fig.
6). Para cerrar el cajón, acompáñelo en el sentido de
cierre y luego presione sobre el frente hasta que se
enganche.
P
U
S
H
P
U
L
L
1
2
6
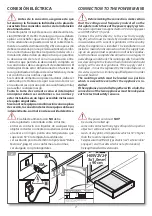
USO
Abra el cajón, gire la rueda “1” seleccionando la
temperatura deseada y pulse el botón rojo “2”: se en-
cenderá la luz piloto roja del botón, que permanecerá
encendida durante todo el funcionamiento (fig. 7).
Para apagar el aparato ponga en la posición “0 - off”
la rueda “1” y pulse el botón “2”; la luz roja se apagará.
2
1
7
USING THE APPLIANCE
USE DESCRIPTION
The appliance is equipped with a hot air ventilating
system. A fan distributes in an optimal way towards the
internal space of the warming drawer.
The thermostat allows the user to control and set the
appliance at the desired temperature.
The circulation of the air heats the drawer in a rapid
and uniform way.
With the protective measures in place it is not possible
to accidentally touch the heating element or the fan.
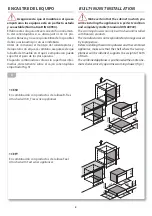
OPENING AND CLOSING THE DRAWER
To open the drawer press the front of the drawer, grasp
the handle, pull the drawer towards you until it is opened
completely (fig. 6) To close the drawer, gently push the
drawer back, pushing the front until it has completely
gone back.
USE
Open the drawer. Turn the handle “1” in order to set the
desired temperature and then press the red button “2”.
A red light will turn on and will remain on throughout
use (fig. 7). To turn off the appliance, turn the handle “1”
to the “ - off”0 position and then press the button “2”.
The red light will turn off.