background image

Baofeng UV-5R

iii

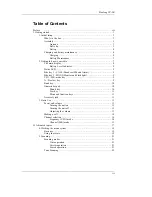
Table of Contents

Preface  ....................................................................................................   vii
I.  Getting  started  .........................................................................................  1

1.  Initial  setup  ....................................................................................   3

What's  in  the  box  ........................................................................  3
Assembly  ..................................................................................   3

Antenna  ............................................................................   3
Belt  clip  ............................................................................   3
Battery  ..............................................................................   4

Charging and battery maintenance .................................................. 4

Charging  ...........................................................................   4
Battery Maintenance ............................................................  5

2. Getting to know your radio ...............................................................  7

The  main  display  ........................................................................   8

Battery Level Indicator ........................................................  9

Status  LED  ................................................................................   9
Side key 1 - CALL (Broadcast FM and Alarm) ................................  9
Side key 2 - MONI (Monitor and Flashlight) .................................... 9
VFO / MR -mode key .................................................................. 9
A  /  B  select  key  ..........................................................................  9
Band  key  .................................................................................   10
Numeric  keypad  ........................................................................   10

Pound  key  ........................................................................  10
Star  key  ...........................................................................   11
Menu and function keys .....................................................  11

Accessory  jack  ..........................................................................  11

3.  Basic  Use  .....................................................................................  13

Power  and  volume  .....................................................................  13

Turning the unit on ...........................................................  13
Turning the unit off ...........................................................  13
Adjusting the volume .........................................................  13

Making  a  call  ...........................................................................   14
Channel  selection  ......................................................................   14

Frequency (VFO) mode ......................................................  14
Channel (MR) mode ..........................................................  15

II.  Advanced  topics  ...................................................................................   17

4. Working the menu system ...............................................................  19

Basic  use  .................................................................................   19
Using  short-cuts  ........................................................................   19

5.  Scanning  ......................................................................................   21

Scanning  modes  ........................................................................   21

Time  operation  .................................................................   21
Carrier  operation  ...............................................................   21
Search  operation  ...............................................................   21

Tone  Scanning  ..........................................................................   22

Summary of Contents for UV-5R Series

Page 1: ...Baofeng UV 5R The Chinese Radio Documentation Project http radiodoc github com Lennart Lidberg...

Page 2: ...blic Domain Where the work or any of its elements is in the public domain under applicable law that status is in no way affected by the license Other Rights In no way are any of the following rights a...

Page 3: ...de key 2 MONI Monitor and Flashlight 9 VFO MR mode key 9 A B select key 9 Band key 10 Numeric keypad 10 Pound key 10 Star key 11 Menu and function keys 11 Accessory jack 11 3 Basic Use 13 Power and vo...

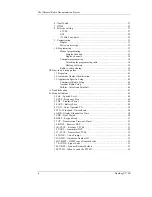
Page 4: ...Commercial Radio Setup 45 Amateur Radio Setup 45 MilSim Airsoft and Paintball 46 A Troubleshooting 47 B Menu definitions 49 0 SQL Squelch Level 49 1 STEP Frequency Step 49 2 TXP Transmit Power 49 3 SA...

Page 5: ...ED Display back light colour Standby 56 30 RX LED Display back light colour Receive 57 31 TX LED Display back light colour Transmit 57 32 AL MOD Alarm Mode 57 33 BAND Band Selection 57 34 TDR AB Trans...

Page 6: ...The Chinese Radio Documentation Project vi Baofeng UV 5R...

Page 7: ...e polish of a professional publication the content should be the best it can be Many thanks to all of those who donated to make this possible Also big thanks to O Reilly Media for their inspiration an...

Page 8: ...The Chinese Radio Documentation Project viii Preface...

Page 9: ...Baofeng UV 5R 1 Part I Getting started Part one covers the basic setup and use of your hand held two way transceiver Chapter 1 Initial setup Chapter 2 Getting to know your radio Chapter 3 Basic Use...

Page 10: ...The Chinese Radio Documentation Project 2 Getting started...

Page 11: ...ted with a Male SMA connector To mount your antenna Female SMA connector align the two connectors and turn clockwise until it stops Do not over tighten your antenna to avoid damage to the connectors W...

Page 12: ...y pack see Figure 2 1 Baofeng UV 5R overview as you slide the battery downward Charging and battery maintenance For optimum battery efficiency cycle the battery at least three times before regular use...

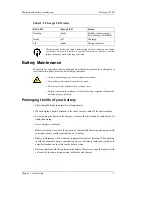
Page 13: ...to fire or intense heat Dispose of batteries in accordance with local recycling regulations Batteries do not belong in your trash can Prolonging the life of your battery Only charge batteries in norma...

Page 14: ...moisture in the battery This method is only effective against minor splashes light rain for instance A soaked radio may very well be beyond repair Storage Fully charge your battery before long time st...

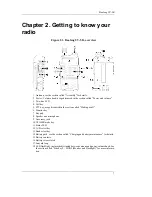
Page 15: ...he section called Making a call 6 Monitor key 7 Keypad 8 Speaker and microphone 9 Accessory jack 10 VFO MR mode key 11 Status LED 12 A B select key 13 Band select key 14 Battery pack see the section c...

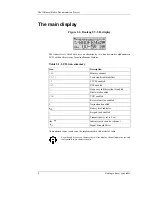
Page 16: ...channel 25 75 Least significant modifiers CT CTCSS enabled DCS DCS enabled Frequency shift direction if enabled S Dual watch enabled VOX VOX enabled R Reverse function enabled N Narrowband enabled Bat...

Page 17: ...receiver Another momentary press turns the broadcast FM receiver off Press and hold to activate the alarm function Press again to turn it off Side key 2 MONI Monitor and Flash light Press momentarily...

Page 18: ...functions scan and keypad lock respectively Pound key In channel mode also acts as a transmit power short key While in channel mode momentarily press to change between High and Low transmit power Do...

Page 19: ...Scanning for details Menu and function keys The key used to enter the menu and confirm menu options The and keys are used to navigate through the menu as well as select channels and step up or down i...

Page 20: ...ccessories such as headsets speaker mics or programming cables align the connecors and push in fully The fit isn t always perfect on cheap cables and connectors and may require a bit of force to wiggl...

Page 21: ...on by holding down miscellaneous keys as you turn it on Holding down the key while turning on the radio provides you with the firmware version Holding down the key while turning on the radio provides...

Page 22: ...l depend entirely on your use case Frequency VFO mode In Frequency VFO mode you can navigate up and down the band by using the and keys Each press will increment or decrement your frequency according...

Page 23: ...on frequencies you re not authorized to operate on is illegal and in most jurisdictions a serious offence If you get caught transmitting without a license you can and will get fined and in worst case...

Page 24: ...The Chinese Radio Documentation Project 16 Basic Use...

Page 25: ...the more advanced topics such as setup of repeater offset and programming via computer link Chapter 4 Working the menu system Chapter 5 Scanning Chapter 6 Dual Watch Chapter 7 DTMF Chapter 8 Selectiv...

Page 26: ...The Chinese Radio Documentation Project 18 Advanced topics...

Page 27: ...eter 5 When you ve selected the parameter you want to set for a given menu item a To confirm your selection press and it will save your setting and bring you back to the main menu b To cancel your cha...

Page 28: ...ntering the desired parameter you have two options a Use the arrow keys as we did in the previous section or b Use the numerical keypad to enter the numerical short cut code 5 And just as in the previ...

Page 29: ...ation Time carrier or search each of which are explained in further details in their respective section below Procedure 5 1 Setting scanner mode 1 Press the key to enter the menu 2 Enter on your numer...

Page 30: ...des or b to scan for CTCSS sub tones 3 Press the key to select 4 Press the key momentarily CT or DCS will start flashing in the display as the radio starts scanning Once it finds a tone or code in use...

Page 31: ...ey to switch between high and low transmit power in channel mode You cannot save duplex channels Procedure 6 1 Enabling or disabling Dual Watch mode 1 Press the key to enter the menu 2 Enter on the nu...

Page 32: ...entarily override the lock without having to setting the menu option to OFF you can do so by pressing the key an instant before pressing the PTT Another option for overriding the lock momentarily is t...

Page 33: ...gle digit sequence Table 7 1 DTMF frequencies and corresponding codes 1209 Hz 1336 Hz 1477 Hz 1633 Hz 697 Hz 1 2 3 A 770 Hz 4 5 6 B 852 Hz 7 8 9 C 941 Hz 0 D The Baofeng UV 5R has a full implementatio...

Page 34: ...The Chinese Radio Documentation Project 26 DTMF...

Page 35: ...code can you get that radio to open up to your transmissions The Baofeng UV 5R features three different ways of group calling CTCSS DCS Tone burst 1750Hz The Baofeng UV 5R does not feature any form of...

Page 36: ...m To turn CTCSS off follow the same procedure but set it to off with the key instead of selecting a CTCSS sub tone frequency For more information see the section called 11 R CTCS Receiver CTCSS and th...

Page 37: ...set it to off with the key instead of selecting a DCS code For more information see the section called 10 R DCS Receiver DCS and the section called 12 T DCS Transmitter DCS in Appendix B Menu definiti...

Page 38: ...The Chinese Radio Documentation Project 30 Selective calling...

Page 39: ...eps Procedure 9 1 Changing backlight colour 1 Press the key to enter the menu 2 Enter one of the following on your numeric keypad a to change the Standby colour b to change the receive colour c to cha...

Page 40: ...message 1 Click other in the menu bar a dialogue box titled Other should have popped up 2 In the box titled Power On Message there are two text fields representing the two lines on your LCD Enter the...

Page 41: ...radio to Frequency VFO mode using the key When in Frequency VFO mode select your desired receive frequency using the numerical keypad After that use the menu system to configure the finer details of...

Page 42: ...t a hold of your software and how to install it that you ve already installed your software and that you know how to find out what port your programming cable is hooked up to Attaching the programming...

Page 43: ...formation window in the Baofeng software features a simple and easy to use spreadsheet style interface Some columns are obvious others aren t as transparent as to what their purpose is However in most...

Page 44: ...he channels you want to add To delete a channel simply go to the RX Frequency field of that channel s row erase it and click on another field The row should now erase itself When you re done adding an...

Page 45: ...ant to clone from while holding down the key The master will show COPING in the display and if makes a successful connection to the slave it will start flashing red to indicate it s transmitting data...

Page 46: ...The Chinese Radio Documentation Project 38 Programming...

Page 47: ...d setup guides Part three covers is a collection of how to documents to help you set up your radio for specific working environments Chapter 11 Repeaters Chapter 12 Automatic Number Identification Cha...

Page 48: ...The Chinese Radio Documentation Project 40 How to and setup guides...

Page 49: ...frequencies on the same memory channel How you use this kind of repeater is by setting the receive frequency of your radio to the output frequency of the repeater and the transmit frequency of your ra...

Page 50: ...h the procedure again Certain Amateur Radio repeaters especially in Europe use a 1750Hz tone burst to open up the repeater To see how this is done with the Baofeng UV 5R see the section called 1750Hz...

Page 51: ...ow called DTMF En code Decode 3 Go to the Program menu select Read from radio and the Read Data From Radio window will open 4 Click the Read button The status LED on the radio will flash red indicatin...

Page 52: ...will flash red indicating it s transmitting data 4 In the lower left corner there s a nameless box with a number of drop down lists including but not limited to DTMF ST and PTT_ID Use the DTMF ST dro...

Page 53: ...frequency mode If your employer has a dispatch system that requires your radio to identify via ANI please see Chapter 12 Automatic Number Identification for detailed instructions on how to set that up...

Page 54: ...ft games Paintball games or other recreational military simulations 462 550 MHz channel 15 462 575 MHz channel 16 462 600 MHz channel 17 462 625 MHz channel 18 462 725 MHz channel 22 Channel numbers r...

Page 55: ...arge the battery The LED indicates recep tion but the speaker is silent Volume is too low CTCSS or DCS enabled Turn up the volume Change your CTCSS or DCS to match those you re trying to communicate w...

Page 56: ...The Chinese Radio Documentation Project 48 Troubleshooting...

Page 57: ...hen using the and keys This is also the interval the scanner will run at Key Values kHz Notes Default value 0 2 5K 25 0K 1 5 0K 2 6 25K 3 10 0K 4 12 5K 5 25 0K This does only affect the radio when in...

Page 58: ...rrowband Sets maximum band deviation Key Values Notes Default value 0 WIDE 5kHz WIDE 1 NARR 2 5kHz In the USA FCC part 90 radios are mandated to switch over to Narrowband communi cation by January 1st...

Page 59: ...conds Notes Default value 15 600 Increments of 15 seconds 60 To use the numeric keypad for input use the following formula T 15 15 X where T is the time in seconds that you want and X is a two digit c...

Page 60: ...codes and their corre sponding numerical value Remember to input any leading zeros when using the numer ical keypad To set it to off enter code 000 13 T CTCS Transmitter CTCSS Sets the Continuous Ton...

Page 61: ...ode Selects if you should send your S CODE DT or ANI code with the PTT ID Key Values Notes Default value 1 DT ST S CODE only DT ANI 2 ANI code onlyANI ST 3 DT ANI Both 0 OFF You cannot set DTMFST whil...

Page 62: ...TT ID When to send the PTT ID Sets when to send the PTT ID ANI and or S CODE code s Key Values Notes Default value 1 BOT Beginning Of Trans mit OFF 2 EOT End Of Transmit 3 BOTH Both BOT and EOT 0 OFF...

Page 63: ...usy Channel Lock out If enabled your radio will prevent you from transmitting on active frequencies Key Values Notes Default value 1 ON OFF 0 OFF 24 AUTOLK Automatic Keypad Lock If enabled keypad will...

Page 64: ...eading zeroes For a 2MHz shift enter For a 600kHz shift enter Use the and keys to set offsets below 100kHz 27 MEM CH Store a Memory Channel Stores current settings in memory to the specified channel n...

Page 65: ...BLUE BLUE 2 ORANGE 3 PURPLE 0 OFF 31 TX LED Display back light colour Transmit Sets the back light colour while transmitting a signal Key Values Notes Default value 1 BLUE ORANGE 2 ORANGE 3 PURPLE 0...

Page 66: ...dio to transmit on the selected frequency when in Dual Watch mode Key Values Notes Default value 1 A Upper display OFF 2 B Lower display 0 OFF 35 STE Squelch Tail Elimination Key Values Notes Default...

Page 67: ...CD MSG 1 MSG Displays a 2 line welcome message 39 ROGER Roger Beep Transmits an audible tone after you release the PTT Key Values Notes Default value 1 ON OFF 0 OFF 40 RESET Restore defaults Resets th...

Page 68: ...The Chinese Radio Documentation Project 60 Menu definitions...

Page 69: ...ng temperature 20 C to 60 C Supply voltage 7 4 Consumption 75mA standby 380mA reception 1 4A transmission Mode of operation Simplex or semi duplex Duty cycle 03 03 54 min Rx Tx Standby Dimensions mm 5...

Page 70: ...7N 009 D051N 010 D053N 011 D054N 012 D065N 013 D071N 014 D072N 015 D073N 016 D074N 017 D114N 018 D115N 019 D116N 020 D122N 021 D125N 022 D131N 023 D132N 024 D134N 025 D143N 026 D145N 027 D152N 028 D15...

Page 71: ...088 D606N 089 D612N 090 D624N 091 D627N 092 D631N 093 D632N 094 D645N 095 D654N 096 D662N 097 D664N 098 D703N 099 D718N 100 D723N 101 D731N 102 D732N 103 D734N 104 D743N 105 D754N CTCSS table Table C...

Page 72: ...4 Technical specifications Number Frequency Number Frequency 31 171 3 32 173 8 33 177 8 34 179 9 35 183 5 36 186 2 37 189 9 38 192 8 39 196 6 40 199 5 41 203 5 42 206 5 43 210 7 44 218 1 45 225 7 46 2...

Page 73: ...Baofeng UV 5R 65 Colophon All linework drawings were recreated in Inkscape http inkscape org using the original Baofeng manual artwork as reference...

Page 74: ...The Chinese Radio Documentation Project 66 Colophon...

Reviews: