Banner MIGHTYLAM 2700 Operating Instructions Manual Download Page 14


14

TROUBLESHOOTING 


PROBLEM: 

Laminator is inoperative.  Motor does not run, indicator lights are out.


ACTION: 

Unit may be unplugged.  Connect power supply. Ensure that your circuit breaker has   

                           not tripped. Fuse may have blown.  Replace 15 amp power fuse. 


PROBLEM: 

Laminating film and item being laminated move through laminator erratically. 


ACTION: 

Check thickness of item to be laminated.  Maximum thickness is 1/16” (1.6mm) if  

                           rollers have not been adjusted.


Clean heat shoes of residual adhesive.  Refer to  

                           MAINTENANCE section for cleaning instructions.


PROBLEM:   Plastic is not bonding to the item or to itself at the edges. 
 

ACTION: 

Make sure heat shoes and rollers are at proper operating temperature and  have had time to warm up 


(Approximately 30 minutes).  See table 1 for the suggested  

                          temperature ranges. 


PROBLEM: 

Wrinkles appear on the laminated items running parallel with the outside edges. 


ACTION: 

Increase film tension on top and/or bottom supply rolls. Reduce heat shoe  

                           temperature. Clean heat shoes of residual adhesive.  See MAINTENANCE section  

                           for cleaning instruct

ions. 


PROBLEM: 

Blistering of the film appears over the item or along the edge. 


ACTION: 

Reduce temperature on one or both heat shoes.  If the indicator light remains on after  

                           the adjustment is made, disconnect the power supply and contact your dealer. Clean laminating  


rollers.  See MAINTENANCE section for cleaning instructions.  There may be moisture in the  


paper you are laminating.  Store paper in a dry place and be sure that any ink is thoroughly dry before 

  laminating. 
 

PROBLEM: 

Laminated material curls after leaving pull rollers.


ACTION: 

Adjust tension.  If laminated item curls upwards, reduce top roller film. If item curls downward, reduce 


bottom film tension. Clean heat shoes of residual adhesives as it may be causing “drag” on one side.  


Refer to MAINTENANCE section for cleaning instructions. 


Summary of Contents for MIGHTYLAM 2700

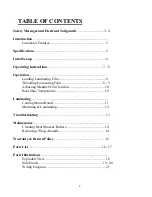
Page 1: ...OPERATING INSTRUCTIONS MIGHTYLAM 2700 ROLL LAMINATOR...

Page 2: ...ading Laminating Film 8 Threading Laminating Film 8 9 Adjusting Mandrel Film Tension 10 Heat Shoe Temperature 10 Laminating Coating Mount Board 11 Mounting Laminating 12 Troubleshooting 13 Maintenance...

Page 3: ...n the laminator They may contact dangerous voltage points or short out components that could result in fire or electrical shock The laminator should only be operated from the type of power source indi...

Page 4: ...representative When the power supply cord or plug is damaged or frayed If liquid has been spilled into the laminator or it has been exposed to water If the laminator has been subjected to excessive j...

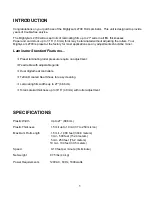
Page 5: ...Laminator Standard Features Preset laminating roller pressure require no adjustment Feed table with adjustable guide Dual digital heat controllers Teflon coated Heat Shoes for easy cleaning Laminating...

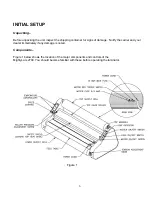
Page 6: ...ainer for signs of damage Notify the carrier and your dealer immediately if any damage is noted Components Figure 1 below shows the location of the major components and controls of the MightyLam 2700...

Page 7: ...ing and Adjusting the Set Temperature To determine the Set Temperature with the heater switch activated and the current temperature displayed press and hold down either the up or down arrow for 3 4 se...

Page 8: ...poly in film rolls shiny side out dull side in 1 For the top supply roll place the mandrel ends into the slots in the top of the laminator If you are facing the front of the laminator the film should...

Page 9: ...to 350 F Do not touch the surface of the heat shoes 5 Turn the Motor Switch on to start the Laminating and Pull Rollers 6 Feed a piece of thin cardboard about 10 x 25 against the film so that it is ce...

Page 10: ...above 5 If you are not ready to laminate turn the motor switch and heat switch off Setting Heat Shoe Temperature The laminator temperature should be adjusted according to the film thickness and the it...

Page 11: ...3 Carefully loosen each release screw and lower the blade in contact with the web Tighten the release screw 4 To prevent accidental damage to rollers remove slitter blades when not in use Figure 8 La...

Page 12: ...andrel to keep the adhesive from accumulating on the rollers and heat shoes Thread as for laminating film 3 Using the supplied allen wrench back out the four pressure adjustment screws 1 full turn for...

Page 13: ...her temperatures than indicated for mounting and laminating mount board 5 Turn the fans on 6 Perform a test mount to ensure proper settings for successful mounting If any adjustments are necessary mak...

Page 14: ...laminated items running parallel with the outside edges ACTION Increase film tension on top and or bottom supply rolls Reduce heat shoe temperature Clean heat shoes of residual adhesive See MAINTENANC...

Page 15: ...ic film at the top and bottom mandrels 4 Turn the motor switch on and pull the film out of the back of the machine 5 Turn the motor switch off 6 Use a soft cloth moistened with denatured alcohol to re...

Page 16: ...proper usage The manufacturer makes no other warranty stated or implied except as stated above Return Policy If your laminator is not operating properly first review the Operating Instructions and Tro...

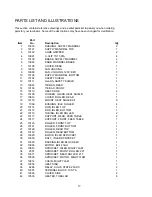
Page 17: ...AT SHOE 2 16 10105 HOLDER GLASS HEAT SHIELD 1 17 10816 COVER ROLLER REAR 1 18 10118 MOUNT HEAT SHOE EZII 8 19 1060 BUSHING IDLE ROLLER 4 20 10114 ROD IDLER TOP 1 21 10115 ROD IDLER BOTTOM 1 22 10119 T...

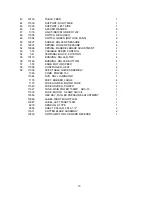
Page 18: ...1 55 10113 BUSHING ROLLER TOP 4 56 10126 BUSHING ROLLER BOTTOM 4 57 557 KNOB MOTOR SPEED 1 58 11596 CONTROLLER HEAT 2 59 11535 FEED TABLE GUIDE ASSEMBLY 1 1395 CORD POWER 14 3 1 11544 DVD ROLL LAMINA...

Page 19: ...19...

Page 20: ...20...

Page 21: ...21...

Page 22: ...22...

Reviews: