background image

11

Before playing a loaded CD, all

information on the CD is registered,

such as the number of tracks. Then

the CD starts playing from the

beginning. Playback continues until

the whole CD has been played,

unless you choose differently.

You can always keep track of what the CD

player is doing by watching the displays.

The displays show either track number or

track time, depending on which display

mode it has been set to. If you have

named the CD, the name will also be

shown in the display*

Use the CD player

Play a CD 

Press to play a loaded CD 

Press to play specific track

numbers

Press to play the next track

Press to play the previous track

Press to pause playing

Press to resume playing

Press to search forward toward

the end of the CD

Press to search backward toward

the beginning of the CD – Keep

the button pressed down until

you have reached the point you

want 

Adjust volume…

Press to adjust the volume up or

down

Press to silence the speakers

completely, press again to restore

sound

CD

9

STOP

GO

tt

ss


MUTE

NOTE! BeoSound 3200 automatically switches

to standby if idle for 30 minutes. *If the

display has been set to show the name of the

CD, only the name will appear in the display

and you cannot follow the elapsed time

process. See page 7 for details of the various

display modes.

TRACK    1   2   3   4   

5

   6   7   8   9  10

 RANDOM 

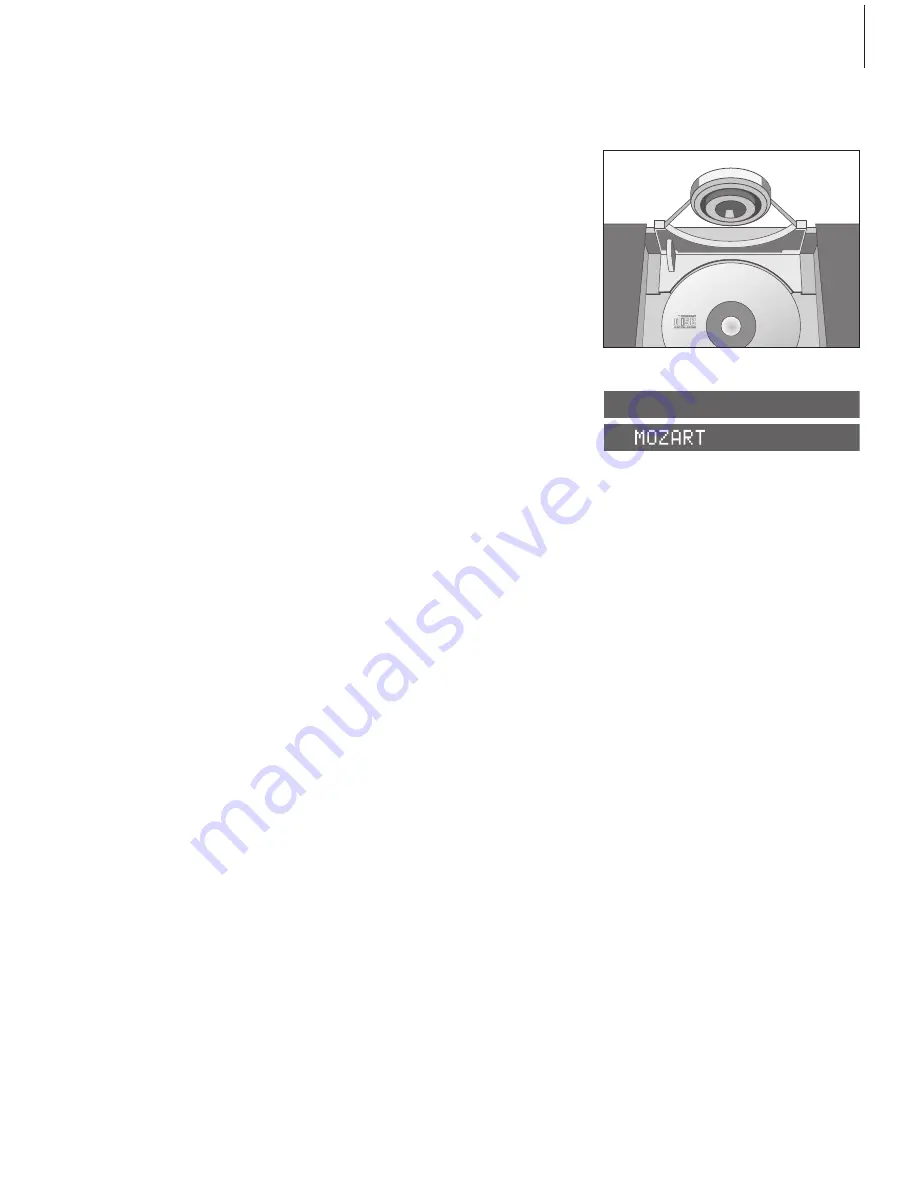
The CD playing has been named ‘MOZART’. The

tracks are being played in random order.

1. Nomeooo jxisks skjs  kskd skd oo jxisks

 2. Skjs  kskd skd oo 

3. Jxisks skjs  kskd skd Nomeooo 

4. Jxisks skjs  kskd skd oo jxisks skjs  kskd 

5. Skd oo jxisks skjs  kskd skd 

Summary of Contents for BeoSound 3200

Page 1: ...BeoSound 3200 Guide...

Page 2: ...personnel WARNING To prevent fire or electric shock do not expose this appliance to rain or moisture This symbol indicates that a dangerous voltage constituting a risk of electric shock is present wi...

Page 3: ...radio stations Furthermore learn how to edit the CD memory copy move and delete and how to make the music system start or stop at a specific time as well as how to operate an Audio Video system Placem...

Page 4: ...utton to raise the clamp which holds the CD in place You can now remove a CD or load one you want to play Always load a CD with the label facing you Press LOAD again to lower the clamp If you press CD...

Page 5: ...es that will appear in the display unless you name the groups as described on page 19 1 Nomeooo jxisks skjs kskd skd oo jxisks 2 Skjs kskd skd oo 3 Jxisks skjs kskd skd Nomeooo 4 Jxisks skjs kskd skd...

Page 6: ...9 0 SETUP MUTE TRACK 1 2 3 4 5 6 7 8 9 10 RANDOM Displays The displays tell you what the system is doing The cues in the upper display relate to functions in the CD player e g track number The lower...

Page 7: ...side of the panel give you access to all primary functions switching the system on and off adjusting volume muting sound and operating the radio CD player and CD memory The radio station named CLASSIC...

Page 8: ...8...

Page 9: ...mote control if you have one For information about more advanced operation such as copying the contents of a CD into the CD memory refer to the next chapter Advanced operation on page 15 Daily use Pla...

Page 10: ...tored in the green group Press to play the CDs stored in the yellow group Press to play the CDs stored in the red group Press to play the CDs stored in the blue group If no CDs are stored in the group...

Page 11: ...ing Press to search forward toward the end of the CD Press to search backward toward the beginning of the CD Keep the button pressed down until you have reached the point you want Adjust volume Press...

Page 12: ...for further information Use the radio Switch on the radio Press to switch on the radio Use the number keys to select a stored station Step through all stored stations Switch to standby Pressing 0 swi...

Page 13: ...t radio program number CD or CD track number Press to make a Timer programming Steps through your radio programs or tracks on a CD Press when RANDOM or REPEAT is shown in the display to activate the f...

Page 14: ...14...

Page 15: ...udio Video setup Advanced operation Play favourite tracks only 16 Edit a CD Play or delete a series of tracks Random and Repeat 17 Different ways of playing CDs Copy and store a CD 18 Copy and store a...

Page 16: ...ss to start scanning the CD EDITING appears and SCAN is shown in the upper display Press to include a track number in the series or Press to exclude a track number from the series EDIT OK appears in t...

Page 17: ...tion ON appears and REPEAT is shown in the upper display To cancel the random or repeat function simply press the relevant button again CD CD MEM RANDOM ON CD REPEAT ON NOTE If you cancel the random p...

Page 18: ...h to copy the CD Press GO to confirm Then the display indicates to copy all tracks Press to copy the entire CD Press to choose which group to store your CD in green yellow red or blue The first availa...

Page 19: ...has no name the disc number e g DISC 1 appears Press to list the names one by one Delete CD name Press to delete a name and series of tracks while the appropriate name is displayed DELETE appears Pre...

Page 20: ...e group you wish to copy from Press to select the CD you wish to copy the CD starts playing Press to be able to copy the CD to another group Press to select the group you wish to copy to Press to sele...

Page 21: ...play the CDs in the group you last listened to Press to select the group you wish to delete a CD or track from Press to select the CD you wish to delete or delete a track from the CD start playing Pr...

Page 22: ...ess to step between program numbers If you choose CD memory as your source select a group also Press to accept the source A start time appears Key in the start time you want Press to accept A stop tim...

Page 23: ...ed Press to change source if you wish Press to accept if you have changed the source Key in your corrections Press to accept OK appears Press to store STORED appears indicating that your corrected Tim...

Page 24: ...ither system Use an Audio Video system Play audio or video sound on either system To listen to sound from your video system on your music system speakers without switching on the television screen Pre...

Page 25: ...eir sockets on the rear panel of the music system remember not to connect it to the mains yet 5 Mount the glass doors 6 Connect the products to the mains Placement connections and maintenance How to s...

Page 26: ...llow a space of at least 5 cm above and to each side of the music system for adequate ventilation Remember to leave enough space at the sides for the glass doors to open If you want to hang the music...

Page 27: ...eaker or you may connect one speaker to each of the two sockets Refer to the User s guide for your BeoLab loudspeakers Remember to set the L R LINE switch on the BeoLab speakers to L and R left and ri...

Page 28: ...properly with the grill Do not plug in the cables before the cable cover is mounted Mount the glass doors The labels on the back of the glass doors indicate which end should be pointing upwards and w...

Page 29: ...e system switched to standby To program Option for your audio system While holding down the button press LIST Let go of both buttons Press LIST repeatedly until OPTION is shown in the Beo4 display and...

Page 30: ...ss doors we recommend that you use a mild window cleaner Fasten the doors again as described in this guide Leave the doors half way open before reconnecting the system to the mains CD memory hard disc...

Page 31: ...o4 refer to the chapter Daily use on page 9 Tuning and preference settings Tune and edit radio stations 32 Tune in radio stations Move stored radio stations Delete radio stations Adjust and store soun...

Page 32: ...Press to switch from STEREO to MONO Press to accept the first available program number appears Press to switch to a different program number or Key in the program number you want Press to store the st...

Page 33: ...e of the number buttons to select a radio station Press to delete the radio station you are listening to DELETE appears Press again to delete the station DELETED appears indicating that the radio stat...

Page 34: ...to access the sound adjustment function VOL and the current volume level appears Press to raise or lower the sound levels Press repeatedly to display the different sound displays e g BAL Press to adj...

Page 35: ...time appears Press to change to the exact time if necessary Alternatively key in the exact time Press to accept The date appears Press to change the date if necessary Press to accept The year appears...

Page 36: ...ue PIN _ _ _ _ is displayed Key in your personal PIN code The PIN code is not displayed When the four digit code has been entered the display returns to the relevant source e g RADIO 1 When the PIN co...

Page 37: ...0 9 PIN GO CONFIRM PIN _ _ _ _ 0 9 PIN GO STORED Deactivate the PIN code system Press twice when the set is in standby Press to key in the four digit PIN code PIN _ _ _ _ appears Key in your personal...

Page 38: ...ess to get access to the audio configuration Press repeatedly until AUDIO1 appears in the display Press to store the configuration STORED appears to indicate that the configuration has been stored You...

Page 39: ...appears to indicate that the button has been moved and you leave the Beo4 setup function automatically LIST ADD LIST MOVE GO GO 1 9 MOVED LIST ADD LIST REMOVE GO GO REMOVED Remove extra buttons Press...

Page 40: ...CD memory 20 Copy selected tracks only into the CD memory groups 18 Delete CDs from the CD memory 21 Delete tracks from the CD memory 21 Move CDs in the CD memory 20 21 Name CD memory groups 19 Name...

Page 41: ...t the clock 35 Sound adjustments 34 Radio Delete radio stations 33 Move radio stations 32 Name radio stations 19 Switch on the radio 12 Tune in radio stations 32 Random Play tracks in random order 17...

Page 42: ...lufsen product Anything which you consider important positive or negative may help us in our efforts to refine our products Thank you Write to Bang Olufsen a s Customer Service dept 7210 Peter Bangs V...

Page 43: ...determined by turning the equipment off and on the user is encouraged to try to correct the interference by one or more of the following measures Reorient or relocate the receiving antenna Increase th...

Page 44: ...www bang olufsen com...

Reviews: