background image

6

Loudspeakers

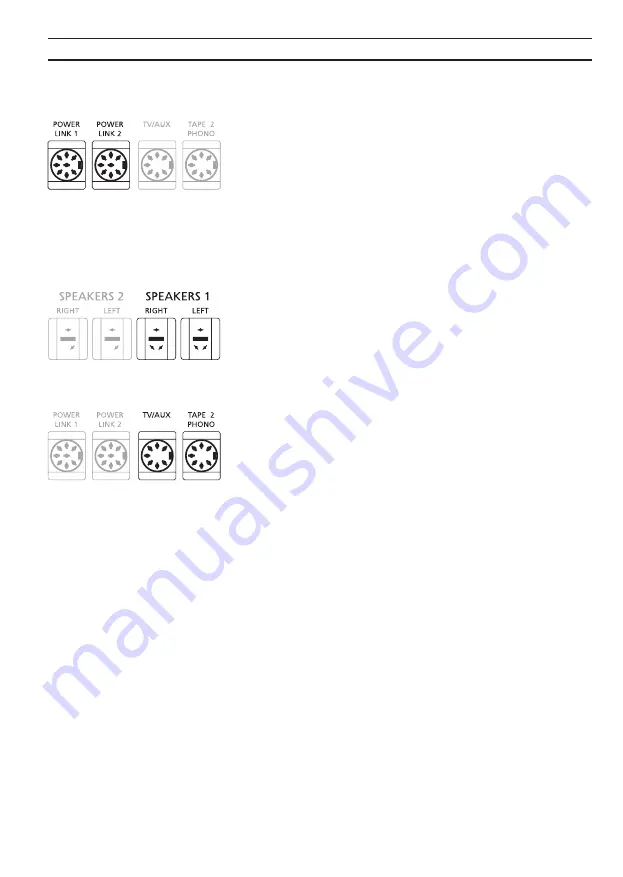
The sockets marked POWER LINK 1 and POWER LINK 2 are
for connecting active speakers with the Bang & Olufsen
Power Link facility, e.g. the Beolab 8000.

You may choose to loop the signals through from speaker
to speaker, as mentioned in the User’s guide for your
Beolab loudspeakers, or you may connect one speaker to
each of the two power link sockets. Remember to set the
L

R

LINE switch on the Beolab speakers to L and R (left and

right), respectively

The sockets marked SPEAKERS 1 (and SPEAKERS 2) are for
connecting a pair of passive loudspeakers. Connect the left
loudspeaker to the socket marked LEFT, and the right loud-
speaker to the socket marked RIGHT.

Auxiliary equipment

The two sockets marked TV/AUX and TAPE 2 - PHONO
enables you to connect and use compatible Bang &
Olufsen equipment with your Beocenter 9300, e.g. an extra
audio tape recorder, a record player, or a video system. The
sockets may also accommodate equipment of other makes.
Consult your Bang & Olufsen dealer for details.

Video system

If you have a compatible Bang & Olufsen TV set you may
connect it to the Beocenter 9300.

Connect your Beovision TV to the socket marked TV/AUX
using a special Audio Aux Link cable.

Second tape recorder

If you have a second tape recorder it may be used in con-
nection with the Beocenter.

Connect the tape recorder to the socket marked TAPE 2 -
PHONO.

Record player

If you have a record player it may be used in connection
with the Beocenter. The record player must be of a model
equipped with a preamplifier (RIAA), e.g. a Beogram 7000.

Connect the record player to the socket marked TAPE 2 -
PHONO.

> Connections

Untitled-1

27-06-00, 13:27

6

Summary of Contents for Beocenter 9300

Page 1: ...B E O C E N T E R 9 3 0 0 ...

Page 2: ...de reasonable protection against harmful interference in a residential instal lation This equipment generates uses and can radiate radio frequency energy and if not installed and used in accordance with the instructions may cause harmful interference to radio communications However there is no guarantee that interference will not occur in a particular installation If this equipment does cause harm...

Page 3: ...etting up guide explains how to set up your Beocenter 9300 and make it ready for use We recommend that you follow the instructions in this guide carefully See the Beocenter 9300 User s guide also enclosed for detailed operating instructions Contents 4 Placement 5 Connections 8 Ready for Use 10 Maintenance 12 International Guarantee ...

Page 4: ...ion holes Transport protection Remove the two screws using a screwdriver and place them in the two holes labelled PLAY for safekeeping If you ever have to transport the Beocenter we strongly recommend that you re insert the two transport screws in the holes labelled TRANSPORT IMPORTANT Before using the Beocenter 9300 the two transport protection screws for the CD drive mechanism must be removed Ot...

Page 5: ...ng Olufsen dealer advise you Connect your FM signal to the socket marked FM and your AM signal if any to the socket marked AM Connect loudspeakers aerial s and any other units to the Beocenter before connecting it to the mains LINE IN OUT type 2518 only Do not remove dummy plug if not in use Right Left Local Control System MCL FM aerial Active speakers AM aerial Second Bang Olufsen tape recorder o...

Page 6: ... marked TV AUX and TAPE 2 PHONO enables you to connect and use compatible Bang Olufsen equipment with your Beocenter 9300 e g an extra audio tape recorder a record player or a video system The sockets may also accommodate equipment of other makes Consult your Bang Olufsen dealer for details Video system If you have a compatible Bang Olufsen TV set you may connect it to the Beocenter 9300 Connect y...

Page 7: ...stribute the sound from your video sources to other rooms Please contact your Bang Olufsen dealer for details Connect the two 3 pin DIN plugs on the MCL cable i e the cable which leads to the other rooms to the sockets marked SPEAKERS 2 left and right respectively Headphones The socket marked PHONES on the front of the Beocenter to the right underneath the operation panel enables you to connect he...

Page 8: ... options Option 1 To be used for a setup with your Beocenter 9300 and the Beovision placed together in one room this is the factory setting Option 2 To be used for a setup with the Beocenter 9300 placed in one room and your Beovision placed in another Option 0 To be used if you want to disable remote control operation of the Beocenter 9300 to enable remote control again select one of the other opt...

Page 9: ...00 and the con nected Beovision TV are placed together in one room Program both systems to Option 1 The Beocenter 9300 and the con nected Beovision TV are split up and placed in two rooms Program both systems to Option 2 ...

Page 10: ...ts and grease stains on the glass panels Tape path The tape path that is the tape heads pinch rollers and other parts which the tape touches during playback or recording should be cleaned every now and then to avoid dust and fluff buildup It is a good idea to clean the tape path prior to making an important recording NOTE Never use alcohol or other solvents to clean any part of your Beocenter 9300...

Page 11: ...uld ever be used on the CD Avoid extreme heat and humidity and never write on your CDs Handling your Compact Cassettes Compact Cassettes tapes should always be stored in a protective box at normal room temperature Avoid extreme temperatures and humidity Before loading your Compact Cassette make sure that the tape is tightly wound If not try using a pencil or other thin object to tighten the tape Y...

Reviews: