6
10
F
Figure 2.
F
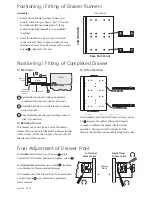
RH Side Shown
F
Figure 1.
10
1.
Identify drawer front clip (2 per drawer front)
2.
Hold plastic clip in one hand, and with other hand ‘unlock’ metal part of clip by swivelling through 90
o
3.
Secure metal clip to back of drawer front with 2 x screws. Reposition plastic portion of clip by
swivelling it back through 90
o.
* Repeat this procedure for fixing other clip
F
e
e
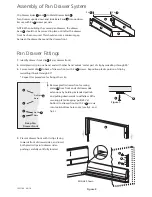
Pan Drawer Fittings
Assembly of Pan Drawer system
Clip Drawer Sides and to Metal Drawer Back .
Turn Drawer upside down and slide Base Panel into position.
Secure with 2 x screws per side.
NOTE: When building the curved pan drawers, the drawer
base should not be secured in place until after the drawer
front has been secured. This should ensure a minimum gap
between the drawer base and the drawer front.
2
1
F
3
4
Deep Pan
Drawer Front
Fix Clip
Here
e
Fix Plate
Here
10
2
1
F
3
4
2 x
F
2 x
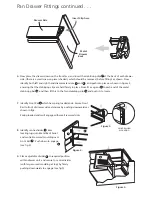
4.
Remove plastic drawer front securing
plates from front ends of drawer side
extensions by holding ‘extended pull tab’
and pulling downwards to withdraw. Affix
securing plates (keeping ‘pull tabs’ at
bottom) to drawer front with 2 x screws
into top & bottom holes only. (see fig1. and
fig2.)
10
F
5.
Present drawer front with its clips facing
towards front of drawer sides, and insert
both plastic clips into drawer sides -
pushing carefully until fully located.
4
CSS1199 06/10


