Remote System
User's Guide
Attention for Installation
(Read this section thoroughly before installation.)
Before using the Remote Sensor, read this manual carefully.
During installation and operation, pay close attention to the
safety aspect.
◆ Please turn off the Remote System before any performances
such as mounting, maintenance or breakdown.
◆ Ensure correct connections by reference to the wiring dia-
gram.
◆ To avoid malfunction caused by induction noise, cable
should be kept apart from motor or other power cable.
◆ Work for a while or immediately after operation, please do
not touch the (power supply unit, charging Unit, Head part) hot
spots. Doing so could result in burns.
◆ This product, which is one of those high frequency utiliza-
tion equipment of Radio Law, Upon use You will need to install
application. Please use it after you have made the application
without fail. Installation details of the application procedure,
see Telecommunications website of the Ministry of Internal
Affairs and Communications, Please.
◆ This product has become a Japan national specification. It
can not be used outside of Japan. It can not be used outside
of japan. When used outside of Japan, I guess we assume any
liability You.
(Former NIHON BALLUFF co., Ltd.)
Mail :[email protected] Web:http://www.b-plus-kk.com
Wireless Power Supply by
2017. 07. 26
T313402He
Remote Power supply system
210W specification RCS series
Charging unit : RCS210-PB24
Power Supply unit : RCS240-AC1
Passive Head
Active Head : RCS240AH
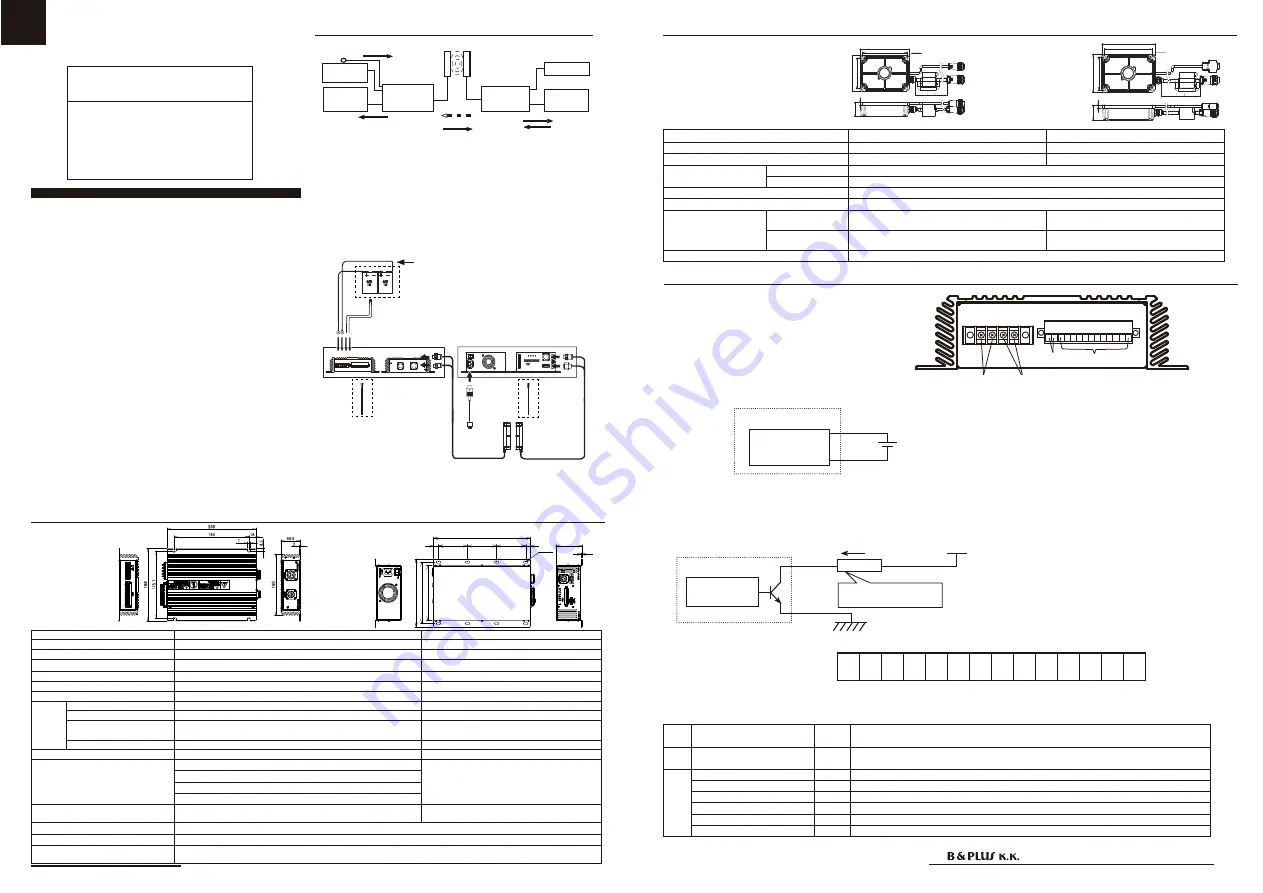
System configuration
Dimension
Specification
RCS210-
PB24
External
control
devices
External
control
devices
AC Power
24V
lead battery
RCS240AH
RCS240PH
RCS240-
AC1
【Function of each component】
Power supply unit :
I will convert to the high-frequency power supply, the
AC power. Further, in response to the (power supply start signal) input
signals, supplies a high frequency power to the Active head, and
output control equipment in Zone signal and various signals Active
head is received.
Charging unit :
And is Charging to the battery. It regularly monitors the
battery voltage and output voltage [battery monitor signal H, M, L] as
the result.
Head :
I can carry a variety of signal and power transmission in a
non-contact.
[Passive Head]
RCS240PH
Passive Head
Active Head
Type code
RCS240PH
RCS240AH
Application charging unit / power supply unit
RCS210-PB24
RCS240-AC1
Rated gap
Distance
10mm
Center offset
The sum total of gap of length and width is 10 mm or less.
Operating / Storage temperature
0 〜 50℃ /-10℃〜 50℃
Protection class
IP65
Connection
(With the connector
cable 1m)
Supply
Connected to the Charging unit at the (fe-
male) 3-pin round
Connected to the Charging unit at the (male)
3-pin round
Signal
Connected to the Charging unit at the (female)
5-pin round
Connected to the Charging unit at the
(male) D-sub9 pin
Accessories
4 screws M6x15, One ferrite clamp
【Connection diagram】
Power supply
Signal transmission
Various signal transmission
Various signal transmission
Charging unit
Power Supply unit
Type code
RCS210-PB24
RCS240-AC1
Rated input voltage
−
AC100V / AC200V
Output voltage / current
Max30V / Max7A
−
Current consumption
−
4A
Operating / Storage temperature
0 〜 40℃ /0 〜 50℃
0 〜 50℃ /0 〜 50℃
Protection class
IP20
IP20
Connec-
tion
Power supply / signal
Round 3 pin / Round 5 pin
Round 3 pin / D-sub 9-pin
Power
−
3P inlet
Terminal block
Battery connection(2-pole),Thermistor connection (2-pole),
Terminal width is 6.2 mm or less,Terminal screw size is M3.
−
Various signal connector
Refer to the following page "wiring."
Refer to the following page wiring.
Cooling method
Natural air cooling
Forced air cooling
Protection circuit
Input overvoltage protection
−
Battery high temperature / low temperature protection
Battery not connected protection
Battery reverse connection protection
Accessories
Output cable (1.5m), Thermistor with cable (1.5m),
External device communication connector, 4 screws M6x15
Power cable (2m), External device communication
connector, 4 screws M6x15, One ferrite clamp
Parallel driving
None
Series driving
Avaiable
Signal output time required
Up in zone signal light from entering the head transmission area ≦ 5s
To start charging from the in-zone signal lights ≦ 5s
(1)Parts of the dotted line (External device communication cable
and 24V lead batteries) within the product is not included with this
product. They are contents prepared and processed of a visitor.
(2)I have you use the attached article always, please paste it into
the top portion of the terminal near the 24V lead battery thermis-
tor. In the case,please do not touch any terminals.
(Wireless Power Supply)
【
Charging unit
】
【
Power
Supply unit
】
【Head】
Charging unit
Power Supply unit
Passive
Head
Active Head
Power
cable
Output cable
(2)
Thermistor with Cable
(1) 24V lead battery
(1)
External device
communication
cable
(AWG24 〜 16)
(1)
External
device com-
munication
cable
(AWG28
〜 16)
[Power Supply unit] RCS240-AC1
1
8-7X15
170
190
210
15
90
90
90
15
80
300
[Active Head]
RCS240AH
Temperature control
Wiring
Signal type
Pin
number
Contents
Input Voltage monitor request
1.2
It monitors the battery voltage and the voltage applied to this pin, and the output
voltage monitor signal.
O u t -
put
Voltage monitor signal H
3.4
It is almost fully charged. (Charging aim:about 90%)
Voltage monitor signal M
5.6
If the charge has been reduced somewhat. (Charging aim:about 70%)
Voltage monitor signal L
7.8
It needs charging for charging amount is reduced. (Charging aim:less than about 50%)
Float charging signal
9.10
It turns on, when a charging current value turns into a rated value.
charging signal
11.12
I will turn OFF during charging ON, in charge cut-off and float charging start.
Error signal
13.14
It turns on, if a battery error occurs.
● Charging side (RCS210-PB24)
②
①
④
1234567891011121314
③
① The output terminal for batteries
② The terminal for thermistor
③ Input signal (voltage monitor request signal)
Each output signal is open-collector. The maximum current value and the maximum output voltage, please connect so
as not to exceed the maximum value by referring to the following values .
Connect the load before doing so, please do not short-circuit the output signal.
● Maximum load current : 5mA
● Maximum load voltage: 24V
Internal circuit
Vcc
Charging unit
I
To fit each condition,
please select the load
Load
<Input signal pin assignment>
④ Output signal
Internal circuit
Charging unit
Vin
7.5 〜 30V
Other than at the time of charging, It is used when you want to output the batteries voltage monitor request signal.
L
+
L
-
M
+
M
-
H
+
H
-
F
+
F
-
C
+
C
-
N
+
N
-
1
2
3
4
5
6
7
8
9
10 11 12 13 14
+ −
Specification
Dimension
[Thermistor]
+
−
〇 +
〇−
: RCS240PH
[Charging unit] RCS210-PB24
● Input current : 100mA
● Input voltage : 7.5V 〜 30V
※ Each cable, please
connect with the specified
length.
You may receive an error
due to the output such as a
decrease occurs.
Please refer to the
[Mounting of the ferrite
clamp]of the rear surface.
䢢䢳䢴䢸䢢
䢢䢺䢸䢢
ఏ㏦㒊
ἲ
䢶䢯䪻䢸䢰䢷
䢢䢳䢶䢲䢢
䢢䢳䢲䢲䢢
䢢䢳䢲䢲䢲䢢
䢢䢺䢢
䢢䢶䢲䢢
䢢䢳䢴䢸䢢
䢢䢺䢸䢢
䢢䢳䢴䢸䢢
䢢䢺䢸䢢
䢶䢯䪻䢸䢰䢷
䢢䢳䢲䢲䢢
䢢䢳䢶䢲䢢
䢢䢳䢲䢲䢲䢢
䢢䢺䢢
䢢䢶䢲䢢
䢢䢳䢴䢸䢢
䢢䢺䢸䢢


