
LICHT UND LEUCHTEN
LUZERN SCHWEIZ
[email protected]
www.baltensweiler.ch
Tel. +41 41 429 00 30
Fax +41 41 429 00 31
BALTENSWEILER
1
2
3
4
1
6
5
2
3
4
8
8
7
90°
90°
5
6
8
7
Luzern, 11th january 2018 / AlGu
M 1205-e
PINA LED W
ASSEMBLY AND OPERATING INSTRUCTIONS
Assembly instructions
Operating instructions
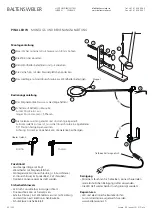
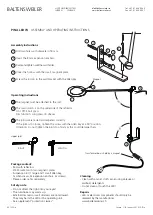
Drill two holes with diameter of 8 mm.
Insert the 8 mm expansion anchors.
Fixate and tighten well the wall holder.
Cover the hollow with the small, magnetic plate.
5
7
6
The
magnet must be attached to the rod.
The main switch is on the underside of the reflector.
On / Off: Short press
Dim function: Long press / 5 phases
The joints were tested and adjusted correctly.
If the joint is too loose, tighten the screw with the Allen key at a 90° position.
Attention: Do not tighten the joints too firmly as this could demage them.
RIGHT
WRONG
Magnet
Upper joint:
Transformer box is held by a magnet
Package content:
- Rod with reflectors
- Wall bracket with two magnetic plates
- Suspension kit (1 large and 1 small Allen key,
1x Allen srewc, 2x expansion anchors, 2x screws)
- Please order optics separately
Cleaning
- Clean with a moist cloth; avoid using abrasive or
alcoholic detergents.
- Do not clean or touch the LED!
Repairs
- LED or electronic components should only be
replaced by the manufacturer.
www.baltensweiler.ch
Safety note
- Do not direct the light into your eyes!
- The luminaire may warm up.
- External dimmers or wall dimmers are not allowed.
They may harm the LED or the operating unit.
- See supplement “protection classes”.
Screw the rod on to the wall bracket with the Allen key.