2
Assembling instruction
Connector BKS-S147M-00
No. 827 520 DE
•
Edition 0211; Specifications subject to change without notice.
Usage
The 7-pin connector of the series
BKS-S147M-00 is suitable for cables
with a diameter of 6 to 8 mm.
Technical Data
S147 coupler socket
System
Binder series 423
Nominal voltage
as per VDE 0110/72 Gr. A 60 V
Temperature range
–40...+85 °C
Connection type
soldered
Max. cross-section
0,75 mm
2
Housing material
CuZn, nickel
Socket body
PBTP gv.
Contacts
CuSn + 0,8 µm Au
Protection class
IP 67 as per
IEC 60529 (in screwed state)
Cable inlet
6...8 mm
Cable clamp PG 9
Assembling
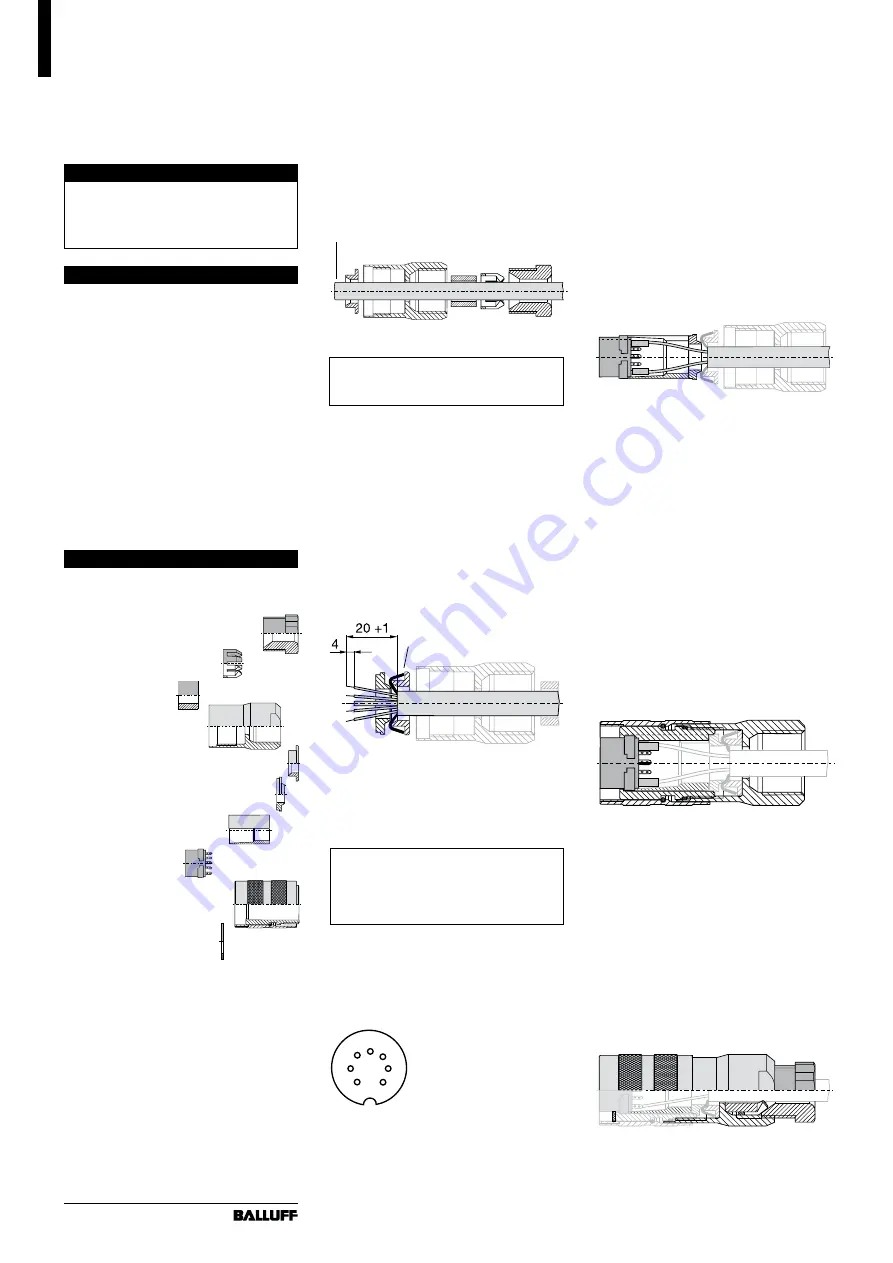
Take the 10 parts of the connector
out of the packing.
1
PG Screw
2
Cable clamp
3
Rubber bush
4
Rear housing
5
Braid clamp (coned inside)
6
Braid clamp (coned outside)
7
Slotted spacing tube
8
Socket body
9
Front housing
with tube inside
10 Flat (rubber) gasket
Step 1
(see fig. 1)
Thread the parts 1 to 5 on the cable
in the order shown.
Cable end
(5)
(4)
(3)
(2)
(1)
Fig. 1: Parts threaded on the cable
The PG screw must be screwed
only later - in step 5!
Step 2
(see fig. 2)
Bare and strip the cable braiding for
a length of 20 mm.
Fan out the braid and lay it on the
braid clamp (5), and cut out the over
hanging braid.
Strip the leads for about 4 mm, twist
and coat with a touch of solder.
Thread the braid clamp (6) and
clamp the braid against clamp (5).
(6) (5)
(4)
(3)
Fig. 2: Braid clamped and
the leads stripped
Step 3
(see fig. 3 and 4)
Recommendation: Slip an 8 mm
length of insulating sheath over
each lead. (Not included in deliv-
ery).
Connect the leads to the socket
pins and solder (for pin assignment
see the corresponding BTL operat-
ing manual). Push the insulating
sheaths over the soldered pins.
4
1
5
2
6
7
3
Fig. 3: Socket body (8)
Carefully spread the slotted spacing
tube (7) and usher it over the leads.
Place it on the socket body (8) and
line up the slot with the grove on
the socket body with the noses
wedged so that the socket body
and spacing tube do not turn against
each other.
(8)
(7)
(6) (5)
(4)
Fig. 4: Leads soldered and
spacing tube mounted
Step 4
(see fig. 5)
Slip the front housing (9) from the
front with the inside thread towards
the cable end and make sure that
the wedge on the inside fits in the
grove on the socket body (8) and
the slot on the spacing tube (7).
Screw the front housing (9) on to the
rear housing (4).
While screwing
make sure that the socket body
and the cable are not twisted
(e.g.
by connecting the corresponding
plug of the BTL), in order to avoid
stress on the leads!
(9)
(4)
Fig 5:
Front housing mounted
Step 5
(see fig. 6)
Push the cable clamp (2) over the
rubber bush (3) and both of them
into rear housing (4). Screw in the
PG screw (1) firmly into the rear
housing (torque as per
DIN VDE 0619).
Set the flat gasket (10) from the
front (line up nose and grove) and
carefully press it in all around.
(10)
(3) + (2) (1)
Fig 6:
PG screw screwed,
connector assembled completely
View of pins:
soldering side
Braid laid on,
over hanging braid cut out
Balluff GmbH
Schurwaldstrasse 9
73765 Neuhausen a.d.F.
Germany
Phone +49 (0) 71 58/1 73-0
Fax +49 (0) 71 58/50 10
E-Mail: [email protected]
http://www.balluff.de


