BALAY 3VF341ND Instructions For Use Manual Download Page 19

en

19

Programme interruption

Carefully open the door, it could happen
that water splashes out of the
appliance. Only open completely when
the spray arm no longer turns.
If the programme is already in “drying”
mode, an acoustic signal reminds you
to close the appliance door or to abort
the programme.
Switch OFF the main switch 

1

.

Indicator light goes out. The programme
remains stored.

If warm water is connected or if the
machine is already heated up and the
appliance door has been opened, leave
the door slightly ajar, then close it,
otherwise the appliance door can jump
open through the expansion.

In order to continue the programme
flow, switch the main switch ON again
and close the door.

Cancel programme (Reset)

Only when the master switch is ON.
Press the   and   programme
buttons simultaneously and hold them
pressed for approx. 3 sec.
The programme continues for approx.
1 min.
The PROGRAMME END indicator and
the indicator for the programme that
has just been terminated light up.
Set main switch 

1

 to OFF.

Close the detergent compartment  

30

.

To restart the dishwasher, set main switch

1

 to ON again and select desired

programme.

Changing the programme

It is possible to change the programme
selection after you have switched the
dishwasher on, provided that you have not
yet closed the door.
If it is necessary to change the programme
after this, the programme cycle that has
already begun (e.g. washing) will still carry
on to the end.

Maintenance and care

You can help prevent faults by checking
and maintaining your appliance regularly.
This will save time and reduce problems.
Therefore you should occasionally
examine the inside of your dishwasher.

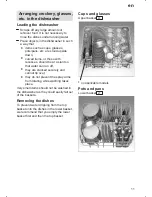
Overall condition of the
appliance

Check the rinsing compartment for grease
and limescale deposits.
If you find any deposits:

Fill the detergent dispenser with
detergent. Start the empty appliance
with the programme which has the
highest rinsing temperature.

Clean the door seal:

Wipe the door seal regularly with
a damp cloth and remove any deposits.

Dishwasher salt

Check the LOW SALT indicator 

4

 or

24

. Top up with salt, if required.

Rinse-aid

Check the LOW RINSE-AID indicator

5

 on the front panel  or the level

indicator on the rinse-aid container

29

. Top up with rinse-aid, if required.
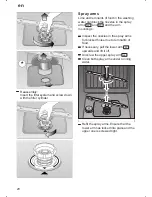
Filters

The filters 

25

 prevent larger remnants of

food or other objects from getting inside
the pump. This residue can occasionally
clog up the filters.
The filter system consists of a filter
cylinder, a flat fine filter and, depending on
the model, a microfilter (*).

Inspect the filters for obstructions every
time the dishwasher has been used.
By unscrewing the filter cylinder, you
can remove the filter system. Remove
any food remnants and clean the filters
under running water.

Summary of Contents for 3VF341ND

Page 1: ...EN Instructions for use Dishwasher...

Page 2: ......

Page 3: ...he special salt container 8 Filling the rinse aid container 9 Unsuitable dishes 10 Arranging crockery glasses etc in the dishwasher 11 Detergents 14 Programme overview 17 Washing dishes 18 Maintenance...

Page 4: ...uctor system of the domestic electricity supply has been installed correctly Electrical connection conditions must correspond with the specifications on the rating plate of the dishwasher Built under...

Page 5: ...the reach of infants Keep infants away from the open dishwasher It could contain residue of the cleaning agent If a fault occurs Repairs or other work on the dishwasher should only be carried out by a...

Page 6: ...ean with a dry or moist cloth only Do not use abrasive or scouring detergents Appliance interior 20 Upper basket with 2 tiered cup rack 21 Additional cutlery basket for the top basket 22 Upper spray a...

Page 7: ...programme button B and switch on the main switch 1 then release the buttons The display 4 flashes and buttons A and B illuminate Hardness value 2 was set at the factory To change the setting Press pr...

Page 8: ...nd drains away Therefore always refill the salt dispenser immediately before switching on the dishwasher to prevent corrosion As a result the overflowing salt solution will be immediately diluted and...

Page 9: ...e only rinse aid for domestic dishwashers Spilt rinse aid may result in excessive foam formation in the next rinse cycle Therefore remove any spilt rinse aid with a cloth Adjusting the amount of rinse...

Page 10: ...are soiled with ash wax lubricating grease or ink must not be cleaned in the dishwasher Damage to glassware and other dishes Possible causes type of glass or manufacturing process chemical composition...

Page 11: ...es should be at a slant so that water can run off they are stacked securely and cannot tip over they do not prevent the spray arms from rotating while washing takes place Very small items should not b...

Page 12: ...t other items to be washed Long items serving cutlery salad servers or knives should be placed on the shelf so that they do not obstruct the rotation of the spray arms The shelf can be folded back whe...

Page 13: ...levers on the left and right sides of the basket Always take hold of the side of the basket on the upper edge otherwise the basket will not drop smoothly and may damage the utensils To raise the bask...

Page 14: ...sphates but no chlorine 3 those containing neither phosphates nor chlorine When a phosphate free detergent is used in conjunction with hard water there is a greater possibility that white marks will b...

Page 15: ...r s instructions printed on the detergent packaging when determining the correct dosage Important Due to the different solvency properties of the detergent tablets supplied by various manufacturers th...

Page 16: ...xample Some products with a built in rinsing agent are only used to their full effect in certain programmes This type of product does not generally produce the desired effect with automatic programmes...

Page 17: ...Eco 50 Quick 45 Pre rinse Rinse aid 70 Drying Drying Rinse aid 70 Drying Main rinse Main rinse Rinse aid 55 Wash 45 Rinse aid 65 Wash 50 Rinse off if the dishes have been stacked for several days in t...

Page 18: ...selected This same programme will run again if no other programme button 7 is pressed For appliances with top basket feature If only the top basket is loaded press the top basket button 6 Close door T...

Page 19: ...hat you have not yet closed the door If it is necessary to change the programme after this the programme cycle that has already begun e g washing will still carry on to the end Maintenance and care Yo...

Page 20: ...spray arms 22 and 23 and the arm mountings Inspect the nozzles in the spray arms for blocked holes due to remnants of food If necessary pull the lower arm 23 upwards and lift it off Unscrew the upper...

Page 21: ...olving minor problems yourself Experience has shown that you can resolve most problems that arise during normal daily usage yourself without having to call out a service engineer Not only does this sa...

Page 22: ...tment must be dry before detergent is added Water remains inside appliance after programme has ended Blockage or kink in drainage hose Pump is jammed Filters are blocked The programme is still running...

Page 23: ...oloured Not enough detergent was added to dispenser Detergent has insufficient bleaching properties Use a detergent containing a chemical bleaching agent White stains are left on crockery glasses have...

Page 24: ...ired a metallic appearance Amount of rinse aid set too high Customer Service Please call your local service agent if you are not able to resolve any problem yourself The name of your nearest service a...

Page 25: ...packaging There is a risk of suffocation by the cardboard boxes and the plastic wrapping Up to date information concerning options for disposal can be obtained from your retailer or local municipal a...

Page 26: ...spigot of the siphon Ensure that the drainage hose is not kinked crushed or twisted ensure that there is no sealing cover which prevents the waster water from flowing away Fresh water connection Usin...

Page 27: ...If the appliance is not kept upright during transport any water left inside may seep into the control module and cause subsequent errors with programme functions The appliance must be drained in the f...

Page 28: ...en 28...

Page 29: ......

Page 30: ......

Page 31: ......

Page 32: ...pliance in accordance with our instructions This also includes correct installation of the Aqua Stop extension original accessory Our warranty does not cover defective supply lines or fittings up to t...

Reviews: