background image

3  |  Baker Hughes

Copyright 2020 Baker Hughes Company. All rights reserved.

2. Maintenance

1.  Reasonable precautions should be taken before beginning 

work on the valve. Protective clothing, as required by the 

specific line fluid, should be worn.

2.   Before removing handle or the actuator from the valve, or 

before  removing  seat  retainer  from  a  valve  in  dead  end 

service, close the valve and depressurize the line. The 

eccentric design of the 39004 Series may allow line pressure 

to open the valve if the handle / actuator is not in place while 

the valve is under pressure. 


DO NOT PRESSURIZE THE LINE WITHOUT A HANDLE 

OR ACTUATOR ON THE VALVE.

3.   The 39004 Series valve must be in the closed position to be 

removed from the line.

4.   Begin all work on a valve that has been removed from the 

line by cleaning the valve, removing any grit or scale. When 

handling the valve, care should be taken not to scratch the 

disc edge or seats.

5.   Replacement seats, seals and other parts are available from 

authorized  distributors.  Contact  your  distributor  or  sales 

representative for details of price and delivery.

3. Stem Seal Replacement

Refer to drawing on page 5 for parts identification.
1.  If required, remove handle assembly. Remove socket head 

cap screws (21) and lock washers (22). Remove mounting 

bracket (20). For actuated valves, unbolt mounting bracket 

from body and lift actuator assembly off stem. Note assembly 

positions before removal.

2.  Remove  gland  retainer  nuts  (14)  and  lock  washers  (13). 

Remove  gland  retainer  (11)  anti-blowout  retaining  ring  or 

split ring (10) (depending on size), and gland ring (7).

3.  Hook out stem seals (8), taking care not to scratch stem or 

stuffing box bore. Do not remove thrust washer (9), unless 

further valve disassembly is required.

4.  Examine  stuffing  box  bore  and  stem,  clean  as  necessary 

to remove any corrosion or foreign matter before installing 

new seals.

5.  Install new seals in stuffing box one at a time, TFE (white) 

seals first, with the carbon fiber ring at the top. Stagger seal 

ring  joints  180°  apart  when  installing.  Tamp  each  ring  to 

bottom before installing next ring. 


 Note: On the larger valves it will be necessary to 

compress each seal before adding the next.

6.   Slide gland ring (7) over stem on top of seals (8). Install anti-

blowout retaining ring or split ring (10) (depending on valve 

size). Slide gland retainer (11) over stem and onto gland 

studs  (12).  Place  lockwashers  (13)  and  hex  nuts  (14)  on 

studs (12) and tighten finger tight. Tighten gland nuts (14) 

evenly and alternately to the proper torque value given in 

Table 2.

7.   Remount  actuator,  or  mounting  bracket  (20)  with  lock 

washers (22) and cap screws (21) and handle (27). Tighten 

handle  set  screw  (28)  to  secure  the  handle  to  the  valve 

stem.

8.   Operate valve open and closed several times, to check for 

binding and to set the stem seals. Loosen gland nuts (14) 

and retighten to torque value given in Table 2.

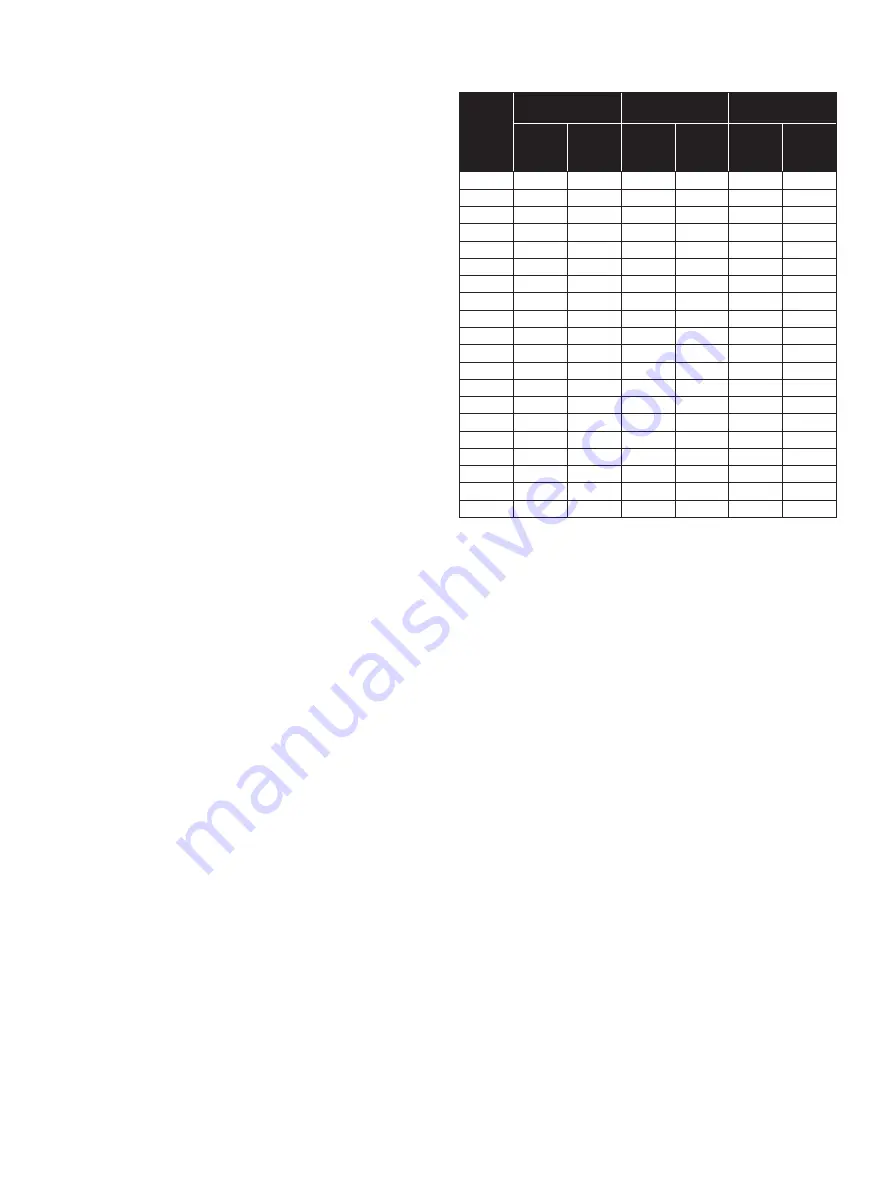
Table 1 - Total Number of Stem Seals 

CF = Carbon Fiber

Valve  

Size

Class 150

Class 300

Class 600

Number  

of Stem 

Seals

Material 

CF / TFE

Number  

of Stem 

Seals

Material 

CF / TFE

Number  

of Stem 

Seals

Material 

CF / TFE

3

4

1 / 3

4

1 / 3

12

2 / 10

4

4

1 / 3

4

1 / 3

12

2 / 10

6

4

1 / 3

4

1 / 3

16

2 / 14

8

5

1 / 4

5

1 / 4

16

2 / 14

10

5

1 / 4

5

1 / 4

18

0 / 18

12

5

1 / 4

5

1 / 4

18

0 / 18

14

6

0 / 6

6

0 / 6

18

0 / 18

16

6

0 / 6

9

0 / 9

16

0 / 16

18

16

0 / 16

20

16

0 / 16

24

10

0 / 10

8

0 / 8

30 

8

0 / 8

9

0 / 9

32 

8

0 / 8

36 

8

0 / 8

9

0 / 9

40 

9

0 / 9

9

0 / 9

42 

9

0 / 9

9

0 / 9

44 

9

0 / 9

48 

9

0 / 9

9

0 / 9

54 

9

0 / 9

60 

9

0 / 9

4. Seat Replacement

1.  With the disc in the closed position, remove the valve from 

the line.

2.   Lay the valve down with the disc in the closed position and 

the seat retainer side facing up.

3.   Remove the socket head cap screws (17), the seat retainer 

(16), and seat (15).

4.   Carefully clean the seat area in the body and seat retainer. 

Remove foreign matter, dirt, etc. Check disc seating area for 

nicks or scratches.

5.   Place the new seat (15) on disc (2), carefully centering it in 

the recess in the body.

6.  Align the holes in the seat retainer (16) with matching holes 

in body and carefully place in position on top of seat (15). 

Be careful not to shift retainer to align holes so that seat is 

not shifted from correct position. Lightly grease cap screw 

(17) threads and tighten down evenly, alternating from top 

to  bottom  and  side-to-side. Tighten  to  the  torque  value  in 

Table 2.

7.   Operate valve several times and examine seat for any 

damage before reinstalling the valve in the line.

Summary of Contents for Masoneilan 39004 Series

Page 1: ...Masoneilan 39004 Series High Performance Butterfly Valve Instruction Manual Rev B Baker Hughes Data Classification Public ...

Page 2: ...ICULAR REQUIREMENTS FOR OPERATION OF OTHER EQUIPMENT AT THE SITE THESE INSTRUCTIONS DO NOT PURPORT TO COVER ALL DETAILS OR VARIATIONS IN EQUIPMENT NOR TO PROVIDE FOR EVERY POSSIBLE CONTINGENCY TO BE MET IN CONNECTION WITH INSTALLATION OPERATION OR MAINTENANCE SHOULD FURTHER INFORMATION BE DESIRED OR SHOULD PARTICULAR PROBLEMS ARISE WHICH ARE NOT COVERED SUFFICIENTLY FOR THE CUSTOMER OPERATOR S PUR...

Page 3: ... Safety Information 1 Introduction 2 1 0 Installation 2 2 0 Maintenance 3 3 0 Stem Seal Replacement 3 4 0 Seat Replacement 3 5 0 Disc and Stem Replacement 4 Special Instructions for Fire Safe Butterfly Valve 6 1 0 Installation 6 2 0 Stem Seal Replacement 6 3 0 Seat Replacement 6 4 0 Stem and Disc Replacement 6 5 0 Field Adjustments All Valves 6 ...

Page 4: ...copied without Baker Hughes s written permission Please report any errors or questions about the information in this manual to your local supplier These instructions are written specifically for the 39004 Series control valve and do not apply for other valves outside of this product line Useful Life Period The current estimated useful life period for the 39004 Series control valve is 25 years To m...

Page 5: ... disc edge 3 For maximum service life install the valve with the seat retainer upstream Positive shutoff will be obtained with the valve in either position however installation with the seat retainer upstream will give longer service life especially in erosive services 4 With the disc in closed position carefully center valve between flanges Guide holes wafer pattern valve or tapped holes lugged v...

Page 6: ... Note On the larger valves it will be necessary to compress each seal before adding the next 6 Slide gland ring 7 over stem on top of seals 8 Install anti blowout retaining ring or split ring 10 depending on valve size Slide gland retainer 11 over stem and onto gland studs 12 Place lockwashers 13 and hex nuts 14 on studs 12 and tighten finger tight Tighten gland nuts 14 evenly and alternately to t...

Page 7: ...ary to lift body and rotate disc slightly to do this Make sure disc is resting on wood block since it will swing freely on stem with pins removed When pins 4 are out lay body down so disc and body are evenly supported on flat surface 9 Using a brass bar or drift punch knock stem 3 loose and pull from body After long or severe service this may take considerable force Be careful not to damage bearin...

Page 8: ...33 1 1 32 1 241 1 1 4 40 1 241 1 1 4 1 521 1 17 32 42 1 241 1 1 4 1 521 1 17 32 44 1 521 1 17 32 48 1 241 1 1 4 1 521 1 17 32 54 1 521 1 17 32 60 1 521 1 17 32 Ref No Description 1 Body 2 Disc 3 Stem 4 Taper Pin 5 Disc Spacer 6 Bearing Assembly 7 Gland Ring 8 Stem Seal 9 Thrust Washer 10 Retaining Ring Ref No Description 11 Gland Retainer 12 Stud 13 Lock Washer 14 Hex Nut 15 Seat Assembly 16 Seat ...

Page 9: ...r wear or damage Replace if damaged 6 Place new seat on disc carefully centering in body recess 7 Place new graphite gasket on the body Position metal seat over the disc lip facing out on top of the polymer seat Place another graphite gasket on top of the metal seat Graphite gaskets can be first attached to the metal seat to simplify the assembly Spray a suitable adhesive like 3M Super 77 general ...

Page 10: ...t allow the valve to over open as this may damage the disc seating surfaces by hitting body or attached piping 4 On gear operators loosen and adjust the closing stop screw to permit proper disc positioning Adjust and lock down when disc closure is within measured tolerance in paragraph 1 Open and close valve recheck measurements before reinstalling in line 5 For other power actuators consult the m...

Page 11: ...Masoneilan 39004 Series Butterfly Valve Instruction Manual 8 Copyright 2020 Baker Hughes Company All rights reserved Notes ...

Page 12: ...most current information The Baker Hughes logo Masoneilan are trademarks of Baker Hughes Company Other company names and product names used in this document are the registered trademarks or trademarks of their respective owners BHMN 39004 IOM 31752B 1120 11 2020 Direct Sales Office Locations Find the nearest local Channel Partner in your area valves bakerhughes com contact us valves bakerhughes co...

Reviews: