background image


9

  o

f


12


Parts List


Marquette Side Table


Letter


Illustration


Description


Qty.


Letter


Illustration


Description


Qty.


A


Tabletop


1


G


M6 x 32 mm 

Bolt


16


B


Legs


2


H


M6 x 20 mm 

Bolt


4


C


Legs


2


I


M6 Steel Washer


20


D


Wicker Side 

Panel


2


J


M6 Bolt Cap


20


E


Wicker Side 

Panel


2


K


Allen Wrench


1


F


Umbrella Hole 

Cover


1


Summary of Contents for Marquette MAR-3PC-SET

Page 1: ...1 of 12 Owner s Manual Marquette 3 Piece Wicker Reclining Set Model Number MAR 3PC SET SKU Number 272 1861...

Page 2: ...2 I Left Recliner Extension 2 B Left Arm 2 J Recliner Extension Support Bar 2 C Back Frame 2 K M8 x 40mm Hex Bolt 8 D Seat Frame 2 L M6 x 35 mm Bolt 8 E Leg Rest Frame 2 M M6 x 32 mm Bolt 16 F Footre...

Page 3: ...llustration Description Qty Q M8 Steel Washer 8 W M6 Bolt Cap 8 R Small Plastic Spacer 4 X M6 Nut Cap 4 S M6 Nut 20 Y M8 Bolt Cap 8 T Seat Back Cushion 2 Z Allen Wrench 2 U Leg Rest Cushion 2 AA M6 Op...

Page 4: ...do not attempt to assemble Contact InSide Out Customer Support Team See page 12 Two people are required to assemble heavy items Assemble product on a soft and non abrasive surface such as carpet to av...

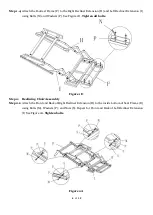
Page 5: ...I using Bolt M and Large Plastic Spacers O See Figure 1B Figure 1B Step 1 3 Attach the Leg Rest Frame E to the Right Recliner Extension H and Left Recliner Extension I using Bolts N and Washers P See...

Page 6: ...N and Washers P See Figure 1D Tighten all bolts Figure 1D Step 2 Reclining Chair Assembly Step 2 1 Attach the Front and Back of Right Recliner Extension H to the inside bottom of Seat Frame D using B...

Page 7: ...gure 2B Step 2 3 Attach the Back Frame C to the Seat Frame D using Bolt M Washer P Small Plastic Spacer R then Washer P and Nut S for the Top Hole only Repeat opposite side of Back Frame C Top Hole on...

Page 8: ...ee Figure 3A Figure 3A Step 4 Attach Seat Back Cushion T Leg Rest Cushion U and Footrest Cushion V with Velcro straps See Figure 4A Figure 4A Note Please see our video for additional assembly assistan...

Page 9: ...ration Description Qty Letter Illustration Description Qty A Tabletop 1 G M6 x 32 mm Bolt 16 B Legs 2 H M6 x 20 mm Bolt 4 C Legs 2 I M6 Steel Washer 20 D Wicker Side Panel 2 J M6 Bolt Cap 20 E Wicker...

Page 10: ...n are present Note If any part is missing or damaged do not attempt to assemble Contact InSide Out Customer Support Team See page 12 Two people are required to assemble heavy items Assemble product on...

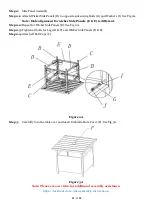
Page 11: ...is different Step 2 2 Repeat for Wicker Side Panels E See Fig 2A Step 2 3 Tighten all bolts for Legs B C and Wicker Side Panels D E Step 2 4 Attach all Bolt Caps J Figure 2A Step 3 Carefully turn the...

Page 12: ...ainst peeling cracking or blistering for 1 year if the product has not been scratched or abraded Fabric Cushions are covered by a 1 year warranty against manufacturing defects Wicker Resin wicker is w...

Reviews: