


Single Zone Gas Monitor
20
P/N: 3015-4256 Rev 13
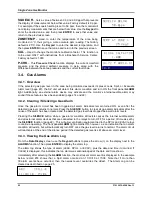
PPM LOG
– Contains records of the last 200 measurements. Each
record shows the measurement’s date, time, and ppm level. Note that
the interval at which the measurements are logged is determined by the
LOG INT
function.
Use the
Keypad
Up
and
Down
buttons to change the record number by
a factor of 1. Use the
Right
and
Left
buttons to change the record
number by a factor of 10. Press
QUIT
to return to the previous screen.
In the example on the right, record #025 shows that a level of 425 ppm
was measured on 11/07/10 at 15:35.
Note that the PPM Log can be cleared as described on page 25.
ALARMS
– Contains records of the last 30 alarm events, with the
monitor’s most recent alarm being shown when the
Alarm
screen is first
displayed. After 30 events have been recorded, the newest record
overwrites the oldest. Each record displays either LEAK, SPILL, or
EVAC including the date and time the alarm occurred. Use any of the
Keypad
buttons to scroll through the other alarm records. Press
QUIT
to
return to the previous screen. Refer to page 22.
Note that the ppm levels at which alarms occur are set using the
LEAKLVL, SPILLLVL
, and
EVACLVL
functions.
In the example on the right, record #03 shows that a spill event occurred
on 11/10/10 at 15:06.
FAULTS
– Contains records of the last 30 fault events, with the
monitor’s current fault status being shown when the
Fault
screen is first
displayed. After 30 events have been recorded, the newest record
overwrites the oldest. Each record lists an event’s numeric fault code
plus the date and time the fault occurred. Use any of the
Keypad
buttons to scroll through the other fault records. Press
QUIT
to return to
the previous screen. Refer to
System Faults
(page 23).
In the example on the right, record #15 shows that a Purge Flow Fault
<1000> occurred on 11/10/10 at 12:37.
DIAGNOS
– Enters the diagnostic function. Press the
Up Arrow
Keypad
button to toggle between the monitor’s two diagnostic screens.
Refer to (page 26).
GAS TYPE
– Used to select of any one of the gas types listed for
monitoring. (See the gas library in the Specifications section.) Use the
Keypad
to select the desired gas type, and then press
ENTER
to save
the selection and return to the previous screen.
LEAKLVL
–
Sets the Leak Alarm level, adjustable from 1 to 300 ppm.
Factory default is 100 ppm. Note that the Leak Alarm level cannot be set
higher than either the Spill or Evacuate Alarm levels. Refer to Appendix
for recommended alarm settings for other gases. Use the
Keypad
to set
the desired Leak Alarm level, and then press
ENTER
to save that level
and return to the previous screen.
EDIT LEAK LEVEL
0100 PPM
SELECT GAS TYPE
R134A
0.4ppm 0.00
0.00002au 4.260v
4.26500v <0000>
24.5cD 14.00psi
#15 <1000> @
11/10/10 12:37
#03 SPILL @
11/10/10 15:06
#025 425PPM @
11/07/10 15:35


