BAC Document Number: Easybond MKII Manual V03
28/08/13
Page
21
of
32
As the colours of the wires in the mains lead of this appliance may not correspond with the
coloured markings identifying the terminals in your plug, proceed as follows:
The wire, which is, coloured green and yellow must be connected to the terminal in the plug,
which is marked with letter E or by the earth symbol or coloured green or green and yellow.
The wire, which is coloured blue, must be connected to terminal, which is marked with the
letter N or coloured black.
The wire, which is coloured brown, must be connected to the terminal, which is marked with
the letter L or coloured red.
If the fuse fails in the appliance it must be replaced with a fuse of the same value - in case of
difficulty consult the supplier.
If the supply cable of this appliance is damaged, it must only be replaced by a repairer
appointed by the manufacturer because special tools are required.
There are no user-serviceable parts in this charger.
10.2 INSTRUCTIONS FOR USE
1. Ensure that the voltage input selector switch is correctly set to the mains supply.
2. Connect the output lead to the battery pack.
3. Connect the charger power cable (plug) to the AC power outlet and switch on. The LEDs
will cycle through a self-diagnostic check. The light sequencing is referenced below.
4. Allow 24 hours of charging before your first use of the batteries.
10.3 LIGHT SEQUENCE INFORMATION:
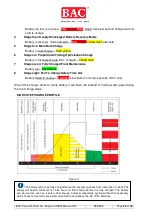
Please note that due to a software upgrade, the light sequence is as follows:
Red
Power on
Yellow
Bulk charge
Yellow (flashing)
Proportional timed charge
Green
Float charge
Red (flashing)
Over run timer on proportional timed charge and can also indicate a
possible defective battery.
Charging Steps:
Red Mains Red Charge Yellow Bulk Charge Green Fully Charged
1
Stage one: Self Check
At power up a Self check - LED illuminate one at a time.
Red
Yellow Green
2 Stage two: Power Interruption Protection
Battery voltage goes straight to full voltage in less than two minutes, it goes straight to
solid green
(Status as Stage 6)
3 Stage 3: Excessive Discharged Battery


