background image

 Copyright © 2017, Baby Trend Inc., All Rights Reserved.  Todos Los Derechos Reservados.


WARNING

15

16

Copyright © 2022, Baby Trend Inc., All Rights Reserved. Todos los derechos reservados. 

Copyright © 2022, Baby Trend Inc., All Rights Reserved. Todos los derechos reservados. 

15

Copyright © 2022, Baby Trend Inc., All Rights Reserved. Todos los derechos reservados. 

ASSEMBLY  MONTAJE

15

Copyright © 2022, Baby Trend Inc., All Rights Reserved. Todos los derechos reservados. 

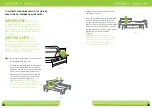
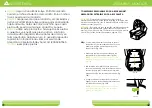
9)

  • Bring the four (4) corners and center tightly 

together (Fig. 9). Wrap Mattress around 
Playard frame with padded side facing 
inward.

 
• Junte las cuatro (4) esquinas y el centro 

con firmeza (Fig. 9). Envuelva el colchón 
alrededor de la estructura del corralito de 
juegos con el lado acolchado hacia adentro. 

10) 

• Secure the hook and loop fasteners by 

feeding them through the loops on the end 
of the Mattress and folding them back onto 
themselves (Fig. 10). Place folded Playard 
into carry bag so that the handle comes 
through the opening between each side of 
the zipper.

• Asegure gancho y pase las correas 

pasándolas por las presillas en el extremo 
del colchón y plegándolas sobre sí (Fig. 10). 
Coloque el corralito plegado en la bolsa 
de transporte de modo tal que la manija 
sobresalga de la abertura entre cada lado 
de la cremallera.

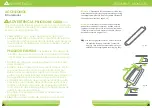
ACCESSORIES

Full-Size Bassinet Warnings:


WARNING: 

Failure to follow these warnings and 

the instructions could result in serious injury or death.


WARNING-FALL HAZARD:

 To help prevent falls, 

do not use this product when the infant begins to 
push up on hands and knees or has reached the 
height of 25 in. (635 mm), weight of 15 lb. (6.8 kg) or 3 
months old, whichever comes first. 

• ALWAYS check that the bassinet is securely locked on 

the base/stand by pulling upwards on the bassinet 
bed.


SUFFOCATION HAZARD


Infants have suffocated:

• In gaps between extra padding and side of the 

bassinet, and

• On soft bedding 

Use only the pad provided by Baby Trend

®

. NEVER 

add a pillow, comforter, or another mattress for 

padding.

•Strings can cause strangulation! DO NOT place items 

with a string around a child's neck such as hood strings 

or pacifier cords. DO NOT suspend strings over the 

bassinet or attach strings to toys.

• NEVER use plastic shipping bags or other plastic film 

as mattress covers not sold and intended for that 

purpose. They can cause suffocation.

• Use bassinet with only one child at a time.
• NEVER place a child under the Full-size bassinet.

Fig. 9

Fig. 10

Summary of Contents for muv PY74

Page 1: ...ted at 1 800 328 7363 Monday through Friday between 8 00 a m and 4 30 p m PST Return Authorizations are required prior to returning product s to Baby Trend Please visit http babytrend com pages limite...

Page 2: ...upervision necessary for the continued safety of your child When used for playing never leave child unattended Child in crib must be under supervision at all times Playard Warnings WARNING Failure to...

Page 3: ...nte puede hacer que la cabeza del ni o se atasque entre el colch n colchoneta y el lateral del corralito causando asfixia Para reducir el riesgo de SMIS los pediatras recomiendan acostar a los ni os s...

Page 4: ...el Centro de juegos NUNCA utilice este producto si hay sujeciones sueltas o ausentes uniones flojas piezas rotas o si la tela o la malla est n rasgadas Revise antes de armar y en forma peri dica dura...

Page 5: ...ubos met licos de soporte Music Center Centro Musical Without Vibration Sin Vibraci n With Vibration Con Vibraci n or o 1 Changing Table 1 Cambiador Type and quantity may vary Tipo y la cantidad puede...

Page 6: ...owering center Pull up one rail at a time hold one hand on each side of the rail and pull up sharply do not pull from the middle where the center latch release is located make sure both tubes latch in...

Page 7: ...central hacia abajo Fig 3a El mecanismo central autom ticamente se asegura en su lugar IMPORTANTE Pruebe todas las barandillas superiores empuj ndolas suavemente hacia abajo para confirmar que est n...

Page 8: ...gancho y bucle cierre que sostienen el colch n desde debajo del piso del corralito de juegos y d jelas a un lado Todav a no destrabe las barandillas superiores El centro del piso debe estar elevado a...

Page 9: ...las sobre s Fig 10 Coloque el corralito plegado en la bolsa de transporte de modo tal que la manija sobresalga de la abertura entre cada lado de la cremallera ACCESSORIES Full Size Bassinet Warnings W...

Page 10: ...n cordones alrededor del cuello del ni o tales como cordones de capuchas o de chupetes NUNCA cuelgue cordones sobre mois s y la cuna ni ate cuerdas a los juguetes The bassinet must be fully assembled...

Page 11: ...ito NUNCA deje la mesa para cambiar al beb armada cuando el ni o est en el corralito La cuna de tama o completo deber dejar de usarse cuando el ni o comience a levantarse apoy ndose en sus manos y rod...

Page 12: ...ecci n C mo armar el corralito Deber quitar el colch n de la parte inferior del corralito para utilizar dentro de su cuna de tama o completo TO ASSEMBLE THE FULL SIZE BASSINET C MO ARMAR LA CUNA DE TA...

Page 13: ...evante la cuna de tama o completo ACCESSORIES Changing Table WARNING FALL HAZARD Children have suffered serious injuries after falling from changing tables Falls can happen quickly STAY in arm s reach...

Page 14: ...mbio Las tablas cambiantes no est n dise adas para un sue o seguro NUNCA permita que el beb se duerma en la mesa para cambiar NUNCA deje el cambiador en su lugar cuando el ni o se encuentre en la cuna...

Page 15: ...paration on the backside of the changing table covering Fig 14d Insert both ends with the push pins into the connector Bars Ensure all pins click into postion on all 4 connection points Fig 14e Close...

Page 16: ...TE Par cuando la mesa cambiadora esta echada hacia arriba debe estar asegurada a el armazon del corrallito usando la cinta de gancho y bucle proveida 15 Locate the 4 clip fasteners on the bottom of th...

Page 17: ...CA use el cambiador si est da ado o roto Fig 16a Fig 16b TO USE CHANGING TABLE RESTRAINT SYSTEM PARA USAR EL SISTEMA DE RESTRICCI N DEL CAMBIADOR 16 Place child on changing table make sure hands and a...

Page 18: ...uently Do not add additional strings or straps to attach to any other crib or playpen The Toybar Mobile Canopy with toys is intended for visual stimulation and not to be grasped by the child ACCESSORI...

Page 19: ...ords NEVER suspend strings over Rock A Bye bassinet or attach strings to toys WARNING Possible entanglement injury with toys attached Keep out of baby s reach Do not use Rock A Bye bassinet or place o...

Page 20: ...ucto y las superficies adyacentes S LO use la cuna ROCK A BYE en el corralito cuando est conectado de forma segura Always provide the supervision necessary for the continued safety of your child NEVER...

Page 21: ...la Cuna Rock A Bye Port til NUNCA coloque al ni o debajo de la cuna Rock A Bye NUNCA guarde la cuna Rock A Bye en el corralito mientras est en uso La cuna de tama o completo deber estar totalmente ar...

Page 22: ...reparaci n o instrucciones llame al servicio de atenci n al cliente de Baby Trend al 1 800 328 7363 NUNCA reemplace piezas ATTENTION Playard and full size bassinet must be fully assembled and securel...

Page 23: ...buttons on the sides and front of the frame Fig 19 Jale la tela por encima del armaz n y asegure la tela con los botones en los costados y la parte delantera del armaz n Fig 19 20 Use the hook and lo...

Page 24: ...ig 22b NOTE DO NOT use the removable bassinet on Playard without securing the hooks and straps to playard Para usar la Extra ble Camita en el Corralito baje la Extra ble Camita hacia la cuna Fig 22a E...

Page 25: ...en posici n cual este alado de la parte posterior del organizador Precione firmamente el gancho asia abajo dentro de la renura asta que se encaje en su lugar Fig 24a Portapa ales pase al paso 24b Cone...

Page 26: ...s como se indica Instale nuevamente la puerta de las pilas y ci rrela con los tornillos To listen to MUSIC press the MUSIC button Press the button to change the song Para escuchar sonidos de la MELOD...

Page 27: ...t on a circuit different from that to which the receiver is connected Consult the dealer or an experienced radio TV technician for help Declaraci n de la FCC Este dispositivo cumple con las normas de...

Page 28: ...OMER SERVICE The Customer Service Department can be contacted at 1 800 328 7363 Monday through Friday between 8 00 a m and 4 30 p m PST Return Authorizations are required prior to returning product s...

Reviews: