background image

Improper assembly can result in damage to your furniture or cause harm to your child. Proper assembly is cri

ti

cal

to ensure a safe and comfortable end result. Please read all instruc

ti

ons before assembly and keep for future use.

BEFORE ASSEMBLY

Unpack all the parts and iden

ti

fy them against the components and

fitti

ngs lists

Do not discard any packaging un

ti

l you are sure you have all the parts and the pack of

fitti

ngs

If you do

nd that any parts are missing or damaged or incorrect, contact customer services of above.

Read the instruc

ti

ons thoroughly before a

tt

empt construct.

You may

nd the construc

ti

on easier with help of another person, in the room for use, on a so

ft

clean

oor so

there is no damage caused to the furniture during construc

ti

on.

Follow each stage of construc

ti

on step-by-step

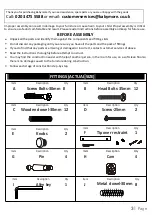
FITTINGS (ACTUAL SIZE)

Item

Descrip

ti

on

Qty

A

8

Item

Descrip

ti

on

Qty

B

12

Item

Descrip

ti

on

Qty

C

12

Item

Descrip

ti

on

Qty

Item

Descrip

ti

on

Qty

Item

Descrip

ti

on

Qty

F

Item

Descrip

ti

on

Qty

Item

Descrip

ti

on

Qty

Thank


you


for


purchasing


Babymore


If


you


need


assistance,


spare


parts


or


you


are


unhappy


with


the


goods


Cal

l

:


020


3475


5588

 o

r


email

[email protected]

D

Head Bolts-35mm

2

E

Wooden dowel-30mm

G

Pin

4

Knobs

2

Screw Bolts-30mm

Screw-25mm

Tip over restraint

1

3

Page

Item

Descrip

ti

on

Qty

I

Allen key

1

H

Cam

4

Item

Descrip

ti

on

Qty

J

8

     Metal  dowel-30mm

Summary of Contents for Sleigh Changer

Page 1: ...1 P a g e INSTRUCTIONS Sleigh Changer Babymore SC V1 14 Babymore Ltd 2012...

Page 2: ...pplied with this product We recommend that you only use size 75 x 45cm changing mat with maximum thickness no more than 1 inch 25 4mm Place the changing mat on the changing surface evenly within the r...

Page 3: ...may nd the construction easier with help of another person in the room for use on a soft clean oor so there is no damage caused to the furniture during construction Follow each stage of construction s...

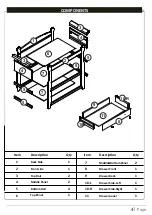
Page 4: ...k Side 1 7 Top Panel 1 2 Front side 1 8 Middle Bottom Panel 2 3 Top Rail 2 9 Drawer Front 1 4 Middle Panel 2 10 R Drawer Side Left 1 5 11 Drawer Side Right 1 6 Bottom Rail 4 Drawer panel 1 1 2 3 3 4 6...

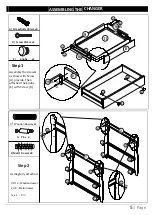
Page 5: ...D D E E A Screw Bolts 30mm x8 Assembly the drawer as show with Screw A provide Then attached the knobs E with Screw D Wooden Dowel x 12 Step 2 2 G G x 4 Pin As diagram attached C C G 1 C C J J J J J J...

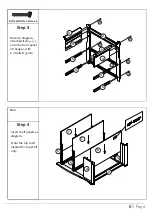
Page 6: ...mx 6 3 3 4 4 2 5 5 5 5 B B B B B B Refer to diagram attached Item 3 4 5 onto the front panel ofchanger with 6 x Bolts B 35mm Step 4 Non 4 4 6 7 7 5 5 2 Insert shelf panels as diagram Note the top shel...

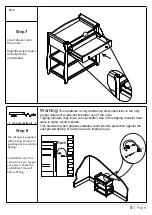
Page 7: ...ep 5 B B B B I B B C 1 3 3 5 4 5 5 5 4 G C 1 Place changer on the front side use same tting of step 2 to attach back side of changer C C H Cam x 4 Step 6 2 4 4 H H Use 4 x Cam H to lock front and back...

Page 8: ...er use of the units Tipping furniture may injure young children Use of this tipping restraint hard ware is highly recommended This hardware when properly installed could procide protection against the...

Page 9: ...uality wood and material Due to the handcrafted nature of our products and our use of solid woods each piece is unique and may contain irregular qualities there will occasionally be natural markings m...

Reviews: