background image

HOW TO USE

Preparing baby meals and defrosting:

To defrost food follow instructions 1 through to 13. For a small
amount of food use 100mls of water, for a medium amount of
food use 200mls of water and for a larger amount of food use
300mls of water in the bottom of the tank.
1. Check  that  the  appliance's  voltage  rating  is  the  same  as

that of the mains power supply. If so, you can safely connect
the appliance.

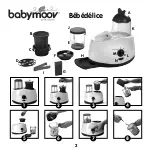
2. Remove the cooking hood, steamer basket and container

from the appliance.

3. Place  the  food  in  the  cooking  basket  (prepare  the  food

according to the recipe book).

4. Measure out the appropriate amount of water for the recipe

using the mixing bowl (use tap water, not bottled water) 

5. Pour the water into the bottom of the tank. Check that the

insulation plate is installed on the black heating element
inside the tank.

6. Place the container in position. Then place the steamer basket

(containing the food) on the container.

7. Install the hood correctly. Take care: the hood does not have

any locking system, do not remove it while the appliance is
in operation.

8. Turn the control button to the

. position. Then press the

"On/Off" button

.

9. The lamp lights up and the cooking cycle starts. Warning: During

cooking steam comes out of the opening on the hood. Keep your
hands well away from this opening to avoid getting scalded.

10. When the cooking cycle has finished, you will hear a beep to

tell  you  the  food  is  ready,  and  the  appliance  stops
automatically. Note: You can stop the cooking cycle at any time
by pressing once on the "On/Off" button.

11. Remove the hood, holding it towards the top. Warning: the

hood gets very hot. Handle with care.

12. Leave the cooking basket to cool for 4 to 5 minutes. Use the

cooking basket handle to remove it.

13. Remove the steamed food and place it in the bowl. At the

same time, pour the cooking juices that have collected in
the container into the bowl. This will make the food more
tasty and juicy. Warning: the container gets hot. Take care
when handling it.

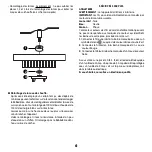
14. Screw the mixing lid onto the bowl to close it.
15. Place it back in the Bébédélice, lining the bowl up with the

slot in the appliance. Then turn the bowl clockwise to lock it
in position.

16. Use your left hand to hold the bowl and your right hand to

turn the control button to the left to chop the food. Warning:
do not chop continuously for more than 10 seconds. This
could result in the appliance overheating.

17. When the food is ready, release the button.
18. Remove the bowl, then the mixing lid.
19. You can now give the food to your baby. Warning: always

check the temperature of the food before giving it to your baby.

20. If there are any left-overs, you can leave them in the chopper

and close it with the lid. You can then also put them in the
refrigerator. Warning: do not start chopping when the bowl
contains no food nor liquid. Never chop when the appliance
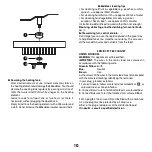
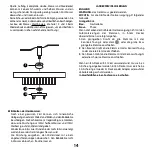
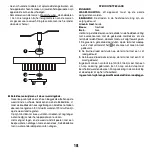
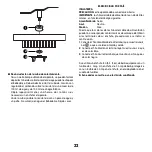
is empty. Removing the blades. Warning: do not forget parts
1,2 and 3 when reassembling the blades in order to avoid
any risk of overheating (see diagram below).

You can prepare healthy and delicious food for your baby! Have
a look at our recipes.

Heating baby bottles/jars:

1. Check that the appliance's voltage rating is the same as that

of the mains power supply. If so, you can safely connect the
appliance.

2. Remove the cooking basket and container from the appliance.
3. Remove the measuring tube from its storage place and fill it

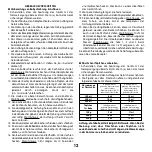
with the amount of water indicated on the attached table*.

Take care: this table is only an indication. If you think the
bottle or jar is not hot enough or too hot, don't hesitate to
increase or reduce the amount of water in the tank.

4. There is no need to pre-heat the appliance. Pour the required

amount of water into the tank. Don't fill above the level
indicated. If there is too much water, the bottle will be heated
for too long and the bottle is liable to get too hot.

8

Quantity of water 

in the bottle

Quantity of water (ml) to

put in the tank for a

bottle prepared at room

temperature (20°C)

Quantity of water (ml)

to put in the tank for a

bottle prepared

and placed in the

refrigerator (4°C)

120 ml

8 ml

12 ml

240 ml

10 ml

13 ml

330 ml

11 ml

14 ml

Jar of

baby food

Quantity of water (ml)

to put in the tank for one

jar (20°C)

Quantity of water (ml)

to put in the tank for

one refrigerated jar (4°C)

120 g

9 ml

11 ml

200 g

10 ml

12 ml

250 g

11 ml

13 ml

Summary of Contents for bebedelice

Page 1: ...ine Auriol 63051 Clermont Ferrand cedex 2 France www babymoov com Notice d utilisation Instructions for use Benutzungsanleitung Gebruikshandleiding Instrucciones de uso Instruções de uso Istruzioni per l uso Használati utasítás Návod k použití Bébédélice 0 ...

Page 2: ...2 Bébédélice 1 4 2 3 5 8 6 7 A B C D E F G J K L M N H I ...

Page 3: ...r un danger Cet appareil n est pas prévu pour être utilisé par des personnes y compris les enfants dont les capacités physiques sensorielles ou mentales sont réduites ou par des personnes dénuées d expérience ou de connaissance sauf si elles ont pu bénéficier par l intermédiaire d une personne responsable de leur sécurité d une surveillance ou d instructions préalables concernant l utilisation de ...

Page 4: ...es aiguilles d une montre pour le serrer 16 Employez votre main gauche pour tenir le bol et votre main droite pour tourner le bouton de commande vers la gauche pour hacher la nourriture Avertissement ne pas hacher en continu pendant plus de 10 secondes Cela pourrait entraîner une surchauffe de l appareil 17 Quand la nourriture est prête lâchez le bouton 18 Enlevez le bol et retirez le couvercle de...

Page 5: ...iter ce dernier pour mélanger le lait Versez une goutte sur l intérieur du poignet pour vérifier sa température Laissez refroidir l appareil au moins 15 MINUTES entre chaque utilisation Stériliser un biberon 1 Assurez que le voltage de l appareil coïncide avec le courant électrique Si oui branchez l appareil en toute sécurité 2 Enlevez le réceptacle de jus de cuisson le panier de cuisson et la clo...

Page 6: ...R PAYS ANGLETERRE AVERTISSEMENT cet appareil doit être mis à la terre IMPORTANT Les fils du cordon d alimentation sont codés par couleur de la manière suivante Jaune Vert Terre Bleu Neutre Marron Phase Comme les couleurs des fils du cordon d alimentation peuvent ne pas correspondre aux marques de couleur qui identifient les bornes de votre prise procédez comme suit 1 Connectez le fil Jaune Vert à ...

Page 7: ...tal or sensory abilities or by persons lacking in experience or knowledge unless the person responsible for their safety has supervised and instructed them in the use of this appliance Chlidren should be supervised to ensure that they do not play with the appliance Comply with the heating times and check that the baby bottle and its contents are at the correct temperature before giving the food to...

Page 8: ...ébédélice lining the bowl up with the slot in the appliance Then turn the bowl clockwise to lock it in position 16 Use your left hand to hold the bowl and your right hand to turn the control button to the left to chop the food Warning do not chop continuously for more than 10 seconds This could result in the appliance overheating 17 When the food is ready release the button 18 Remove the bowl then...

Page 9: ...ch use Sterilizing a bottle 1 Check that the appliance s voltage rating is the same as that of the mains power supply If so you can safely connect the appliance 2 Remove the cooking juices container the cooking basket and the hood from the appliance 3 Leave the insulation plate in the bottom of the tank 4 Remove the mixing bowl and fill it with 90ml water 5 Pour the water into the bottom of the ta...

Page 10: ... or bottle sterilising turn control knob to Bottle warming turn control knob to Don t forget you can use the liquid captured in the green tray to help blend foods to a smoother consistency This also uses all the wonderful juices and nutrients from the food SPECIFICITY PER COUNTRY UNITED KINGDOM WARNING this appliance must be earthed IMPORTANT The wires in the mains lead are coloured in accordance ...

Page 11: ... körperlich sensorisch oder geistig behinderte Personen einschließlich Kinder sowie durch Personen ohne Erfahrung oder Wissen vorgesehen es sei denn diese werden von einer für ihre Sicherheit zuständigen Person beaufsichtigt und auf den Einsatz des Geräts eingewiesen Kinder sollten beaufsichtigt werden damit sie nicht mit dem Gerät spielen Die Aufwärmzeiten einhalten und sicherstellen dass das Flä...

Page 12: ...n den Becher in bezug auf den Schlitz im Gerät ausrichten Den Becher im Uhrzeigersinn drehen um ihn festzuschrauben 16 Den Becher mit der linken Hand festhalten mit der rechten Hand die Bedientaste nach links drehen um die Nahrung zu hacken Warnhinweis nicht länger als 10 Sekunden ununterbrochen hacken Dies kann zu einem Überhitzen des Geräts führen 17 Wenn die Nahrung fertig ist die Taste loslass...

Page 13: ...ufwärmzyklus nicht in der Kammer lassen Die darin enthaltene Stauwärme wärmt das Fläschchen weiter auf ACHTUNG Um Verbrennungen zu vermeiden immer die Temperatur der Nahrung prüfen bevor Sie Ihr Kind füttern Fläschchen gut schütteln um die Milch gut zu mischen Gießen Sie einen Tropfen auf die Innenseite Ihres Handgelenks um die Temperatur zu prüfen Das Gerät zwischen zwei Einsätzen mindestens 15 M...

Page 14: ...eschlossen wird Die Mischung ausgießen den Widerstand mit einem angefeuchteten Lappen abwaschen Den Bébédélice nicht in Wasser eintauchen Trocknen lassen LÄNDERSPEZIFISCHE REGELN ENGLAND WARNUNG das Gerät muss geerdet werden WICHTIG Für die Drähte der Netzversorgung gilt folgender Farbcode Grüngelb Erde Blau Neutralleiter Braun Phase Wenn die Farben der Drähte der Netzversorgung nicht mit den Farb...

Page 15: ...e fysieke sensorische of mentale vaardigheden of door personen zonder ervaring of kennis behalve als ze onder toezicht staan van een persoon die verantwoordelijk is voor hun veiligheid of als ze op voorhand instructies gekregen hebben over het gebruik van het apparaat Kinderen moeten onder toezicht geplaatst worden om ervoor te zorgen dat ze niet spelen met het apparaat Neem de opwarmtijd in acht ...

Page 16: ...er hand de kom vast en draai met de rechter hand de bedieningsknop naar links toe om het voedsel te snijden Waarschuwing niet langer dan 10 seconden continu snijden zo niet zou het apparaat oververhit kunnen raken 17 Als het voedsel klaar is de knop loslaten 18 De kom uit het apparaat halen en het mixerdeksel verwijderen 19 U kunt nu het voedsel aan uw baby geven waarschuwing controleer altijd de ...

Page 17: ...d worden Laat vervolgens een druppel aan de binnenkant van de pols vallen om de temperatuur te testen Na ieder gebruik het apparaat op zijn minst 15 minuten laten afkoelen Steriliseren van een zuigfles 1 Controleer of de spanning van het apparaat overeenkomt met die van het stroomnet Indien dit het geval is kunt u het apparaat in alle veiligheid aansluiten 2 Haal de opvangbak van het kookwater het...

Page 18: ... afdrogen met een een doek De Bébédélice niet in water onderdompelen Laten drogen SPECIFICITEIT PER LAND ENGELAND WAARSCHUWING dit apparaat moet op de aarde aangesloten worden BELANGRIJK De draden in de hoofdaansluiting zijn als volgt gekleurd Groen Geel Aarde Blauw Neutraal Bruin Fase Het kan zijn dat de kleuren van de draden in de hoofdaansluiting niet overeenkomen met de gekleurde merktekens om...

Page 19: ...e de su seguridad Conviene supervisar a los niños para asegurarse de que no jueguen con el aparato Respete el tiempo de calentamiento y asegúrese de que el biberón y su contenido se encuentran a una temperatura correcta antes de dar de comer al bebé Se recomienda no calentar la comida demasiado Para comprobar que no se ha superado la temperatura correcta de los alimentos que se darán al bebé puede...

Page 20: ...ra del aparato A continuación gire el bol en el sentido de las agujas del reloj para apretarlo 16 Utilice la mano izquierda para sujetar el bol y la derecha para girar el botón de mando hacia la izquierda para picar la comida Advertencia no pique de forma continuada durante más de 10 segundos pues podría provocar el recalentamiento del aparato 17 Cuando la comida esté lista suelte el botón 18 Reti...

Page 21: ...l interior de la muñeca para comprobar su temperatura Deje enfriar el aparato al menos 15 MINUTOS entre cada utilización Esterilizar un biberón 1 Asegúrese de que el voltaje del aparato coincide con la corriente eléctrica Si es así enchufe el aparato con toda tranquilidad 2 Retire el receptáculo del jugo de cocción la cesta de cocción y la campana del aparato 3 Deje el plato aislante en el fondo d...

Page 22: ...cable de alimentación son de distintos colores en función del código siguiente Amarillo Verde Tierra Azul Neutro Marrón Fase Puesto que los colores de los hilos del cable de alimentación pueden no corresponder con las marcas de color que identifican a los terminales de su enchufe proceda como se indica a continuación 1 Conecte el hilo Amarillo Verde al terminal que muestra una E o el o que es verd...

Page 23: ...s sem experiência ou conhecimentos excepto no caso de haver pessoas responsáveis pela sua segurança de haver vigilância ou de serem dadas instruções prévias sobre a utilização do aparelho É conveniente vigiar as crianças para que não brinquem com o aparelho Respeite o tempo de aquecimento e assegure se de que o biberão e o seu conteúdo se encontram a boa temperatura antes de o dar ao seu bebé É re...

Page 24: ...mente a tigela no sentido do movimento dos ponteiros do relógio para prender 16 Segure a tigela com a mão esquerda e com a direita rode o botão de comando para a esquerda para picar os alimentos Aviso Não pique continuamente durante mais de 10 segundos para o aparelho não aquecer excessivamente 17 Logo que os alimentos estejam prontos largue o botão 18 Retire a tigela e a cobertura de mistura 19 A...

Page 25: ... uma gota no interior do braço para verificar a temperatura Deixe arrefecer o aparelho pelo menos durante 15 MINUTOS entre cada utilização Esterilizar um biberão 1 Assegure se de que as características eléctricas do aparelho coincidem com as da corrente eléctrica da rede Em caso afirmativo pode ligar o aparelho com segurança 2 Retire o colector do suco da cozedura o tabuleiro de cozedura e a campâ...

Page 26: ...a IMPORTANTE Os condutores no cabo de ligação à corrente estão identificados com as cores seguintes Verde Amarelo Terra Azul Neutro Castanho Tensão Como as cores dos condutores no cabo de ligação à corrente podem não corresponder às cores que identificam os terminais na sua ficha deverá proceder como a seguir se indica 1 Ligue o condutor Verde Amarelo ao terminal com o símbolo E ou ou Verde ou Ver...

Page 27: ...sone prive di esperienza o conoscenza a meno che queste non siano state sottoposte tramite persona responsabile della loro sicurezza a controllo o istruzioni riguardanti il corretto utilizzo dell apparecchio stesso Accertarsi sempre che il bambino non giochi con l apparecchio Rispettate sempre i tempi di riscaldamento ed assicuratevi che il biberon ed il suo contenuto siano ad una buona temperatur...

Page 28: ... la vostra mano sinistra per tenere il recipiente e la mano destra per girare il pulsante di comando verso sinistra per macinare l alimento Avvertenza non macinare continuativamente per più di 10 secondi Ciò potrebbe comportare un surriscaldamento dell apparecchio 17 Quando il cibo è pronto rilasciate il pulsante 18 Togliete il recipiente e ritirate il coperchio di miscela 19 Ora potete dare l ali...

Page 29: ...re la sua temperatura Lasciate raffreddare l apparecchio almeno 15 MINUTI tra ogni utilizzo Sterilizzare un biberon 1 Assicuratevi che la tensione dell apparecchio coincida con la corrente elettrica Se sì collegate l apparecchio in tutta sicurezza 2 Togliete il ricettacolo del succo di cottura il cesto di cottura e la campana dall apparecchio 3 Lasciate il piatto isolante in fondo alla vaschetta 4...

Page 30: ...RTANTE I fili del cordone d alimentazione sono codificati per colore nel seguente modo Giallo Verde Terra Blu Neutro Marrone Fase Poiché i colori dei fili del cordone d alimentazione possono non corrispondere alle marche di colore che identificano i morsetti della presa è consigliabile procedere come segue 1 Connettere il filo Giallo Verde al morsetto contrassegnato da una E o da un o che sia di c...

Page 31: ...í být vyměněn výrobcem jeho servisním zástupcem nebo obdobně kvalifikovanou osobou aby nedošlo k úrazu Tento spotřebič není určen pro používání osobami včetně dětí se zhoršenými tělesnými smyslovými nebo mentálními schopnostmi nebo osobami s nedostatkem zkušeností či znalostí pokud nejsou pod dohledem osoby odpovědné za jejich bezpečnost nebo pokud jim tato osoba neposkytla pokyny ohledně používán...

Page 32: ...jte nádobu na mixování a odšroubujte víčko 19 Připravený pokrm můžete přímo podávat dítěti Upozornění Před podáním dítěti vždy zkontrolujte teplotu pokrmu 20 SZbylý pokrm můžete nechat v nádobce na mixování a zašroubovat víčko Taky jej můžete uskladnit v ledničce Upozornění Nezapínejte funkci mixování pokud v nádobě není potravina nebo tekutina Je li nádoba na mixování prázdná nikdy nezapínejte mi...

Page 33: ...Pokud ano přístroj zapojte do el sítě 2 Vyjměte misku na odkapávání košík na potraviny a parní poklop 3 Nechte izolační desku na dně ohřívací komory 4 Vyjměte nádobu na mixování a nalijte do ní 90ml vody 5 Odměřenou vodu vlijte do ohřívací komory 6 Omytou kojeneckou láhev bez zbytků mléka vložte do ohřívací komory dnem vzhůru Savičku a uzávěr uložte do komory za láhev 7 Nasaďte parní poklop 8 Otoč...

Page 34: ...něn DŮLEŽITÉ Dráty kabelu jsou barevně označeny takto Žlutá Zelená Uzemnění Modrá Střední vodič Hnědá Fázový vodič Vzhledem k tomu barvy vodičů kabelu nemusí odpovídat barevnému označení svorek ve Vaší zástrčce postupujte následovně 1 Zapojte Žlutý Zelený vodič na svorku označenou písmenem E symbolem uzemnění nebo žlutou či zelenou barvou 2 Zapojte hnědý vodič na svorku označenou písmenem L nebo č...

Page 35: ...35 ...
Page 36: ...nt l achat Nous vous rappelons que vous disposez d un droit d accès de modification de rectification et de suppression des données qui vous concernent art 34 de la loi Informatique et Libertés du 6 janvier 1978 Pour exercer ce droit adressez vous à Babymoov Parc Industriel des Gravanches 16 rue Jacqueline Auriol 63051 Clermont Ferrand cedex 2 Les informations qui vous concernent sont destinées à B...

Reviews: