USER MAINTENANCE
INSTRUCTIONS
MAINTENANCE OF THE BLADE
Always apply oil to the blades before and
after use. This will ensure maximum cutting
performance and proper maintenance.
Hold the clipper away from your body in
a downward position, and apply a drop of
BabylissPro lubricating oil on the front and
sides of the cutter blade. Wipe off excess oil
with a soft, dry cloth.
Do not pull, twist, or wrap the supply cord
around the appliance.
HOW TO USE COMB ATTACHMENTS
To use the comb attachments, turn the
clipper to “ ” position. Slide the comb
attachment onto the top of the clipper
blade, and then pull down and over the
back of the blade. To remove, pull up on the
back of the comb attachment and then pull
away from the blade.
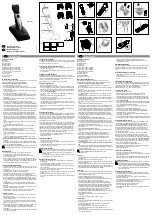
REPLACEMENT (REMOVAL) OF
BLADE SET
Step 1. Unplug the unit and adjust the taper
(see illustration A).
Step 2. Remove the screws and the fixed
blade. Save the screws.
Step 3. Lift off the small moving blade and
replace it with the new one on the
plastic oscillator (see illustration B).
Step 4. Replace the fixed blade using the
screws and lightly tighten them.
Adjust the teeth as shown in
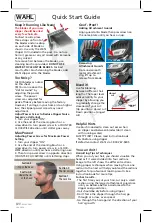
ADJUSTABLE TAPER LEVER
The taper lever is positioned at your thumb.
You can hold the clipper in your hand and
adjust the lever at the same time – while
you are clipping.
The taper lever adjusts the closeness of the
cut from a close cut with the taper lever
in the up position, to a longer length cut
with the taper lever in the down position.
To increase cutting length, slowly push
the lever down. To cut closer, push the
lever up. As different cutting edges are
used in each setting, using the taper lever
lengthens the life of the clipper blades.
Too much hair can slow down hair clippers.
Keep the clipper on for removing hair. Then
push the taper lever back and forth quickly
for several times. If you do this every
time, especially after much hair cutting,
the clipper blades should remain free of
cut hair. Oil the blades after the above
procedures.
DISPOSAL OF LITHIUM ION
BATTERY
This clipper has a lithium ion battery. To
protect the environment, these batteries
should be removed and properly disposed
of when the unit is no longer operating. To
remove the battery block for disposal or
recovery, follow these instructions:
1. Disconnect the clipper from household
outlet.
2. Discharge the battery pack completely
before removing.
3. Remove the blade and bottom cap.
C.
Fixed Blade
1/32" to 1/16"
Small
Moving
Blade
Close Cut
Longer Cut
illustration C, to a gap of 1/32" (1
mm) to 1/16" (1.5 mm), and the
small, moving blade as centered
and parallel as possible to the fixed
blade’s teeth.
IMPORTANT NOTE:
The top edge of the fixed blade must be a
minimum of 1/32" (1 mm) higher than the
top edge of the moving blade, as centered
as possible. This is important so that the
moving blade does not come in contact
with the skin.
Be sure to add a few drops of BabylissPro
lubricating oil to the blades before running.
Don’t forget to tighten the screws after the
blades have been aligned.
BLADE SHARPENING
BabylissPro cutting blades are ground from
the finest quality steel with and are hardened
to extend the cutting performance. As
with any cutting appliance, the cutting
edges become dull from repeated usage.
Increasing blade tension to force the
blade cutting would cause the clipper to
overheat and reduce its motor life. When
the blade is no longer able to cut smoothly,
sharpening is required or replace it with a
new BabylissPro blade set.
Taper
A.
B.
Small
Moving
Blade
Plastic Oscillator
4. Remove 4 screws and open cover.
5.
Remove the screw that fastens the
printed circuit board to housing. Lift
printed circuit board out.
6. Unplug lithium ion battery.
7.
To protect the environment, do not
dispose of your battery with your ordinary
household waste. For more details
on recovery of material and waste-
treatment facilities, please contact the
waste disposal services in your region.
4
5