background image

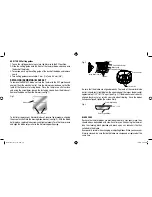
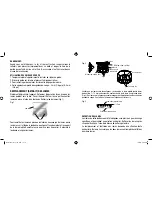
Blade screws

Fig. 1

Blade set

Fig. 3

Comb (large blade)

Cutter (small blade)

1/32" – 1/16"

Fig. 2

Be sure that the blades are aligned properly.  The teeth of the smaller blade 
(cutter) should rest slightly below the upper edge of the larger blade (comb) 
approximately 1/32" to 1/16" apart (see Fig. 3). If the blades are not correctly 
aligned, they may cut or scratch your skin when trimming.  Once the blades 
have been aligned, tighten the screws firmly.

BLADe cARe

Because the trimmer blades are precision-made for a very special use, they 
should always be handled with care. Each time you finish using the trimmer, 
take the cleaning brush provided and brush away any loose hair that has 
collected in the blades. 
Be especially careful when changing or adjusting blades. When you have your 
trimmer serviced, be sure that both blades are sharpened or replaced at the 
same time.

To install or replace your trimmer blade set, reverse the procedure, aligning 
the eccentric shaft into the moving blade bracket (see Fig. 2). With the blade 
held in place, replace blade screws and tighten loosely. Turn the trimmer over 
and align the blade set parallel to the trimmer’s upper housing.

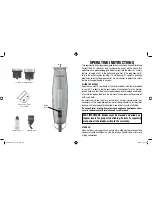
HOW TO uSe cutting guides

1.  To use the cutting guides, always turn the trimmer to the OFF position.
2.  Slide the cutting guide onto the front of the trimmer blade and snap over 

the back of the blade.

3.  To remove, push up the cutting guide at the back of the blade and remove 

comb.

4.  Two cutting guides are available:  3 mm (1/8") and 9.5 mm (3/8").

RePLAcING (ReMOVING) BLADe SeT

To remove the BAB762C blade set, turn the trimmer to the OFF position and 
unplug it from the electrical outlet.  Turn the trimmer upside down so that the 
teeth of the trimmer are facing down.  Place the trimmer on a flat surface 
and using the screwdriver, loosen the fastening screws from the blade set. 
Remove the blade set from the trimmer (see Fig. 1).

Blade

Large blade (Comb)

Blade spring

Small blade (Cutter)

Eccentric shaft

Moving blade bracket

Screw holes

Screws

BAB762C IB-14_17A.indd   7-8

1/28/15   5:02 PM

Summary of Contents for BAB762C

Page 1: ...tisfaction lisez toujours soigneusement les directives avant de l utiliser Operating Instructions Model BAB762C Outlining Trimmer with Replaceable Brushes For your safety and continued enjoyment of this product always read the instruction book carefully before using Directives d utilisation Modèle BAB762C Tondeuse de finition avec balais remplaçables BAB762C IB 14_17A indd 1 2 1 28 15 5 02 PM ...

Page 2: ...not working properly or if it has been dropped or damaged or dropped into water Return the appliance to an authorized Service Center for examination and repair 5 Keep the cord away from heated surfaces 6 Never operate the appliance with the air openings blocked or while it is on a soft surface such as a bed or couch where the air openings may be blocked Keep the air openings free of lint hair and ...

Page 3: ...pread one drop of oil across the blades then turn the trimmer off and wipe away the excess oil with a soft cloth Be careful not to use too much oil and don t oil your trimmer more than necessary as this could damage the motor Never attempt to oil the motor bearing as it is permanently lubricated Keep oil out of reach of children Do not pull twist or wrap line cord around appliance Continuous stres...

Page 4: ...he procedure aligning the eccentric shaft into the moving blade bracket see Fig 2 With the blade held in place replace blade screws and tighten loosely Turn the trimmer over and align the blade set parallel to the trimmer s upper housing HOW TO USE Cutting guides 1 To use the cutting guides always turn the trimmer to the OFF position 2 Slide the cutting guide onto the front of the trimmer blade an...

Page 5: ...less than 1mm the brush must be replaced to prevent possible damage to the motor armature Always replace both side brushes left and right at the same time even if only one brush is below the required length When reinstalling the brushes make sure that the copper plate plug is in the slot and press down to seat in place Reassemble the slotted brush cap and tighten down into place KEEP AWAY FROM WAT...

Page 6: ...ate of purchase if the electrical appliance is accompanied by a proof of purchase If you are sending your defective appliance which is covered by this guarantee directly to the Dannyco Professional Service Center it must be accompanied by the following 1 your dated sales slip 2 a precise description of the defect 3 your complete return address and daytime phone number and 4 a 10 money order for po...

Page 7: ... tombé ou tombé à l eau Le renvoyer à un centre de services autorisé afin qu il soit inspecté et réparé 5 Garder le cordon d alimentation loin des surfaces chaudes 6 Ne pas obstruer les ouvertures ou placer l appareil sur une surface molle telle qu un lit ou un divan où elles pourraient se boucher Vérifier que les ouvertures ne sont pas obstruées par des peluches cheveux ou autres débris 7 Ne pas ...

Page 8: ...indre l appareil et essuyer le surplus d huile à l aide d un linge doux Prendre garde de ne pas utiliser trop d huile et de ne pas lubrifier l appareil plus que nécessaire Cela pourrait endommager le moteur Ne pas essayer de lubrifier les roulements du moteur qui sont lubrifiés à vie Garder l huile hors de portée des enfants Ne pas tirer tordre ou enrouler le cordon d alimentation autour de l appa...

Page 9: ...er les lames sur la tête de la tondeuse en alignant l axe du moteur et le support de la lame mobile Remettre les vis en place sans trop serrer Retourner la tondeuse et aligner les lames Fig 3 Lame fixe grande lame Petite lame lame mobile 1 1 5 mm Fig 2 Vérifier que les lames sont bien alignées Les dents de la lame mobile petite lame doivent être 1 1 5 mm en dessous du haut des dents de la lame fix...

Page 10: ...is périodiquement Cela garantira une performance optimale et optimisera la durée de vie du moteur Important Afin d éviter les risques d électrocution toujours débrancher la tondeuse avant l examiner ou de remplacer les balais Dévisser le capuchon externe à l aide d un tournevis plat ou d une pièce de monnaie Retirer le balai et vérifier la longueur du bout carré Si le bout carré mesure moins de 1 ...

Page 11: ...sans frais en le retournant à votre distributeur ou directement à Dannyco Professionnel s il est accompagné d une preuve d achat Si vous retournez l appareil défectueux toujours sous garantie directement à Dannyco Professionnel il doit être accompagné 1 de votre reçu de caisse daté 2 d une description précise du problème 3 de votre adresse de retour complète et votre numéro de téléphone de jour et...

Reviews: