background image

6

7

ENGLISH

Please carefully read the safety 
instructions before using the 
appliance. 
SAVE THESE INSTRUCTIONS

adaptateur

CA78M

Vibrations 

< 2,5 m/s²

LpA (dB(A))

< 70

PROFESSIONAL CORD/ 
CORDLESS CLIPPER

FX8700GBPE - FX8700IBPE – 
FX8700RBPE

OPERATING INSTRUCTIONS

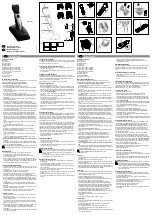
1.  Before using the clipper for the 

first time, charge continuously 
for 4 hours. Maximum battery 
capacity will only be reached 
after 3 charging and discharging 
cycles.

2.  

Make sure the switch on the 
clipper is in the OFF position. 
Connect the charging jack into 
the receptacle on the bottom 
of the clipper. Plug the adapter 
into any electrical outlet (at 
the voltage listed on the label 
affixed to the adapter). The 
charging indicator will light 
up blue to indicate that the 
charging has begun. Charging is 
complete after 4 hours.

3.  The adapter may become warm 

while charging. This is normal.

4. 


Preserving the batteries: To 

maintain the optimum capacity 
of the rechargeable batteries, 
the clipper should be recharged 
for 4 hours approximately every 
6 months.

5.  Make sure the switch is in the 

OFF position when the clipper is 
not operating. 

6. 


If the charging light starts 
to flash rapidly (more than 
4 flashes per second) then 
the appliance is faulty. If this 
happens then please stop 
charging and remove the 
adapter from the mains and 
contact an authorized Service 
Center.

FOR DIRECT PLUG-IN 
OPERATION

Make sure clipper is off. Connect 
charging jack into the receptacle 
at the end of clipper and plug the 
adapter into power outlet.

ON/OFF SWITCH

To operate, simply slide switch 
to ON (marked «I»). To stop 
operation, set to the OFF (marked 
«0») position.

VERY IMPORTANT

: Blades must 

be cleaned and oiled on a regular 
basis for proper functioning. 
Failure to regularly clean and oil 
the blades will void the warranty.

USER MAINTENANCE 
INSTRUCTIONS

MAINTENANCE OF THE BLADE

Always apply oil to the blades 
before and after use. This will 
ensure maximum cutting 
performance and proper 
maintenance. Hold the clipper 
away from your body in a 
downward position and apply a 
drop of BaBylissPro lubricating oil 
on the front and sides of the cutter 
blade. Wipe off excess oil with a 
soft, dry cloth.
Do not pull, twist, or wrap the 
supply cord around the appliance.

HOW TO USE COMB 
ATTACHMENTS

To use the comb attachments, 
turn the clipper to “0” position. 
Slide the comb attachment onto 
the top of the clipper blade, and 
then pull down and over the back 
of the blade. To remove, pull up on 
the back of the comb attachment 
and then pull away from the blade.

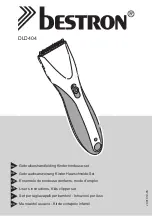
REPLACEMENT (REMOVAL) OF 
BLADE SET

Taper

A.

B.

Small

Moving

Blade

Plastic Oscillator

Step 1.

 Unplug the unit and adjust 

the taper (see illustration A).

Step 2. 

Remove the screws and 

the fixed blade. Save the screws.

Step 3. 

Lift off the small moving 

blade and replace it with the new 
one on the plastic oscillator (see 
illustration B).

Step 4. 

Replace the fixed blade 

using the screws and lightly 
tighten them. Adjust the teeth as 
shown in illustration C, to a gap of 
0.8 mm to 1.5 mm, and the small, 
moving blade as centered and 
parallel as possible to the fixed 
blade’s teeth.

IMPORTANT NOTE:

The top edge of the fixed blade 
must be a minimum of 0.8 mm 
higher than the top edge of the 
moving blade, as centered as 
possible. This is important so that 
the moving blade does not come 
in contact with the skin.
Be sure to add a few drops of 
BaBylissPro lubricating oil to the 
blades before running. Don’t 
forget to tighten the screws after 
the blades have been aligned.

Small

Moving

Blade

Fixe Blade

0.8 mm 

C.

Summary of Contents for 4ARTISTS FX8700GBPE

Page 1: ...FX8700GBPE FX8700IBPE FX8700RBPE T160b TONDEUSE DE COUPE PROFESSIONNELLE PROFESSIONAL CLIPPER EDM TECHNOLOGY BOOST rtists...

Page 2: ...yer et lubrifier les lames r guli rement afin d assurer le bon fonctionnement de l appareil Le non respect de ces instructions annulera la garantie DIRECTIVES D ENTRETIEN ENTRETIEN DES LAMES Lubrifier...

Page 3: ...s RECYCLAGE DE LA BATTERIE LITHIUM ION Cet appareil contient une batterie lithium ion Pour prot ger l environnement cette batterie doit tre retir e et jet e de mani re appropri e en fin de vie Pour re...

Page 4: ...iled on a regular basis for proper functioning Failure to regularly clean and oil the blades will void the warranty USER MAINTENANCE INSTRUCTIONS MAINTENANCE OF THE BLADE Always apply oil to the blade...

Page 5: ...protect the environment these batteries should be removed and properly disposed of when the unit is no longer operating To remove the battery block for disposal or recovery follow these instructions 1...

Page 6: ...den damit sie einwandfrei funktionieren Werden die Klingen nicht regelm ig gereinigt und ge lt erlischt die Garantie HINWEISE ZUR WARTUNG PFLEGE DER KLINGEN DEUTSCH Vor und nach der Verwendung im mer...

Page 7: ...nde auf den Klingen des Haarschneiders ansammeln k nnen len Sie die Klingen so wie oben beschrieben ENTSORGUNG DER LITHIUM IONEN BATTERIE Dieser Haarschneider verf gt ber einen eingebauten Lithium Io...

Page 8: ...eolied om goed te kunnen blijven werken Bij niet regelmatig schoonmaken en smeren van de messen vervalt de garantie NEDERLANDS INSTRUCTIES VOOR DE GEBRUIKER VOOR HET ONDERHOUD VAN HET MES Breng voor e...

Page 9: ...t milieu te beschermen moeten deze batterijen worden verwijderd en op de juiste wijze wordt afgevoerd wanneer het apparaat niet meer werkt Volg onderstaande instructies om het batterijblok te verwijde...

Page 10: ...ruzioni annulla la garanzia ISTRUZIONI DI PULIZIA E MANUTENZIONE ITALIANO MANUTENZIONE DELLE LAME Lubrificare le lame prima durante e dopo ogni utilizzo al fine di garantire sempre la massima efficien...

Page 11: ...chio contiene una batteria litio ioni Per la tutela dell ambiente questa batteria a fine vita deve essere tolta e smaltita correttamente Per togliere la batteria 1 Spegnere e staccare l apparecchio da...

Page 12: ...dad se anular la garant a ESPA OL INSTRUCCIONES DE MANTENIMIENTO MANTENIMIENTO DE LAS CUCHILLAS Aplique siempre lubricante a las cuchillas antes y despu s de su uso De esta forma obtendr un m ximo ren...

Page 13: ...Para proteger el medio ambiente debe retirar la bater a y deshacerse de ella de forma adecuada cuando la unidad ya no est operativa Para retirar la bater a y as poderla eliminar o reciclar siga estas...

Page 14: ...o do aparelho O incumprimento das presentes instru es invalida a garantia INSTRU ES DE MANUTEN O PORTUGU S MANUTEN O DAS L MINAS Lubrifique as l minas antes durante e ap s cada utiliza o isto assegura...

Page 15: ...lizar frequentemente o aparador A seguir lubrifique as l minas RECICLAGEM DA BATERIA DE I ES DE L TIO Este aparelho cont m uma bateria de i es de l tio Para proteger o ambiente esta bateria deve ser r...

Page 16: ...GEHOLDELSE VEDLIGEHOLDELSE AF KNIVEN Sm r altid knivene med olie f r og efter brug Herved sikres maksimal sk reevne og korrekt vedligeholdelse Hold h rklipperen med fronten v k DANSK fra dig selv og b...

Page 17: ...tterier tages ud og bortskaffes korrekt n r produktet ikke l ngere er funktio nelt S dan fjernes batteriet med henblik p bortskaffelse eller nyt tigg relse 1 Tr k h rklipperens stik ud af stikkontakte...

Page 18: ...aden reng rs och sm rjs regelbundet UNDERH LLSANVISNINGAR F R ANV NDARE BLADUNDERH LL Applicera alltid olja p bladen f re och efter anv ndning Detta s kerst ller maximal SVENSKA klipprestanda och l mp...

Page 19: ...as ur och kas tas p l mpligt s tt n r enheten r uttj nt S h r tar du bort bat teriblockeringen f r att kasta eller tervinna det 1 Koppla loss h rklipparen ur v g guttaget 2 L t batteripaketet dra ur h...

Page 20: ...e fungerer som de skal Mangel p regelmessig rengj ring og sm ring av bladene vil gj re garantien ugyldig NORSK VEDLIKEHOLDSINSTRUKSJONER FOR BRUKEREN VEDLIKEHOLD AV BLADET P f r olje p bladene f r og...

Page 21: ...SSERING AV LITIUM IONBATTERI Denne klipperen er utstyrt med et litium ionbatteri For beskytte milj et m batteriet fjernes og avfallsh ndteres p riktig m te n r apparatet skal kastes F lg disse instruk...

Page 22: ...oimassa K YTT J N HUOLTO OHJEET TER N HUOLTO Levit teriin aina ljy ennen k ytt ja sen j lkeen N in varmistat maksimaalisen SUOMI leikkuutehon ja asianmukaisen huollon Pid hiusleikkuri kaukana kehostas...

Page 23: ...tta ei en k ytet Poista akku h vitt mist tai kierr tyst varten noudattamalla alla olevia ohjeita 1 Kytke leikkuri irti verkkovirrasta 2 Tyhjenn akku kokonaan ennen poistamista 3 Irrota nimikyltti ja r...

Page 24: ...46 47 adaptateur CA78M Vibrations 2 5 m s LpA dB A 70 H FX8700GBPE FX8700IBPE FX8700RBPE 1 4 3 2 OFF 4 3 4 4 6 5 0 4 0 0 2 A B 1 2 3 B 4 0 8 mm 1 5 mm 0 8 mm...

Page 25: ...48 49 0 8 mm C 1 2 3 4 4 5 6 7 0 1 8 2 6800 rpm 3 LED 10...

Page 26: ...szeres tiszt t sa s ken se nagyon fontos a k sz l k megfelel m k d s nek biztos t s hoz Ezeknek az el r soknak a figyelmen k v l hagy sa rv nytelen ti a j t ll st MAGYAR KARBANTART SI EL R SOK A K SEK...

Page 27: ...et v delme rdek ben az akkumul tort letciklusa v g n megfelel m don kell elt vol tani s hullad kba dobni Az akkumul tor kiv tele 1 Kapcsolja ki a k sz l ket s h zza ki a konnektorb l 2 Miel tt kiviszi...

Page 28: ...wa n rzecz jest regularne smarowanie aby zapewni prawid owe dzia anie urz dzenia Brak przestrzegania powy szych zalece spowoduje uniewa nienie gwarancji INSTRUKCJE DOTYCZ CE KONSERWACJI KONSERWACJA OS...

Page 29: ...enie zawiera akumulator litowo jonowy Aby chroni rodowisko naturalne akumulator ten musi by wyj ty i prawid owo zutylizowany po zako czeniu u ytkowania urz dzenia Aby wyj akumulator 1 Wy czy urz dzeni...

Page 30: ...m zajist te optim ln st ihac v kon Podr te zast ihova vzh ru nohama sm rem od t la a naneste n kolik kapek mazac ho oleje na p edn a bo n stranu pohybliv epele P ebyte n olej set ete m kk m such m ha...

Page 31: ...ium iontovou baterii V z jmu ochrany ivotn ho prost ed je t eba tuto baterii po skon en jej ivotnosti vyjmout a dn zlikvidovat Vyj mut baterie 1 Vypn te a odpojte za zen 2 P ed vyjmut m baterii mus b...

Page 32: ...62 63 adaptateur CA78M Vibrations 2 5 m s LpA dB A 70 FX8700GBPE FX8700IBPE FX8700RBPE 1 4 3 2 OFF 4 3 4 6 4 5 0 6 4 I 0 0 Fig 2 A B 1 2 3...

Page 33: ...64 65 1 2 3 4 4 5 6 7 1 59141 4 0 8 1 5 0 8 0 8 mm C...

Page 34: ...nerilmektedir 5 Cihaz kullanmad n zda a ma kapama d mesinin 0 zerinde olmas n kontrol edin 6 arj g stergesi h zl bir ekilde yan p s nmeye ba larsa saniyede 4 kereden fazla cihaz n ar zal oldu u anlam...

Page 35: ...etli b ak Sabit b ak 0 8 mm C KES M Y KSEKL AYAR KOLUNUN AYARLANMASI Daha k sa kesim Daha uzun kesim Sa kesme makineniz ba parmak seviyesinde yer alan ve kesme s ras nda kesim boyunu de i tirmenize ol...

Page 36: ...nesius krauti prietais 4 valandas 5 Kai nenaudojate prietaiso patikrinkite ar jungiklis yra ties 0 6 Jei krovimo indikatorius ima greitai mirks ti daugiau nei 4 kartus per sekund tai rei kia kad priet...

Page 37: ...iliukais Nejudamas peiliukas 0 8 mm C KIRPIMO AUK IO REGULIAVIMO SVIRTEL Trumpesnis kirpim Ilgesnis kirpimas J s kirpimo ma in l turi ties nyk iu taisyt kirpimo auk io reguliavimo svirtel kuri leid ia...

Page 38: ...luni 5 Verifica i dac ntrerup torul se afl n pozi ia 0 atunci c nd nu utiliza i dispozitivul 6 Dac indicatorul de nc rcare lumineaz intermitent rapid de mai mult de 4 ori pe secund nseamn c aparatul e...

Page 39: ...mm C BUTONDEREGLAREA N L IMII DE T IERE T iere mai scurt T iere mai lung Aparatul de tuns este dotat cu un buton de reglare a n l imii de t iere situat la nivelul degetului mare i care v permite s reg...

Page 40: ...s poz cij 0 6 Ja uzl des indikators s k tri mirgot vair k nek 4 reizes sekund tas nor da ka ier ce ir defekt va atsl dziet adapteri no elektr bas t kla un sazinieties ar pilnvarotu p cp rdo anas servi...

Page 41: ...m C GRIEZUMA AUGSTUMA IESTAT ANAS SVIRA s ks griezums Gar ks griezums J su trimmeris ir apr kots ar griezuma augstuma iestat anas sviru kas atrodas k a l men un auj main t griezuma garumu grie anas la...

Page 42: ...adima panna 5 Kui te seadet ei kasuta veenduge et seadme l liti on asendis 0 6 Kui laadimise m rgutuli hakkab kiiresti vilkuma sagedusega rohkem kui neli korda sekundis t hendab see t rget seadme t s...

Page 43: ...st taas kinni keerata Liikuv tera P sitera 0 8 mm C L IKEK RGUSE REGULEERIMISHOOB L ikamine madal L ikamine k rgema See juuksel ikusmasin on varustatud l ikek rguse reguleerimishoovaga p idla k rgusel...

Page 44: ...lo aju 0 6 Ako indikator punjenja po ne brzo mirkati vi e od etiri puta u sekundi to zna i da je ure aj neispravan otpojite adapter iz uti nice i obratite se servisu za usluge nakon prodaje UPORABA UR...

Page 45: ...anje Du e i anje Va je i a opremljen ru icom za pode avanje visine nastavka koja se nalazi na mjestu gdje dolazi palac i omogu uje promjenu duljine nastavka ak i tijekom i anja Ru ica za pode avanje...

Page 46: ...anja Prekida start I stop 0 ZNA AJKE TRIMERA 1 8 nastavaka za i anje 2 Digitalni motor 6800 o min 3 LED indikatori razine punjenja a PLAVI indikator mirka punjenje je u tijeku b PLAVI indikator svijet...

Page 47: ...92 93 0 2 A B 1 2 3 4 0 8 mm 1 5 mm 0 8 mm 0 8 mm C 1 2 3 4 4 5 6 7...

Page 48: ...94 95 FX8700GBPE FX8700IBPE FX8700RBPE CA78M 2 5 m s LpA A 70 1 2 OFF 3 4 5 0 6 I 0 I 0 1 8 2 6800 3 LED 10...

Page 49: ...96 97 0 8 mm C 1 2 3 4 5 6 7 0 2 A B 1 2 3 B 4 C 0 8 1 5 0 8...

Page 50: ...98 99 I 0 1 2 6800 3 10...

Page 51: ...BaByliss SARL Zl du Val de Calvigny 59141 Iwuy FR FAC 2023 04 IB 23 070...

Reviews: