ASSEMBLY
ASSEMBLY
10
9
Copyright © 2020, Baby Trend Inc., All Rights Reserved. Todos los derechos reservados. Tous droits réservés.
Copyright © 2020, Baby Trend Inc., All Rights Reserved. Todos los derechos reservados. Tous droits réservés.
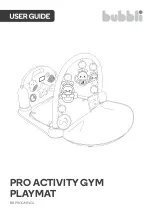
PLACE THE PADDED MAT
WARNING:
Never leave child
unattended. Always keep child in view
while in product. NEVER put child under
the mat.
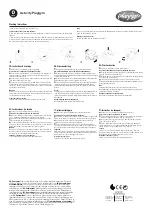
TO DISASSEMBLE FRAME
5
• Unlatch the left latch to
the right and the right
latch to the left. Listen for
the latch to disengage.
Pull the 2 side frames
away from the central
frame (Fig. 5a).
• Press in the pins on the
side frames to release
the each leg with
attached toy bar from the
framing. Press the pins
on each side of the toy
bars to release them from
the legs.
TO DISASSEMBLE
ATTACH / REMOVE TOYS
A
B
C
F
D
G
E
4
•
Center the padded mat
between the frame legs
and under the frame
assembly
(Fig. 4)
.
NOTE:
Padded mat
may be used without the
frame and toy assembly.
Fig. 5a
Fig. 5c
Fig. 5b
Fig. 4
Fig. 7
Unlock both
latches
Pins in
Optional
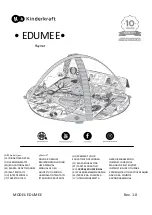
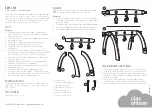
ASSEMBLED VIEW AND PARTS
• (T) shape Connector
removal is optional: Press
the pins and remove each
connector from each leg.
6
• Use the diagram
to see parts and
locations. Use the
list to identify parts
for set up and
disassembly.
A.
Central Frame
B.
Side Frame
C.
Leg
D.
Connector
E.
Toy Rattle / Strap
F.
Toy Bar
G.
Padded mat
• For assembly or
to disassemble
assistance see
(Page 3) to contact
customer service.
TOY ATTACHMENT STRAP
7
• Use hook and loop to attach or remove toys (Fig. 7).