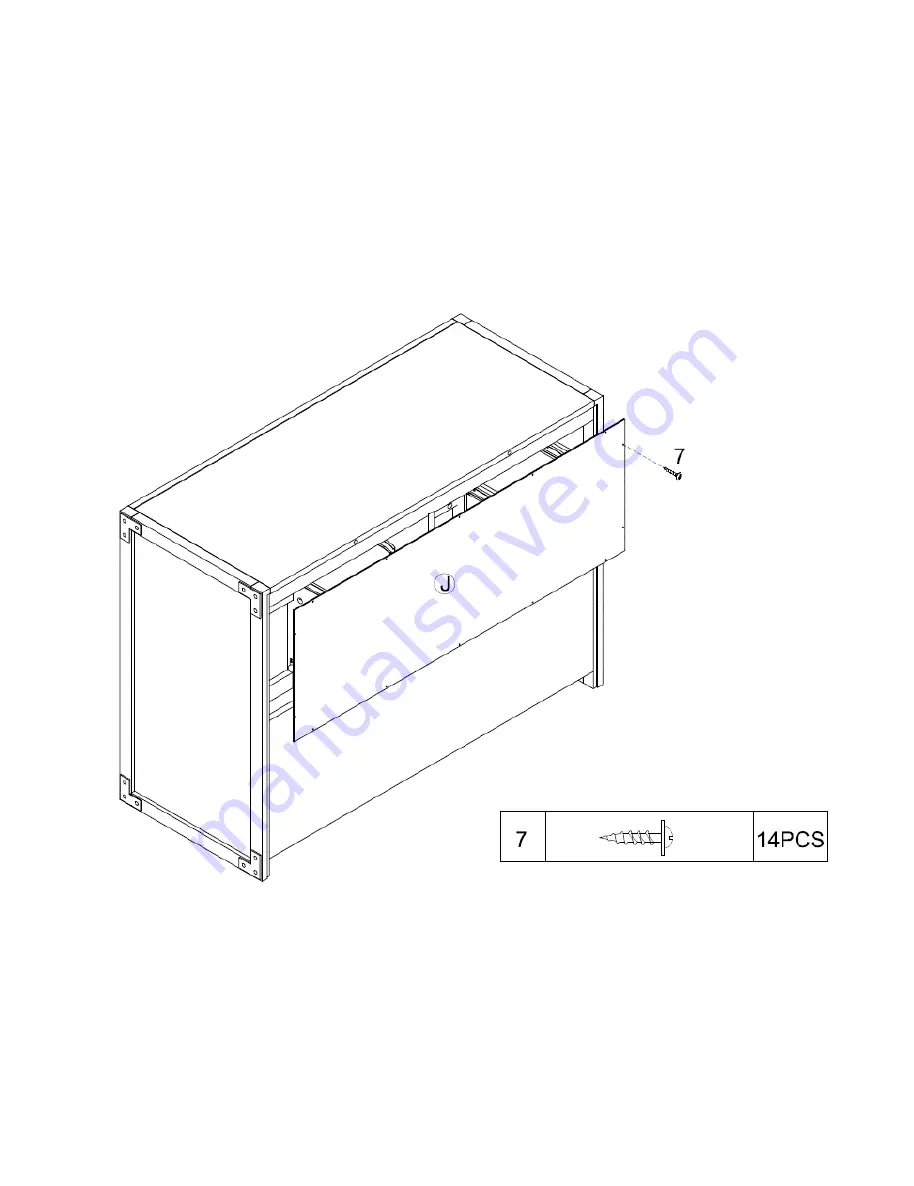
Baby Relax Miles DA7319-1BL Instruction Manual Download Page 36

ETAPA 11

Una el panel superior posterior (J) con la unidad ya ensamblada con tornillos (7).
Utilice un destornillador Phillips (no incluido) para ajustar los tornillos.

Miles Cómoda de 6 Cajones

DA7319-1BL / DA7319-1W

All manuals and user guides at all-guides.com

Summary of Contents for Miles DA7319-1BL

Page 1: ...220 1 BLUE 0 65857 17224 9 WHITE INSTRUCTION MANUAL DA7319 1W WHITE DA7319 1BL BLUE Miles 6 Drawer Dresser DO NOT RETURN PRODUCT TO THE STORE If a part is missing or damaged contact our customer servi...

Page 2: ...missing DO NOT USE Check bolts screws periodically and tighten them if necessary Dust regularly with a soft lint free cloth to prevent soil build up A damp cloth may be used occasionally to clean surf...

Page 3: ...CAM LOCK 26 PCS LARGE WOOD DOWEL 26 PCS 1 4 x 35mm LARGE CAM BOLT 26 PCS SAFETY STRAP 1 KIT ALLEN KEY 1 PC BOLT 1 PC SCREW 26 PCS 6 X 20mm SMALL WOOD DOWEL 24 PCS 3 X 15mm SCREW 14 PCS SMALL CAM BOLT...

Page 4: ...IDDLE RAIL 2 PCS BACK BOTTOM PANEL Miles 6 Drawer Dresser DA7319 1BL DA7319 1W 6 PCS 6 PCS 6 PCS DRAWER RIGHT SIDE RIGHT SIDE PANEL LEFT SIDE PANEL DRAWER LEFT SIDE TOP PANEL 1 PC DRAWER FRONT 1 PC DR...

Page 5: ...STEP 1 Insert large cam bolts 1 into the back top rail A and back bottom panel B as shown Miles 6 Drawer Dresser DA7319 1BL DA7319 1W All manuals and user guides at all guides com...

Page 6: ...3 and large wood dowels 2 into the middle panel C Attach back top rail A and back bottom panel B to the middle panel C and secure by rotating the large cam lock 3 1 2 turn clockwise using a Phillips h...

Page 7: ...STEP 3 Insert large cam bolts 1 into the front middle rails D and front bottom rail E as shown Miles 6 Drawer Dresser DA7319 1BL DA7319 1W All manuals and user guides at all guides com...

Page 8: ...cks 3 and large wood dowels 2 into the middle panel C as shown below Attach front rails D E to the middle panel C and secure by rotating the large cam locks 3 1 2 turn clockwise using a Phillips head...

Page 9: ...STEP 5 Insert large cam bolts 1 into the top panel F as shown Miles 6 Drawer Dresser DA7319 1BL DA7319 1W All manuals and user guides at all guides com...

Page 10: ...cam locks 3 and wood dowels 2 into the middle panel C Place the top panel F on the assembled unit Secure the top panel F by rotating large cam locks 3 1 2 turn clockwise using a Phillips head screwdr...

Page 11: ...STEP 7 Insert large cam bolts 1 into the right left side panels G H as shown Miles 6 Drawer Dresser DA7319 1BL DA7319 1W All manuals and user guides at all guides com...

Page 12: ...d large cam locks 3 into the rails A D E top panel F and back bottom panel B Attach side panels G H to the assembled unit by rotating the large cam locks 3 1 2 turn clockwise using a Phillips head scr...

Page 13: ...hown Use Allen key 5 to tighten the bolts NOTE The support leg I and side frames H G are equipped with adjustable levelers Once assembly is complete and the unit is in the desired location rotate the...

Page 14: ...Drawer Dresser DA7319 1BL DA7319 1W Secure top panel F to the back top rail A with screws 6 as shown Use a Phillips head screwdriver not included to tighten the screws All manuals and user guides at...

Page 15: ...Drawer Dresser DA7319 1BL DA7319 1W Attach back top panel J to the assembled frame with round head screws 7 Use a Phillips head screwdriver not included to tighten screws All manuals and user guides a...

Page 16: ...lts 8 and small wood dowels 9 into the drawer front K Attach drawer sides L M to the drawer front K Secure the drawer sides by rotating small cam locks 10 1 2 turn clockwise using a Phillips head scre...

Page 17: ...er DA7319 1BL DA7319 1W Attach drawer back O to the drawer sides L M with screws 6 Attach handle 12 to drawer front K with bolts 11 Use a Phillips head screwdriver not included to tighten the bolt Rep...

Page 18: ...STEP 14 Insert all drawers into the assembled unit Miles 6 Drawer Dresser DA7319 1BL DA7319 1W All manuals and user guides at all guides com...

Page 19: ...se possible injury Miles 6 Drawer Dresser DA7319 1BL DA7319 1W Top panel maximum weight 30 lbs DO NOT RETURN PRODUCT TO THE STORE If a part is missing or damaged contact our customer service departmen...

Page 20: ...ber 514 353 7819 Request Date Name Shipping Address Street Number City State Zip Code Day Time Phone Number including area code Date Place of Purchase Part s description and quantity Please be sure to...

Page 21: ...SHORT SCREW D THROUGH THE SMALLER HOLE Step 2 LOCATE THE OTHER MOUNTING BRACKET A ON THE WALL OVER A WALL STUD AND 2 INCHES BELOW THE MOUNTING BRACKET SECURED TO THE BACK OF YOUR UNIT ATTACH TO THE WA...

Page 22: ...Fecha de compra MANUAL DE INSTRUCCIONES Modelo No DA7319 1BL Azul Miles C moda de 6 Cajones CODIGO UPC 0 65857 17220 1 Azul NEED HELP CALL US FOR ASSISTANC 1 800 295 1980 DO NOT RETURN PRODUC NO DEVUE...

Page 23: ...da ar los muebles de madera MANTENIMIENTO Verifique las arandelas tornillos peri dicamente y aj stelos si es necesario No eliminar o retirar el dispositivo que asegura los cajones Utilice la correa de...

Page 24: ...mm 6 X 20mm TORNILLO 14 PZAS PERNO DE LEVA PEQUE O 24 PZAS CLAVIJA DE MADERA PEQUE A 24 PZAS 1 4 x 35mm 4 X 25mm PERNO 1 PZA LLAVE ALLEN 1 PZA TORNILLO 26 PZAS PERNO DE LEVA GRANDE 26 PZAS CLAVIJA DE...

Page 25: ...CAJ N LADO IZQUIERDO CAJ N 1 PZA 1 PZA 6 PZAS 6 PZAS BARRA INFERIOR ANTERIOR TAPA DE LA C MODA PANEL LATERAL IZQUIERDO PANEL LATERAL DERECHO 1 PZA 1 PZA 1 PZA 1 PZA 1 PZA 1 PZA 1 PZA 2 PZAS BARRA SUPE...

Page 26: ...1 Inserte un perno de leva grande 1 en el barra superior posterior A y panel posterior inferior B como ilustrado Miles C moda de 6 Cajones DA7319 1BL DA7319 1W All manuals and user guides at all guide...

Page 27: ...os de leva grandes 3 en el panel central C Una la barra superior posterior A y panel posterior inferior B con el panel inferior central C y fije girando el seguro de leva grande 3 1 2 vuelta en sentid...

Page 28: ...A 3 Inserte un perno de leva grande 1 en el barra inferior anterior D y barra inferior central E como ilustrado Miles C moda de 6 Cajones DA7319 1BL DA7319 1W All manuals and user guides at all guides...

Page 29: ...andes 2 y seguros de leva grandes 3 en el panel central C como ilustrado Una la barras D E con el panel inferior central C y fije girando el seguro de leva grande 3 1 2 vuelta en sentido horario con u...

Page 30: ...ETAPA 5 Miles C moda de 6 Cajones DA7319 1BL DA7319 1W Inserte pernos de leva grandes 1 en la tapa del mueble F como ilustrado All manuals and user guides at all guides com...

Page 31: ...leva grandes 3 en el panel central C Coloque la tapa del mueble J sobre la unidad ya ensamblada Fije la tapa del mueble F a la unidad ya ensamblada en girando los seguros de leva grandes 3 vuelta en...

Page 32: ...A 7 Miles C moda de 6 Cajones DA7319 1BL DA7319 1W Inserte un perno de leva grande 1 en panels lateral izquierdo et panel lateral derecho G y H como ilustrado All manuals and user guides at all guides...

Page 33: ...mueble F y panel posterior inferior B como ilustrado Una los paneles laterales derecho e izquierdo G y H con la unidad ensamblada como ilustrado m s abajo a la unidad ya ensamblada girando los seguros...

Page 34: ...a llave Allen 5 para ajustar los pernos NOTA La pata de soporte I y los paneles laterales G y H est n provistos de niveladores ajustables Una vez que haya completado el ensamblado y el mueble se encue...

Page 35: ...6 Cajones DA7319 1BL DA7319 1W Una el tapa del mueble F con la barra superior posterior A con tornillos 6 Utilice un destornillador Phillips no incluido para ajustar los tornillos All manuals and user...

Page 36: ...ior posterior J con la unidad ya ensamblada con tornillos 7 Utilice un destornillador Phillips no incluido para ajustar los tornillos Miles C moda de 6 Cajones DA7319 1BL DA7319 1W All manuals and use...

Page 37: ...aj n K Miles C moda de 6 Cajones DA7319 1BL DA7319 1W Inserte pernos de leva peque os 8 y clavijas de madera peque as 9 en el frente caj n K Una los lados izquierdo y derecho L y M con el frente caj n...

Page 38: ...7319 1W Una el lado posterior caj n O con los lados izquierdo y derecho L y M con tornillos 6 Coloque el manija 12 en el frente caj n K con un perno 11 Utilice un destornillador Phillips no incluido p...

Page 39: ...ETAPA 14 Miles C moda de 6 Cajones DA7319 1BL DA7319 1W Coloque todos los cajones en la c moda ya armada como ilustrado All manuals and user guides at all guides com...

Page 40: ...ede provocar inestabilidad y causar heridas NO DEVUELVA EL PRODUCTO A LA TIENDA Si falta una pieza o est da ada contacte nuestro departamento de servicio a la clientela Reemplazaremos la pieza SIN car...

Page 41: ...eza s y cantidad Por favor aseg rese de incluir n mero de modelo o n mero SKN Servicio a la Clientela POR FAVOR CONTACTE LOS REPRESENTANTES DEL SERVICIO A LA CLIENTELA A LOS SIGUIENTES N MEROS SI FALT...

Page 42: ...UESTRO N MERO DE ATENCI N AL CLIENTE 1 800 295 1980 ETAPA 1 CON EL TORNILLO CORTO D FIJE FIRMEMENTE UN GANCHO DE METAL A A LA BARRA TRANSVERSAL SUPERIOR POSTERIOR DEL MEUBLE A TRAV S DEL AGUJERO M S P...

Page 43: ...LE CONSERVER POUR R F RENCE ULT RIEURE MANUEL D INSTRUCTIONS Miles Commode 6 Tiroirs NOTE CE MANUEL D INSTRUCTIONS NE RETOURNEZ PAS LE PRODUIT AU MAGASIN Si une pi ce est manquante ou endommag e veuil...

Page 44: ...les boulons et les vis p riodiquement et serrez les si cela s av re n cessaire Ne pas d jouer ou enlever le syst me de verrou du tiroir NE PAS UTILISER d outils lectriques Deux personnes peuvent tre n...

Page 45: ...les Commode 6 Tiroirs DA7319 1BL DA7319 1W 8 X 30mm 1 4 x 35mm 4 X 25mm BOULON 1 PCE CL ALLEN 1 PCE VIS 26 PCES PETIT VERROUILLAGE CAME 24 PCES BOULON 12 PCES POIGN E 6 PCES 3 X 15mm 6 X 20mm VIS 14 P...

Page 46: ...1BL DA7319 1W 1 PCE 1 PCE 1 PCE 2 PCES BARRE INF RIEURE AVANT DESSUS DU MEUBLE PANNEAU LAT RAL GAUCHE PANNEAU LAT RAL DROIT 1 PCE 1 PCE 1 PCE 1 PCE PIED DE SUPPORT PANNEAU POST RIEUR SUP RIEUR DEVANT...

Page 47: ...PE 1 Ins rez un grand boulon came 1 dans barre sup rieure arri re A et panneau inf rieur arri re B comme illustr Miles Commode 6 Tiroirs DA7319 1BL DA7319 1W All manuals and user guides at all guides...

Page 48: ...z la barre sup rieure arri re A et panneau inf rieur arri re B au panneau central C et fixez en tournant le grand verrouillage came 3 1 2 tour dans le sens des aiguilles d une montre l aide d un tourn...

Page 49: ...PE 3 Ins rez un grand boulon came 1 dans barre inf rieure avant D et barres inf rieure centrales E comme illustr Miles Commode 6 Tiroirs DA7319 1BL DA7319 1W All manuals and user guides at all guides...

Page 50: ...illages came 3 dans le panneau central C comme illustr Attachez les barres D et E le panneau central C et fixez les barres en tournant les grands verrouillages came 3 1 2 tour dans le sens des aiguill...

Page 51: ...TAPE 5 Miles Commode 6 Tiroirs DA7319 1BL DA7319 1W Ins rez des grands boulons came 1 dans le dessus du meuble F comme illustr All manuals and user guides at all guides com...

Page 52: ...3 dans le panneau central C Placez le dessus du meuble F sur l unit d j assembl e Fixez le dessus du meuble F en tournant les grands verrouillages came 3 en le panneau central C 1 2 tour dans le sens...

Page 53: ...TAPE 7 Miles Commode 6 Tiroirs DA7319 1BL DA7319 1W Ins rez des grands boulons came 1 dans les panneaux lat raux droit et gauche G et H comme illustr All manuals and user guides at all guides com...

Page 54: ...A D et E le dessus du meuble F et dans le panneau inf rieur arri re B Attachez les panneaux lat raux droit et gauche G et H l unit d j assembl e en tournant les grands verrouillages came 3 1 2 tour da...

Page 55: ...s le sens des aiguilles d une montre ou dans le sens contraire aux aiguilles d une montre jusqu ce que le meuble soit bien appuy sur le plancher Miles Commode 6 Tiroirs DA7319 1BL DA7319 1W Attachez l...

Page 56: ...iroirs DA7319 1BL DA7319 1W Fixez le dessus du meuble F la barre sup rieure arri re A avec vis 6 comme illustr Servez vous d un tournevis cruciforme non compris pour serrer les vis All manuals and use...

Page 57: ...6 Tiroirs DA7319 1BL DA7319 1W Attachez le panneau post rieur sup rieur J l unit assembl e avec des vis 7 Servez vous d un tournevis cruciforme non compris pour serrer les vis All manuals and user gu...

Page 58: ...9 1BL DA7319 1W Attachez les c t tiroir gauche et droit L et M au le devant tiroir K et fixez les c t s du tiroir en tournant les petits verrouillages came 10 1 2 tour dans le sens des aiguilles d une...

Page 59: ...cruciforme non compris pour serrer les vis Miles Commode 6 Tiroirs DA7319 1BL DA7319 1W Attachez le poign e 12 au devant tiroir K avec un boulon 11 Servez vous d un tournevis cruciforme non compris p...

Page 60: ...TAPE 14 Miles Commode 6 Tiroirs DA7319 1BL DA7319 1W Ins rez tous les tiroirs dans l unit d j assembl e comme illustr All manuals and user guides at all guides com...

Page 61: ...ndiqu s peut entra ner de l instabilit et causer des blessures NE PAS RETOURNER LE PRODUIT AU MAGASIN Si une pi ce est manquante ou endommag e contactez notre Service la client le Nous remplacerons la...

Page 62: ...No de t l phone jour incluant le code r gional Date Nom du Magasin Description quantit de pi ce s S V P ne pas oublier le num ro de mod le ou de SKU D partement du Service la client le No 413 12345 bo...

Page 63: ...APPELER NOTRE NUM RO DE SERVICE AUX CLIENTS 1 800 295 1980 TAPE 1 L AIDE DE LA VIS COURTE D FIXEZ FERMEMENT UN CROCHET DE M TAL A LA BARRE TRANSVERSALE SUP RIEURE POST RIEURE DU MEUBLE TRAVERS LE TRO...

Reviews: