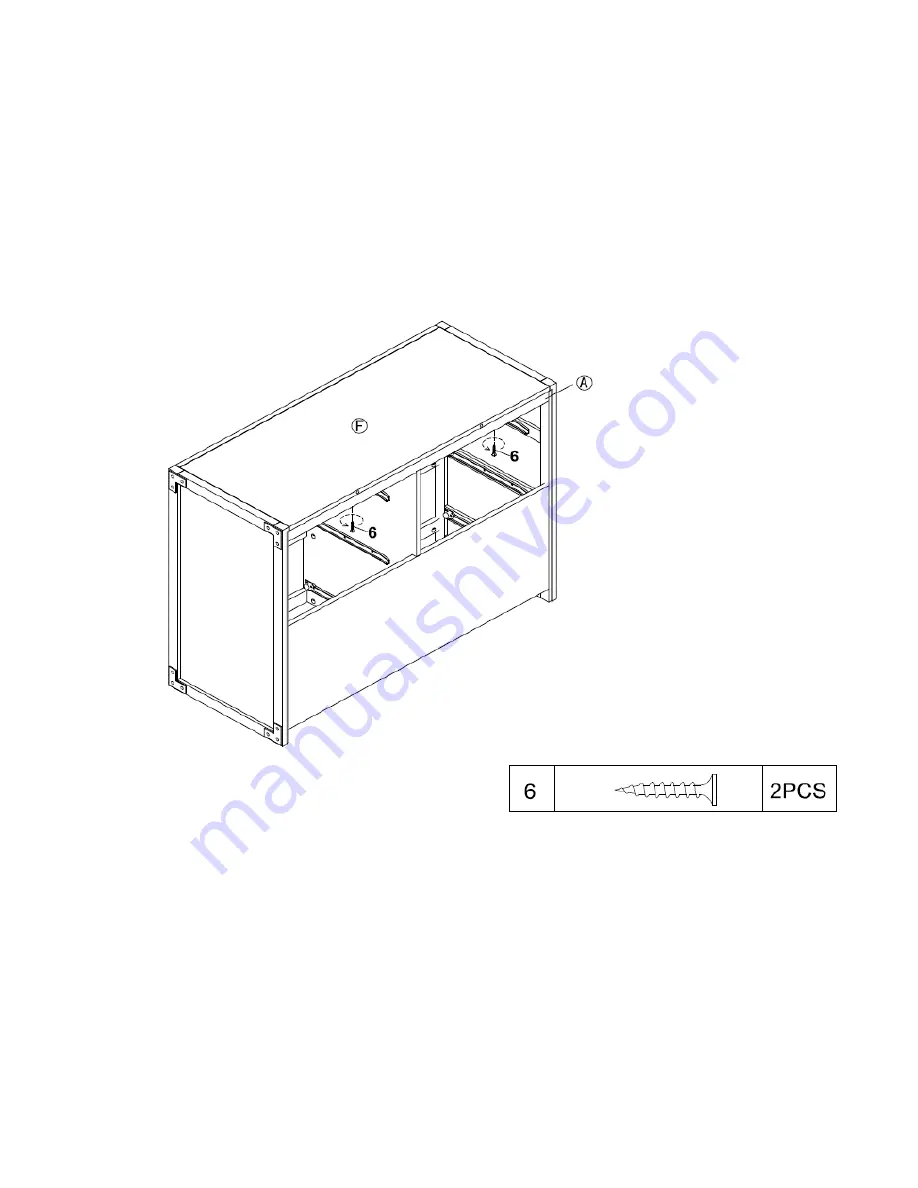
ETAPA 10
Una el tapa del mueble (F) con la barra superior posterior (A) con tornillos (6).
Utilice un destornillador Phillips (no incluido) para ajustar los tornillos.
Cómoda de 6 Cajones
DA7319-1BLS / DA7319-1WS / DA7319-B / DA7319-1G
Page 1: ...EP FOR FUTURE REFERENCE THIS INSTRUCTION BOOKLET 0 65857 17220 1 BLUE 0 65857 17224 9 WHITE INSTRUCTION MANUAL DA7319 1BLS BLUE DA7319 1WS WHITE DA7319 B BLACK DA7319 1G GREY 6 Drawer Dresser DO NOT R...
Page 2: ...anty is valid only upon presentation of proof of purchase This is solely limited to the repair or replacement of defective furniture components and no assembly labor is included This warranty does not...
Page 3: ...319 1G 4 X 25mm 8 X 30mm LARGE CAM LOCK 26 PCS LARGE WOOD DOWEL 26 PCS 1 4 x 35mm LARGE CAM BOLT 26 PCS SAFETY STRAP 1 KIT ALLEN KEY 1 PC BOLT 1 PC SCREW 26 PCS 6 X 20mm SMALL WOOD DOWEL 24 PCS 3 X 15...
Page 4: ...E PANEL FRONT MIDDLE RAIL 2 PCS BACK BOTTOM PANEL 6 PCS 6 PCS 6 PCS DRAWER RIGHT SIDE RIGHT SIDE PANEL LEFT SIDE PANEL DRAWER LEFT SIDE TOP PANEL 1 PC DRAWER FRONT 1 PC DRAWER BOTTOM 1 PC SUPPORT LEG...
Page 5: ...STEP 1 Insert large cam bolts 1 into the back top rail A and back bottom panel B as shown 6 Drawer Dresser DA7319 1BLS DA7319 1WS DA7319 B DA7319 1G...
Page 6: ...o the middle panel C Attach back top rail A and back bottom panel B to the middle panel C and secure by rotating the large cam lock 3 1 2 turn clockwise using a Phillips head screwdriver not included...
Page 7: ...STEP 3 Insert large cam bolts 1 into the front middle rails D and front bottom rail E as shown 6 Drawer Dresser DA7319 1BLS DA7319 1WS DA7319 B DA7319 1G...
Page 8: ...into the middle panel C as shown below Attach front rails D E to the middle panel C and secure by rotating the large cam locks 3 1 2 turn clockwise using a Phillips head screwdriver not included 6 Dr...
Page 9: ...STEP 5 Insert large cam bolts 1 into the top panel F as shown 6 Drawer Dresser DA7319 1BLS DA7319 1WS DA7319 B DA7319 1G...
Page 10: ...2 into the middle panel C Place the top panel F on the assembled unit Secure the top panel F by rotating large cam locks 3 1 2 turn clockwise using a Phillips head screwdriver not included 6 Drawer Dr...
Page 11: ...STEP 7 Insert large cam bolts 1 into the right left side panels G H as shown 6 Drawer Dresser DA7319 1BLS DA7319 1WS DA7319 B DA7319 1G...
Page 12: ...rails A D E top panel F and back bottom panel B Attach side panels G H to the assembled unit by rotating the large cam locks 3 1 2 turn clockwise using a Phillips head screwdriver not included D A E...
Page 13: ...en the bolts NOTE The support leg I and side frames H G are equipped with adjustable levelers Once assembly is complete and the unit is in the desired location rotate the adjustable levelers clockwise...
Page 14: ...STEP 10 Secure top panel F to the back top rail A with screws 6 as shown Use a Phillips head screwdriver not included to tighten the screws 6 Drawer Dresser DA7319 1BLS DA7319 1WS DA7319 B DA7319 1G...
Page 15: ...TEP 11 Attach back top panel J to the assembled frame with round head screws 7 Use a Phillips head screwdriver not included to tighten screws 6 Drawer Dresser DA7319 1BLS DA7319 1WS DA7319 B DA7319 1G...
Page 16: ...9 into the drawer front K Attach drawer sides L M to the drawer front K Secure the drawer sides by rotating small cam locks 10 1 2 turn clockwise using a Phillips head screwdriver not included Slide t...
Page 17: ...h drawer back O to the drawer sides L M with screws 6 Attach handle 12 to drawer front K with bolts 11 Use a Phillips head screwdriver not included to tighten the bolt Repeat steps 12 and 13 to assemb...
Page 18: ...STEP 14 Insert all drawers into the assembled unit 6 Drawer Dresser DA7319 1BLS DA7319 1WS DA7319 B DA7319 1G...
Page 19: ...an the maximum weights indicated may result in instability or cause possible injury Maximum weight on top of the dresser Maximum weight per drawer 15 lbs DO NOT RETURN PRODUCT TO THE RETAILER If a par...
Page 20: ...OF THE FURNITURE USING THE SHORT SCREW D THROUGH THE SMALLER HOLE Step 2 LOCATE THE OTHER MOUNTING BRACKET A ON THE WALL OVER A WALL STUD AND 2 INCHES BELOW THE MOUNTING BRACKET SECURED TO THE BACK O...
Page 21: ...anco NOTA Numero de lote TOMADO DEL CARTON _____________________________________ Fecha de compra MANUAL DE INSTRUCCIONES Modelo No DA7319 1BLS Azul C moda de 6 Cajones CODIGO UPC 0 65857 17220 1 Azul...
Page 22: ...ha da ado y o sus componentes est n rotos o faltan NO LO USE Para evitar da ar la superficie una vez instalados los niveladores NO arrastrar el mueble para despla Aseg rese de levantarlo CUIDADO LIMP...
Page 23: ...A 6 PZAS 3 X 15mm 6 X 20mm TORNILLO 14 PZAS PERNO DE LEVA PEQUE O 24 PZAS CLAVIJA DE MADERA PEQUE A 24 PZAS 1 4 x 35mm 4 X 25mm PERNO 1 PZA LLAVE ALLEN 1 PZA TORNILLO 26 PZAS PERNO DE LEVA GRANDE 26 P...
Page 24: ...OSTERIOR FRENTE CAJ N LADO IZQUIERDO CAJ N 1 PZA 1 PZA 6 PZAS 6 PZAS BARRA INFERIOR ANTERIOR TAPA DE LA C MODA PANEL LATERAL IZQUIERDO PANEL LATERAL DERECHO 1 PZA 1 PZA 1 PZA 1 PZA 1 PZA 1 PZA 1 PZA 2...
Page 25: ...ETAPA 1 Inserte un perno de leva grande 1 en el barra superior posterior A y panel posterior inferior B como ilustrado C moda de 6 Cajones DA7319 1BLS DA7319 1WS DA7319 B DA7319 1G...
Page 26: ...l central C Una la barra superior posterior A y panel posterior inferior B con el panel inferior central C y fije girando el seguro de leva grande 3 1 2 vuelta en sentido horario con un destornillador...
Page 27: ...ETAPA 3 Inserte un perno de leva grande 1 en el barra inferior anterior D y barra inferior central E como ilustrado C moda de 6 Cajones DA7319 1BLS DA7319 1WS DA7319 B DA7319 1G...
Page 28: ...es 3 en el panel central C como ilustrado Una la barras D E con el panel inferior central C y fije girando el seguro de leva grande 3 1 2 vuelta en sentido horario con un destornillador Phillips no in...
Page 29: ...ETAPA 5 Inserte pernos de leva grandes 1 en la tapa del mueble F como ilustrado C moda de 6 Cajones DA7319 1BLS DA7319 1WS DA7319 B DA7319 1G...
Page 30: ...ral C Coloque la tapa del mueble J sobre la unidad ya ensamblada Fije la tapa del mueble F a la unidad ya ensamblada en girando los seguros de leva grandes 3 vuelta en sentido horario con un destornil...
Page 31: ...ETAPA 7 Inserte un perno de leva grande 1 en panels lateral izquierdo et panel lateral derecho G y H como ilustrado C moda de 6 Cajones DA7319 1BLS DA7319 1WS DA7319 B DA7319 1G...
Page 32: ...rior B como ilustrado Una los paneles laterales derecho e izquierdo G y H con la unidad ensamblada como ilustrado m s abajo a la unidad ya ensamblada girando los seguros de leva grandes 3 1 2 vuelta e...
Page 33: ...s pernos NOTA La pata de soporte I y los paneles laterales G y H est n provistos de niveladores ajustables Una vez que haya completado el ensamblado y el mueble se encuentre en el lugar deseado gire l...
Page 34: ...na el tapa del mueble F con la barra superior posterior A con tornillos 6 Utilice un destornillador Phillips no incluido para ajustar los tornillos C moda de 6 Cajones DA7319 1BLS DA7319 1WS DA7319 B...
Page 35: ...a el panel superior posterior J con la unidad ya ensamblada con tornillos 7 Utilice un destornillador Phillips no incluido para ajustar los tornillos C moda de 6 Cajones DA7319 1BLS DA7319 1WS DA7319...
Page 36: ...del el frente caj n K Inserte pernos de leva peque os 8 y clavijas de madera peque as 9 en el frente caj n K Una los lados izquierdo y derecho L y M con el frente caj n K Fije los lados del caj n gir...
Page 37: ...aj n O con los lados izquierdo y derecho L y M con tornillos 6 Coloque el manija 12 en el frente caj n K con un perno 11 Utilice un destornillador Phillips no incluido para ajustar el perno Repita las...
Page 38: ...ETAPA 14 Coloque todos los cajones en la c moda ya armada como ilustrado C moda de 6 Cajones DA7319 1BLS DA7319 1WS DA7319 B DA7319 1G...
Page 39: ...eso m ximo indicado puede provocar inestabilidad y causar heridas PESO M XIMO PARA CAJ NS 15 LBS PESO M XIMO PARA PANEL SUPERIOR 30 LBS NO DEVUELVA EL PRODUCTO A LA TIENDA Si falta una pieza o est da...
Page 40: ...PREGUNTAS POR FAVOR LLAME A NUESTRO N MERO DE ATENCI N AL CLIENTE 1 800 267 1739 ETAPA 1 CON EL TORNILLO CORTO D FIJE FIRMEMENTE UN GANCHO DE METAL A A LA BARRA TRANSVERSAL SUPERIOR POSTERIOR DEL MEUB...
Page 41: ..._ _______ CONTIENT INFORMATION DE S CURIT IMPORTANTE VEUILLEZ LE LIRE ET LE CONSERVER POUR R F RENCE ULT RIEURE NOTE MANUEL D INSTRUCTIONS Commode 6 Tiroirs CE MANUEL D INSTRUCTIONS NE PAS RETOURNER C...
Page 42: ...es en bois V rifiez les boulons vis p riodiquement et serrez les si n cessaire GARANTIE LIMIT E D UN AN Dorel garantit que son produit soit exempt de d fauts de fabrication et de mat riaux et accepte...
Page 43: ...CAME 26 PCES Commode 6 Tiroirs DA7319 1BLS DA7319 1WS DA7319 B DA7319 1G 8 X 30mm 1 4 x 35mm 4 X 25mm BOULON 1 PCE CL ALLEN 1 PCE VIS 26 PCES PETIT VERROUILLAGE CAME 24 PCES BOULON 12 PCES POIGN E 6 P...
Page 44: ...PCES BARRE INF RIEURE AVANT DESSUS DU MEUBLE PANNEAU LAT RAL GAUCHE PANNEAU LAT RAL DROIT 1 PCE 1 PCE 1 PCE 1 PCE PIED DE SUPPORT PANNEAU POST RIEUR SUP RIEUR DEVANT TIROIR C T GAUCHE DU TIROIR 1 PCE...
Page 45: ...TAPE 1 Ins rez un grand boulon came 1 dans barre sup rieure arri re A et dans le panneau inf rieur arri re B tel qu illustr Commode 6 Tiroirs DA7319 1BLS DA7319 1WS DA7319 B DA7319 1G...
Page 46: ...eau central C Attachez la barre sup rieure arri re A et le panneau inf rieur arri re B au panneau central C et fixez en tournant le grand verrou came de 3 1 2 tours dans le sens horaore l aide d un to...
Page 47: ...TAPE 3 Ins rez un grand boulon came 1 dans barre inf rieure avant D et dans la barre inf rieure centrale E tel qu illustr Commode 6 Tiroirs DA7319 1BLS DA7319 1WS DA7319 B DA7319 1G...
Page 48: ...panneau central C tel qu illustr Attachez les barres D et E au panneau central C et fixez les barres en tournant les grands verrous came de 3 1 2 tour dans le sens horaire l aide d un tournevis cruci...
Page 49: ...TAPE 5 Ins rez des grands boulons came 1 dans le dessus du meuble F tel qu illustr Commode 6 Tiroirs DA7319 1BLS DA7319 1WS DA7319 B DA7319 1G...
Page 50: ...ntral C Placez le dessus du meuble F sur l unit d j assembl e Fixez le dessus du meuble F en tournant les grands verrous came 3 en le panneau central C d 1 2 tour dans le sens horaire l aide d un tour...
Page 51: ...TAPE 7 Ins rez des grands boulons came 1 dans les panneaux lat raux droit et gauche G et H tel qu illustr Commode 6 Tiroirs DA7319 1BLS DA7319 1WS DA7319 B DA7319 1G...
Page 52: ...du meuble F et dans le panneau inf rieur arri re B Attachez les panneaux lat raux droit et gauche G et H l unit d j assembl e en tournant les grands verrous came de 3 1 2 tours dans le sens horaire l...
Page 53: ...s boulons NOTE Le pied de support I et les panneaux lat raux G et H sont quip s de niveleurs ajustables Lorsque l assemblage sera compl t et le meuble plac l endroit d sir tournez les niveleurs ajusta...
Page 54: ...xez le dessus du meuble F la barre sup rieure arri re A avec vis 6 tel qu illustr Servez vous d un tournevis cruciforme non compris pour serrer les vis Commode 6 Tiroirs DA7319 1BLS DA7319 1WS DA7319...
Page 55: ...1 Attachez le panneau post rieur sup rieur J l unit assembl e avec des vis 7 Servez vous d un tournevis cruciforme non compris pour serrer les vis Commode 6 Tiroirs DA7319 1BLS DA7319 1WS DA7319 B DA7...
Page 56: ...hez les c t gauche et droit du tiroir L et M l avant du tiroir K et fixez les c t s du tiroir en tournant les petits verrous came de 10 1 2 tours dans le sens horaire l aide d un tournevis cruciforme...
Page 57: ...d un tournevis cruciforme non compris pour serrer les vis Attachez la poign e 12 l avant du tiroir K avec les boulons 11 Servez vous d un tournevis cruciforme non compris pour serrer le boulon R p te...
Page 58: ...TAPE 14 Tel qu illustr ins rez tous les tiroirs dans l unit d j assembl e Commode 6 Tiroirs DA7319 1BLS DA7319 1WS DA7319 B DA7319 1G...
Page 59: ...que les poids maximum indiqu s peut entra ner de l instabilit et causer des blessures Poids maximum sur le dessus de la commode 30 Lbs Poids maximum dans les tiroirs 10 lbs NE PAS RETOURNER CE PRODUIT...
Page 60: ...DES QUESTIONS VEUILLEZ APPELER NOTRE NUM RO DE SERVICE AUX CLIENTS 1 800 267 1739 TAPE 1 L AIDE DE LA VIS COURTE D FIXEZ FERMEMENT UN CROCHET DE M TAL A LA BARRE TRANSVERSALE SUP RIEURE POST RIEURE D...