background image

2 – 7 Knives 
 

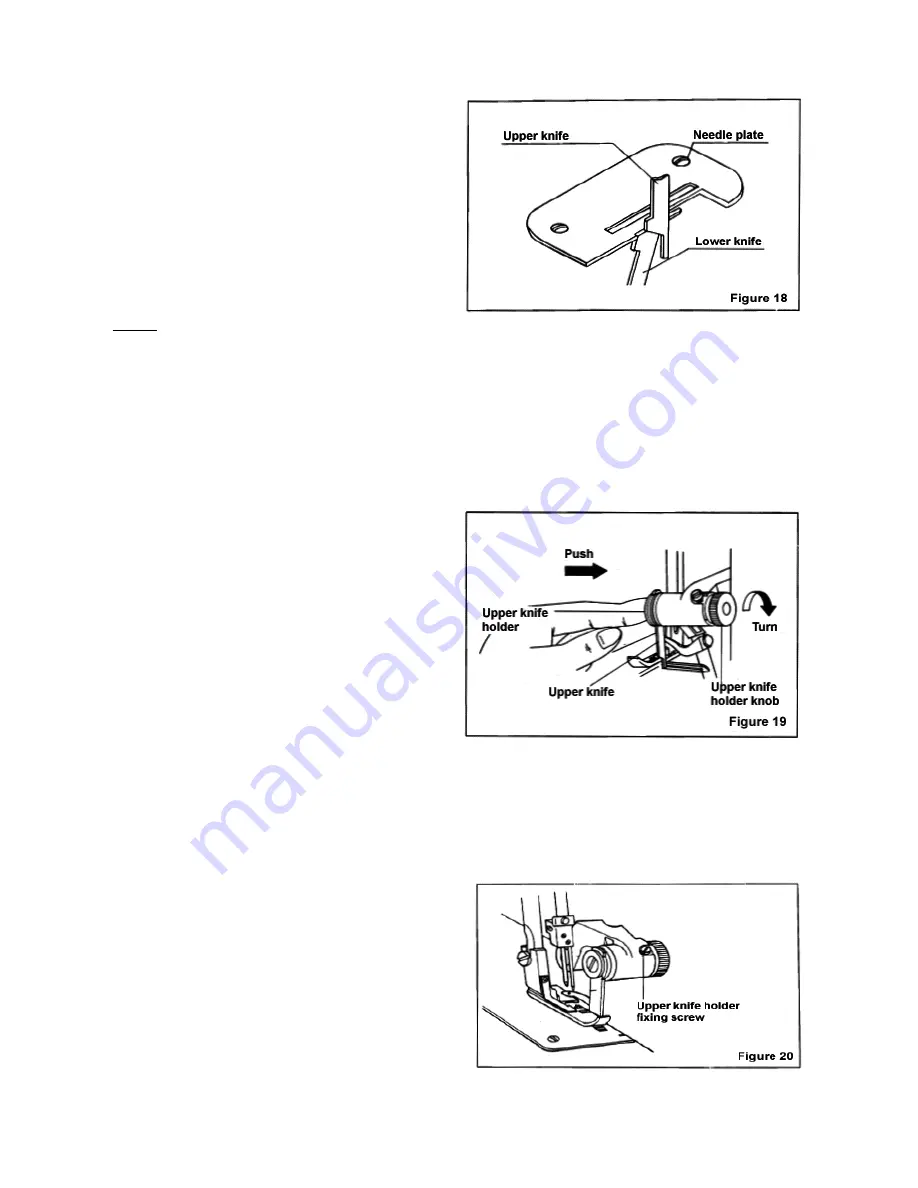
The two devices used to perform cutting are referred 
to as knives – the upper knife and lower knife – 
located at the right edge of the needle plate. Unlike 
household knives, they are approximately 1/16” thick, 
and pose no danger in handling. They cut like 
scissors, and their sharpness is derived from the 
angle of the precision ground edges. 


Never   sew over pins with your serger. This will cause damage to both knife blades, making replacement 
necessary. 
 
The upper knife is made of an especially hard steel and should remain sharp for a long time, probably many 
years. The lower knife is made of a softer steel and will require periodic replacement. The frequency of 
replacement is determined by how often you sew, how clean you keep your serger, and the types of fabrics 
you sew. Synthetic, metallic, and hard finish fibers cause more wear to the knife blades than do softer, natural 
fibers. When you notice the fabric not feeding readily or the edges of the fabric are not cleanly cut, replace the 
lower knife. To replace either knife refer to “Care & Maintenance” (Page 31). 
 
The upper knife may be moved out of cutting position when no trimming is desired. The lower knife is in a 
fixed position and remains that way, even when cutting is not desired. 


• 

Disengaging the upper knife 

 
1.  Open the front cover. 
 
2.  With the left hand, firmly push the upper knife 

holder to the right; then rotate the knife holder 
knob clockwise with your right hand until the 
knife is raised to its highest position. You will 
feel it “snap” into a locked position. 

 
3.  Close the front cover. 
 
 
As you sew with the upper knife disengaged, be sure to align fabric with the right edge of the needle plate as 
it is fed into the feed dogs. Failure to do so will cause the fabric to catch in the loopers. Should a “fabric jam” 
occur, stop sewing immediately. Raise the needle and presser foot, and use the tweezers to free fabric from 
loopers. If necessary, remove presser foot for better access. 
 
To return upper knife to cutting position, push upper knife holder to the right, and rotate counter – clockwise 
until the knife is completely down and resting firmly against lower blade. 
 

• 

Locking the upper knife to sew extra heavy 
fabrics 


When sewing extra heavy fabrics like denim or 
canvas etc., tighten the upper knife holder 
fixing screw. 
 
Note: When sewing normal fabrics, loosen the 

screw to unlock the upper knife. 


11 

Downloaded from www.Manualsoncd.com

Summary of Contents for Pro Line BL4-838D

Page 1: ...Downloaded from www Manualsoncd com WWW MANUALSONCD COM ...

Page 2: ...bility to seam overcast and trim all in one operation you will be completing more garments in less time Increased Sewing Ability Difficult fabrics and handling techniques will no longer pose a challenge The Baby Lock handles all types of fabrics with equal ease Your Baby Lock serger is a high quality dependable performance machine and with proper care and maintenance will give you many years of se...

Page 3: ...Downloaded from www Manualsoncd com ...

Page 4: ...tch chain When fabric travels through the machine the threads then become locked over the fabric As the fabric is fed into the feed dogs two cutting knives perform in a scissor like action to trim the edge prior to stitching After setting up your machine for the first time take a few moments to learn how it sews Turn the handwheel toward you and watch the movement and operation of the various part...

Page 5: ...1 2 Parts of the machine 4 Downloaded from www Manualsoncd com ...

Page 6: ...n insert plug into wall outlet The On Off switch is located on the lower right side of the machine Make sure power is always off when machine is not in use Your machine is equipped with a two step electronic foot control This control will allow you to control maximum speed at which you can sew depending on where the switch is set When the switch located on the front of the controller is set on HIG...

Page 7: ...t in frequent fraying and breaking Threads of other fiber content and weight may be used as well Keep in mind though their strength and thickness as these factors determine the ease with which thread passes through the thread guides tension discs needle and loopers Specialty threads often require tension adjustment to be made For more information on specialty threads See pages 27 28 Cone thread Wh...

Page 8: ... to attempt to pull the knot through the eye This may bend or break the needle Figure 8 4 Separate the thread chain discarding needle thread tail and gently pull the looper threads individually until each knot passes completely through the machine Hint As you pull the tension disc rings forward slightly making it easier for the knot to pass through 5 Pull the needle threads through in the same man...

Page 9: ... the first thread on the third spindle of the thread holder Beginning with its corresponding eye on the telescopic thread guide thread all green color coded thread guides including the tension disc and end with the upper looper B Lower looper Place the next thread on the far right spindle and thread in the same manner following the blue color coded path and end with the lower looper When threading...

Page 10: ...the thread plate Figure 12 E Place all threads under and to the left of the presser foot and make a few stitches to begin the chain Figure 13 IMPORTANT If a looper thread breaks or runs out while the other threads remain intact it is necessary to follow this rethreading sequence 1 Unthread the eyes of the needles 2 Rethread the looper 3 Rethread needle eyes If you forget to unthread rethread the n...

Page 11: ...ader dial clockwise until the threading hook comes through the eye of the needle 3 Form a looper of thread and place the loop around the threader hook guide Slowly release the threading dial and the thread simultaneously to thread the eye of the needle 4 After threading the right needle set the changing lever to L Thread the left needle in same manner as the right needle 10 Downloaded from www Man...

Page 12: ...ed out of cutting position when no trimming is desired The lower knife is in a fixed position and remains that way even when cutting is not desired Disengaging the upper knife 1 Open the front cover 2 With the left hand firmly push the upper knife holder to the right then rotate the knife holder knob clockwise with your right hand until the knife is raised to its highest position You will feel it ...

Page 13: ...e front cover The number 1 represents the shortest stitch number 4 is the longest stitch The M symbol is used for setting the rolled edge 1 Raise the presser foot 2 With your left forefinger push in the red stitch length button firmly and rotate the handwheel counter clockwise until the button fits the groove of the stitch dial you will feel snap into place 3 Continuing to hold the red button in t...

Page 14: ...just above the eye of the needle Gently pull back on the thread chain until the threads clear the stitch fingers See page 15 3 Rotate the upper knife to its highest position See page 11 4 Turn the red stitch width dial away from you until the desired stitch width number is aligned with the indicator on the needle plate Figure 23 5 Lower the presser foot upper knife and close the front cover 4 2 To...

Page 15: ... pressure with a coin turn the presser adjuster screw counterclockwise To return the pressure on the pressure foot to its normal setting turn the pressure adjuster screw clockwise 5 1 Tape guide slot in presser foot The tape guide slot in the presser foot is designed to guide a stabilizing tape or a narrow elastic into the stitching Insert the tape or elastic through the slot and under the back of...

Page 16: ... required 6 1 Thread cutter Your serger s thread cutter in on the lamp cover After finishing the seam cut the thread with thread cutter As you sew you will quickly discover that maneuvering your fabric is a little different from conventional sewing This is caused by the stitch fingers holding the threads Learn to clear the threads from the stitch fingers and it will simplify serger sewing 6 2 To c...

Page 17: ... create the seam The right needle thread visible from the top side of the seam interlocks with both loopers to add durability Figure 33 The tension on each thread is controlled by its color coded tension dial Turn the dial to the right clockwise to tighten or increase the tension turn it to the left counterclockwise to loosen or decrease tension The chart on page 35 indicates the suggested number ...

Page 18: ... Otherwise pre trim the edge with scissors 2 Sew along one edge until you reach the corner Make one stitch off the edge of the fabric 3 Clear the stitch fingers and rotate the fabric to reposition the needle just below the previous row of stitching Gently pull up on all threads to remove slack and resume stitching Note If you find a loose thread loop at the corner it is due to too much slack in th...

Page 19: ...rk Do not watch the needle If the fabric feeds in accurately the needle will automatically seam in the right place 7 6 Locking ends The stitch will not readily unravel and in most instances you will find it necessary to secure ends When you do though select one of these methods A Leaving a 3 chain separate threads and tie a knot B Apply a dot of seam sealant Fray check on the threads at the edge o...

Page 20: ...THREAD SERGING Three thread serger stitching is ideal for seaming and overcastting on fabric when raveling is not a problem knits and firm wovens for example To convert your serger to wide three thread stitching 5 7 mm 7 5 mm snip the right hand needle thread just above the eye Remove the thread from the yellow color coded thread guide and remove the right needle Figure 48 49 NOTE Please tighten t...

Page 21: ...n on each thread is controlled by its color coded tension dial Turn the dial to the right clockwise to tighten or increase tension Turn the dial to the left counter clockwise to loosen or decrease tension The chart on page 35 indicates suggested range of tension number ranges for three thread stitching Note on this chart the specific setting for your own machine The pictures below illustrate some ...

Page 22: ...ead sewing If tension is properly set the needle thread forms a flat overedge loops on the underneath side of the fabric while the lower looper thread creates similar stitches on the top side of the fabric Both threads lock together at the cut edge as well as at the needle stitching line See Figure 60 9 1 To convert from three thread to two thread sewing 1 Open the front cover and rotate the handw...

Page 23: ...1 Open the front cover and rotate the handwheel to bring the upper looper to its lowest position 2 With your finger or small screwdriver push in the brass screw and rotate clockwise to bring the subsidiary looper to the up position 3 Place upper looper thread back in any thread guides which may have come undone and back through the eye of the looper 4 For four thread sewing replace the second need...

Page 24: ...ern you want to have on the outside of the garment If you wish to have the loop pattern showing place fabric wrong sides together before sewing seam Figure 65 If the ladder effect is desired on the outside the fabric is placed right sides together Figure 66 9 4 Flatlock tucks Decorative tucks may be created on blouses dresses childrens and infants wear etc with the use of the flatlock stitch Eithe...

Page 25: ...to create a type of blindhem on your Baby Lock serger which will provide a sturdy finish for sportswear childrens wear and home decorator items 1 Set the machine for two thread sewing stitch width 5 stitch length 4 2 Fold the fabric up along hemline and press in place Then fold back against the right side of the garment to create a soft fold about from the top edge of the hem 3 Align hem under the...

Page 26: ... base Figure 71 Place the stitch width former in the side door accessories compartment 6 Turn the stitch width adjusting dial red dial until the marked M on the dial matches the red indicator on the needle plate Figure 72 7 Set the stitch length to M 8 Lower the presser foot and the upper knife Setting the machine in the above manner will provide a narrow edge but not a rolled edge It creates an a...

Page 27: ...setting on chart page 35 10 3 Two thread narrow rolled edge A two thread narrow rolled edge is often preferred for hemming very soft fabrics which may otherwise develop undesired stiffness with three threads It can also produce interesting picot like effects on tricot and stretch knit fabrics if the stitch is lengthened to 4 1 Remove the stitch finger See steps 3 5 page 25 2 Remove left needle use...

Page 28: ...ine for two thread or three thread rolled edging rolled or unrolled stitch width M Edge the fabric in the direction of greatest stretch usually the crossgrain or in the case of wovens along the bias More lettucing can be developed by either slightly stretching fabric in front of presser foot as you sew or stretching edge after it has been sewn 10 6 Resetting from narrow rolled edge to four thread ...

Page 29: ...grain line areas Also use these settings to automatically ease areas where additional fullness is required such setting in a sleeve At the maximum setting of 2 00 the differential feed can actually gather a lightweight fabric to nearly double fullness It is recommended that the longest stitch length setting be used to maximize the gathering effects 12 SPECIALTY THREADS There are a growing number o...

Page 30: ...osed seam only 3 thread seaming Yes Yes Yes for outside exposed seam only 2 thread flatlock Yes Yes Yes 4 thread edging Yes Yes Yes 3 thread edging Yes Yes Yes 2 thread edging Yes Yes Yes 3 thread narrow rolled edging Use in upper looper only Yes Yes 2 thread narrow rolled edging Use in lower looper only Yes Yes COMMENTS May work satisfactorily in size 14 needle not in size 11 May be used through ...

Page 31: ...corator and nursery items Yes Yes Yes Not appropriate Yes Yes Yes Not appropriate Yes Not appropriate Yes Yes Yes Yes Yes Yes Yes Yes Yes Yes Yes Yes Yes Yes Yes Soft lightweight monofilament only Use in needle and upper looper May break in lower looper Use in upper looper only Not appropriate Yes Soft lightweight monofilament only Lower looper only Use in upper looper only Not appropriate Some br...

Page 32: ...placing the lower knife 1 Open the front cover 2 Move the upper knife to the up position 3 Remove the lower knife clamp screw and the lower knife 4 Insert the new knife into the groove and move it up until the upper edge is flush with the top of the needle plate 5 Tighten the lower knife clamp screw 6 Close the front cover Replacing the upper knife 1 Open the front cover and rotate handwheel to br...

Page 33: ...operate at best performance for many years if kept clean at all times The cutting action of the serger creates much more lint than you will find on convential sewing machine This lint impedes the efficiency of the serger and also acts as a sponge to draw oil from it Your serger needs no oiling for many years because the major moving parts are made from oil impregnated metal Use the cleaning brush ...

Page 34: ...read 8 Is thread feeding off spool cone freely 9 Is the needle size correct for the type fabric being used Fabric will not feed into machine 1 Is the presser foot down 2 Are the knife blades sharp 3 Are the knife blades clean of lint 4 Is the presser foot properly adjusted 5 Are the feed dogs and presser foot free of lint 6 Are the knives properly set and is the upper knife against the lower knife...

Page 35: ...tch to off 3 Do not place anything on the speed controller otherwise the machine will start inadvertently or the controller or motor may burn out 4 The maximum permissible power for the sewing lamp bulb 10 15 watts 110 volts or 15 watts 240 volts over 200 voltage country 5 When using your serger for the first time place a piece of waste fabric under the presser foot and run the machine without thr...

Page 36: ...ur Fleece Spandex 11 14 Long staple polyester Size 50 mercerized cotton 4 thread seaming or overcastting 3 thread seaming or overcastting 2 thread flatlock or overcastting 3 thread narrow rolled edge 2 thread narrow rolled edge 3 3 3 M 1 5 M 1 5 5 7 7 5 3 5 7 5 3 5 7 5 M M 5 7 N A 5 7 N A 0 5 2 N A N A 4 6 5 7 N A 0 5 2 N A 3 5 4 6 2 4 2 4 2 4 2 5 N A 2 4 2 4 2 4 8 9 3 5 HEAVY WEIGHT Denim Wool co...

Reviews: