background image

8

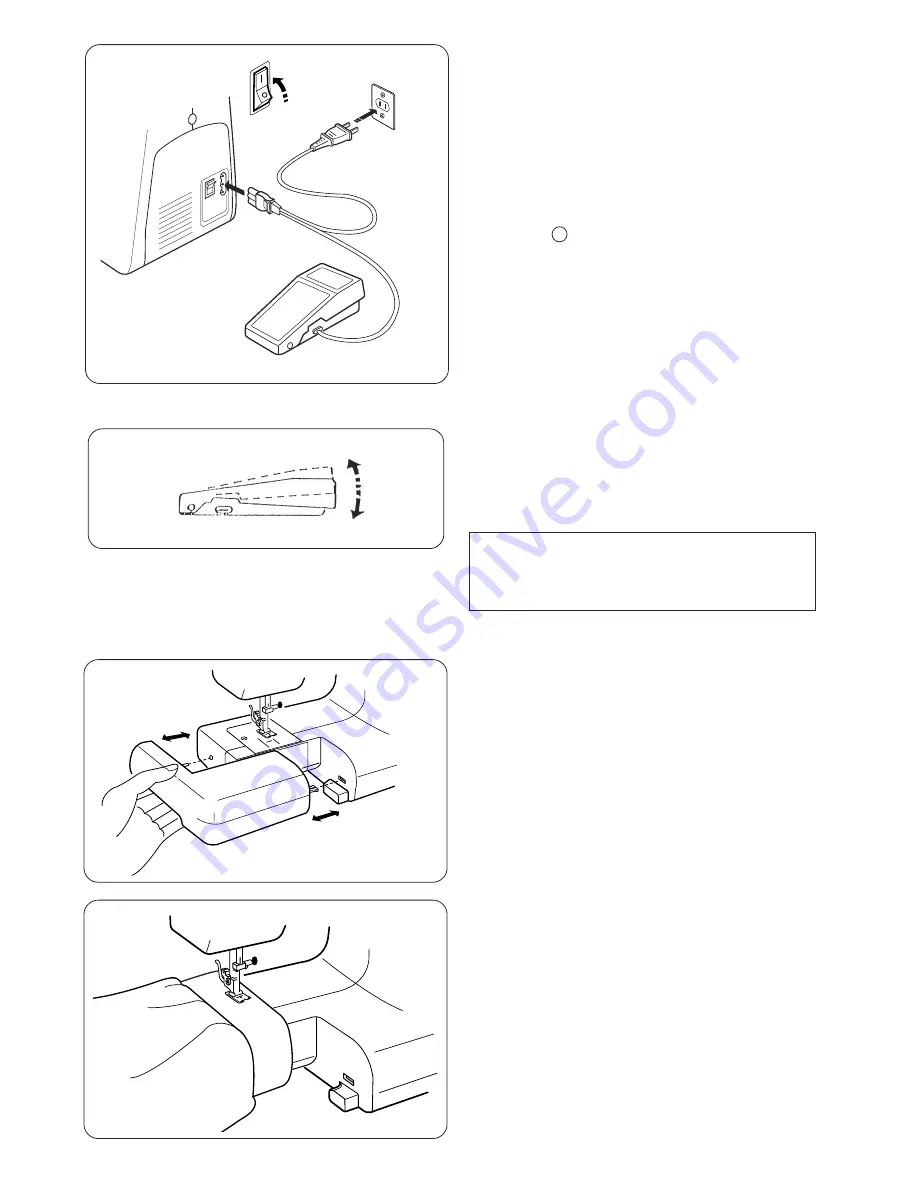
 Connecting the Machine to the Power

   Supply

Before connecting the power, make sure the
voltage and frequency of your electrical power
conform to the machine.

Make sure the power switch is in the “ OFF ”
position. (“     “).

Insert the nonreversible plug into the machine
socket and plug the machine into the electrical
outlet.

Then turn the power switch “ON”.

Caution:

Do not place anything on the foot control,
otherwise the machine will start advertently.

Foot control

Sewing speed can be varied by the foot control.
The harder you press on the control, the faster
the machine runs.

Extension Table/Free Arm Sewing

The extension table provides added sewing surface
and can be easily removed for free arm sewing.

Detaching the table:

Pull the table away from the machine.

Attaching the table:

Push the extension table until it snaps into the ma-
chine.

• Advantages and uses of free arm sewing:


Avoid fabric bunching around the needle when

bartacking to reinforce pockets, plackets and

waistlines.

     –

For stitching sleeves, waistbands, pant legs or

any circular garment area.

     –

For darning socks or mending knees, elbows

or areas of wear in children's clothes.

Summary of Contents for BL9

Page 1: ......

Page 2: ...as been dropped or damaged or dropped into water Return this sewing machine to the nearest authorized retailer or service center for examination repair electrical or mechanical adjustment 4 Never oper...

Page 3: ...o someterla a ajustes el ctricos o mec nicos 4 No utilice nunca el aparato si tiene bloqueada alguna v a de ventilaci n Mantenga las v as de ventilaci n de esta m quina de coser y el pedal de control...

Page 4: ...de r paration le plus proche afin de la faire examiner r parer ou d effectuer des r glages lectriques ou m caniques 4 Il ne faut jamais faire fonctionner cette machine si les orifices d a ration sont...

Page 5: ...bbin Thread 18 Balancing Needle Thread Tension 20 Thread Tension for Zigzag Sewing 20 Pattern Selector Dial 22 Stitch Length Dial 22 Selecting Stretch Stitch Patterns 22 Reverse Stitch Button 24 Darni...

Page 6: ...a 19 Compensaci n de la tensi n del hilo de la aguja 21 Bot n selector de puntada 23 Selector de la longitud de puntada 23 Selecci n de Motivos de Punto Estirado 23 Bot n de puntada reversa 25 Para co...

Page 7: ...iguille 21 S lecteur des Motifs 23 S lectionner Point Motifs Extensibles 23 Contr le de la longueur de point 23 Bouton de marche arri re 25 Plaque de reprisage 25 SECTION 3 BASES DE LA COUTURE Point D...

Page 8: ...inder spindle y Spool pins u Bobbin winder thread guide i Thread guide o Thread take up lever 0 Thread tension dial 1 Face plate 2 Needle plate 3 Extension table 4 Presser foot holder 5 Needle clamp s...

Page 9: ...quina 2 Brazo libre 3 Palanca de elevaci n del pie prensatelas Nota Las especificationes est n sujetas a cambio sin previo aviso SECTION 1 PI CES PRINCIPALES Noms des Pi ces q Bouton de marche arri r...

Page 10: ...g Instructions The symbol of a switch indicates the OFF position of a switch This appliance has a polarized plug one blade wider than the other To reduce the risk of an electric shock this plug is int...

Page 11: ...vija est dise ada de forma que s lo puede introducirse en un sentido dentro de una toma de corriente polarizada Si no encaja completamente en la toma de corriente invierta la clavija Si tampoco encaja...

Page 12: ...ed can be varied by the foot control The harder you press on the control the faster the machine runs Extension Table Free Arm Sewing The extension table provides added sewing surface and can be easily...

Page 13: ...ia proporciona una superficie de costura a adida y puede desmontarse f cilmente para coser con el brazo libre Desmontaje de la mesa Separe la mesa de la m quina Montaje de la mesa Empuje la mesa suple...

Page 14: ...w Highest position CAUTION Turn off the power switch when changing a presser foot To Attach and Remove the Presser Foot To remove Turn the handwheel toward you to raise the needle to its highest posit...

Page 15: ...dor w Ranura Precauci n Ponga el interruptor en OFF antes de cambiar el pie Relevage et abaissement du pied de biche Le releveur de pied permet de relever et d abaisser le pied de biche Vous pouvez le...

Page 16: ...blunt needle To check the needle Thread and Needle Chart Fabrics Thread Needle Size Crepe de Chine Voile Lawn Organdy Georgette Tricot Light weight Medium weight Heavy weight Linens Cotton Pique Serge...

Page 17: ...de que ha apagado y ha desenchufado la m quina de la red el ctrica antes de cambiar la aguja Changer d aiguille Relever l aiguille en tournant le volant vers soi et rabaisser le pied presseur Desserre...

Page 18: ...ol pins are used for holding the spool of thread in order to feed thread to the machine To use pull up the spool pin Push down for storage Setting Spool Pins Removing or Inserting the Bobbin Case Open...

Page 19: ...ndo introduzca la caja de bobina encaje el saliente en el rebaje de la pista de la lanzadera e Saliente Fixer les portes Bobines Les portes bobines sont utilis s pour placer les bobines n cessaire l e...

Page 20: ...foot control Stop the machine when it has made a few turns and cut the thread close to the hole in the bobbin n Depress the foot control again When the bobbin is fully wound stop the machine Return t...

Page 21: ...Boitier de Canette z Mettre la canette dans son boitier S assurer que le fil se d vide dans le sens de la fl che x Tirer le fil dans la fente du boitier de canette c Tirer le fil sous le ressort de te...

Page 22: ...ake up lever from right to left v Draw the thread down and slip it into needle bar thread guide on the left b Thread the needle eye from front to back Note You may want to cut the end of thread with s...

Page 23: ...c vos deux mains x En tenant le fil pr s de la tige glissez vers le bas dans la tension ensuite passer autour du ressort de tension c Montez le fil fermement vers le haut et passer le fil de droite ga...

Page 24: ...tom thread will appear on the right side top side of the fabric Loosen the needle thread tension by moving the dial to a lower number c Needle thread tension is too loose The needle thread top thread...

Page 25: ...adapt e selon les tissus utilis s le nombre de couches de tissus et la m thode de couture Pour un point droit id al les fils se croisent entre les deux paisseurs de tissus comme le montre l agrandiss...

Page 26: ...s Set the stitch length dial at S S to sew the stretch stitch pattern If the stretch stitch pattern is not even turn the stitch length dial in toward to compress it or to expand it Stitch Length Dial...

Page 27: ...jales Ajuste el bot n selector en el intervalo 0 3 4 cuando cosa la puntada en zigzag S lectionner Point Motifs Extensibles Ajuste el selector en S S para coser el modelo de puntada el stica Si el mod...

Page 28: ...stitch button depressed the machine sews backwards Darning Plate To set the darning plate Position the darning plate with the 3 pins on the bottom Fit the darning plate pins into the needle plate hole...

Page 29: ...s de la tapa de aguja Los dientes del corretelas se ver a trav s de los huecos de la tapa zurcidora Bouton de marche arri re Si vous tenez le bouton de la marche arri re vers le bas la machine coud le...

Page 30: ...along the guide line letting the fabric feed by itself x For fastening the end of seams press the reverse stitch button and sew several reverse stitches Raise the presser foot and remove the fabric dr...

Page 31: ...en la tela Levante el pie prensatelas Gire la tela en torno a la aguja para cambiar de direcci n de costura seg n se desee Baje el pie prensatelas y contin e SECTION 3 BASES DE LA COUTURE Point Droit...

Page 32: ...esser foot and turn the fabric to line the edge with the 5 8 1 6 cm seam guide 3 Lower the presser foot and begin stitching in the new direction Line up the fabric edge facing you with the cornering g...

Page 33: ...ntadas en zigzag simple se utilizan ampliamente para sobrehilar coser botones etc Point Zigzag q Motif de point C w Pied de biche Pied zigzag e Tension du fil 2 5 r Longueur de point 0 5 4 Couture sim...

Page 34: ...eam Trim the seam allowance after sewing Note Be careful not to cut the stitches w e r q q Pattern selector A or B w Presser foot Zigzag foot e Thread tension 2 6 r Stitch length S S Triple Stitch The...

Page 35: ...g e Tensi n de hilo 2 6 r Longitud de puntada S S Se cose con dos puntadas hacia delante y una puntada hacia atr s formando una costura que no se rasga f cilmente Couture Triple q Motif de point A ou...

Page 36: ...r the foot to hold the button in place The holes in the button should align with the slot of the foot A pin can be placed on the foot to form a shank Make sure to check if the needle enters into both...

Page 37: ...puntadas y corte los hilos de la aguja y de la bobina dejando 20 cm 8 en el extremo Lleve los hilos de la aguja entre el bot n y la tela a trav s de los orificios del bot n Estire los hilos de la agu...

Page 38: ...he pattern selector dial at Sew until you reach the back marking w of the buttonhole Stop sewing at a right stitch with the needle out of the fabric n Set the pattern selector dial at Sew a few bartac...

Page 39: ...a entre 0 5 y 1 0 para ajustar la densidad de la puntada para ojales z Marquez soigneusement la longueur de la boutonni re sur le tissu Disposez le tissu sous le pied en situant la marque de la bouton...

Page 40: ...the hem as illustrated leaving 1 4 0 7 cm of the hem edge showing q Wrong side of the fabric w 1 4 0 7 cm A Heavyweight fabrics B Fine weight fabrics c After hemming is completed press together both...

Page 41: ...r de Puntada E w Pie prensatelas pie prensatelas para zigzag e Tensi n de hilo 2 4 r Longitud de puntada 1 3 z Sur les tissus pais qui s effilochent on devrait d abord surfiler les bords bruts Puis pl...

Page 42: ...S Stretch Stitch Patterns If forward and reverse feeds become unbalanced due to the type of fabric adjust the balance by turning the stitch length dial as follows If patterns are compressed turn the d...

Page 43: ...n gire el bot n selector hacia Si los modelos se estiran gire el bot n selector hacia V ase la p gina 23 SECTION 4 LES POINTS DECORATIFS Points stretch d coratifs q Motif de point A E w Pied de biche...

Page 44: ...tive stitch between the gathering stitches Pull out the gathering stitches Smocking q Pattern selector D w Presser foot Zigzag foot e Thread tension 1 4 r Stitch length S S Baste or fuse with iron on...

Page 45: ...do Extraiga las puntadas de fruncido Aplicaciones q Selector de Puntada C w Pie prensatelas Pie prensatelas para zigzag e Tensi n de hilo 1 4 r Longitud de puntada 0 5 1 Smocks q Motif de point D w Pi...

Page 46: ...holder e Hook race ring r Hook t Hook race To assemble hook race unit Hold the hook by the center pin and fit it carefully back into the hook race forming a perfect circle with the hook driver Attach...

Page 47: ...a lanzadera e Anillo de la pista de la lanzadera r Lanzadera t Pista de la lanzadera SECTION 4 ENTRETIEN DE VOTRE MACHINE D montage et Remontage du Crochet de la Navette Note Mettez le commutateur sur...

Page 48: ...he right Sewing Light Oiling the Machine Remove the cap screw and face plate Apply a few drops of fine quality sewing machine oil to the points indicated by the arrows in the illustrations For a machi...

Page 49: ...cados en las figuras con una flecha Una m quina que se utiliza constantemente es aconsejable engrasarla dos o tres veces al a o En el caso de que la m quina no trabaje ligera como consecuencia de habe...

Page 50: ...n to the back when sewing is finished 6 The needle is too fine for the fabric being sewn 7 The pattern selector dial had been turned while the needle was in the material 1 The needle is incorrectly in...

Page 51: ...ltos de puntada 1 La aguja est montada incorrectamente 2 La aguja est doblada o sin punta 3 La aguja y o los hilos no son adecuados para la labor que se est cosiendo 4 El hilo de la aguja no est enheb...

Page 52: ...iguille est trop grosse pour le tissu cousu 4 Les points sont trop gros pour le tissu cousu En cousant des tissus tr s l gers placez une feuille de papier en dessous du tissu cousu 1 La tension du fil...

Page 53: ......

Page 54: ......

Page 55: ......

Page 56: ...743 801 726 E F S...

Reviews: