background image

25

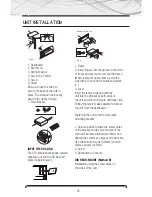
1. Dashboard
2. Nut (5mm)
3. Spring Washer
4. Screw (5 x 25mm)
5. Screw
6. Strap
Be sure to use the strap to
secure the back of the unit in
place. The strap can be bent by
hand to the desired angle.
7. Plain Washer

INPUT THE SD CARD

The SD oblique andle keeps upward 
exposure put into the SD slot and
press it again to eject.

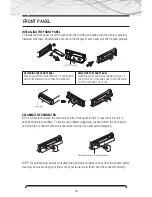
1. Frame
2. Insert fingers into the groove in the front 
of frame and pul l out to remove the frame. 
(When reatt achi ng the frame, point the 
side with a Groove dow nwards and attach 
it. )
3. Lever
Insert the levers supp lied with the
unit into the grooves at both sides of
the unit and shown in figure until they click. 
Pulling the levers makes posible to remove 
the unit from the dashboard.

Fastening the unit to the factory radio 
mounting bracket:

1. Select a position where the screw holes 
of the bracket and the screw holes of the 
main unit become aligned (are fitted), and 
tighten the screws at 2 places on each side. 
Use either truss screws (5x5mm) or flush 
surface screws (4x5mm).
2. Screw
3. Dashboard or console

DIN REAR-MOUNT (Method B)

Installation using the screw holes on
the sides of the unit.

UNIT INSTALLATION

1

2

3

4

5

6

7

(

Fig

.

2

)

2

1

3

(

Fig

.

3

)

Removing the uni t

2

3

2

Summary of Contents for DV-8772

Page 1: ...MOBILE ENTE RTAINMENT SY ST EM INSTRUCTIONS MANUAL DV 8772 CAR DVD MP4 PLAYER BLUETOOTH www b52audio com INSTRUCTIONS MANUAL 02 26 MANUAL DE INSTRUCCIONES 27 52 Manual de Instru es 53 78 ENGLISH...

Page 2: ...ic operation 06 Radio operation 07 DVD MPEG4 VCD MP3 CD operation 09 BLUETOOTH operation 10 Remote control layout 12 Remote control operation 13 Setup 18 Installing the front panel 24 Detaching the fr...

Page 3: ...the diagram Incorrect connections may cause the unit mal function or damage the vehicle s electrical system Be sure to connect the speaker leads to the speakers terminal Never connect the left and ri...

Page 4: ...handle the disc as follows Handle the disc by its edge to keep the disc clean and do not touch the surface Do not use your cds with labels or stickers attached which may leave a sticky residue while...

Page 5: ...ESET EQ LOGO TELEFONO BUTTON 5 REMOTE CONTROL SENSOR 6 BAND BUTTON ID3 SELECT 7 TUNING SELCTING TRACKS FW RW 8 EJECT BUTTON 9 MODE SWITCH BUTTON PRESET STATIONS AMS 11 NUMBER BUTTON 12 DISC SLOT 13 TF...

Page 6: ...n to resume to normal And it will erase the clock setting and some memorized functions TURNING THE UNIT ON OFF Press power button the unit 3 press vol to increase the sound level and press vol to decr...

Page 7: ...ODE SELECTOR Press mod button to select RADIO DVD USB SD card TV AUX MODE when the unit whthout connect anyone function press mode butoon the unit will skip over this function SENSOR 5 Receptor for th...

Page 8: ...once again the radio search will stop on the station Pressing anyone preset number button for several seconds the radio will save the station at the preset number button 2 Pressing and holding ams but...

Page 9: ...show on LCD SELECTING TRACKS FW RW Press 7 to choose your favorite track upward or downward respectively Press and hold 7 button to fast forward or rewind the track upward or downeard respectively PL...

Page 10: ...m the bluetooth operation by press the button on the panel on remote controler REMARK Depend on bluetooth mobile the bluetooth system support HSP HFP A2DP and AVRCP bluetooth profile 2 HANDSFREE PHONE...

Page 11: ...tacally record the call in phone number which you have missed up to 10 phone number Press eq button shoetly can entre the bletooth screen the press eq button shortly can look up the phone numbers Pres...

Page 12: ...TION PLAY SETUP MENU MENU DISPLAY ZOOM SETTING EQ BUTTON POWER BUTTON PAUSE PLAY BUTTON 1 MUTE BUTTON SELECTING MENU BUTTON BAND SYSTEM SWITCH ENTER BUTTON VOLUME CONTROL TUNING SELECTING FW RW PROGRA...

Page 13: ...ntrol Imagen POWER BUTTON Press 1 button to turn power ON OFF PAUSE PLAY BUTTON Press 3 button to cut down the sound output press it again to resume the previous sound level MUTE BUTTON Press 3 button...

Page 14: ...n fast forward rewind PROGRAM PLAYING ST During disc playing mode press 9 prog button to enter programming page Press 4 button and 14 numbers button to program the racks to be played NOTE St will only...

Page 15: ...an change the sound to left right Speaker or stereo mode PBC Menu During VCD 2 0 mode when press 16 PBC button at the first time PBC playback starts and The menu of entire disc appears on the TV And t...

Page 16: ...on for MP3 WMA CD playing mode SETUP 1 Press SETUP 23 key of remote control in the stop mode Press the STOP button Twice to ensure the player is under STOP mode 2 The main page of setup menu is displa...

Page 17: ...para disfrutar mejor de la imagen Presione el bot n DETENER para volver al ultimo estado NOTA Si continua presionando la tecla derecha ingresar al estado de selecci n de archivos de m sica imagen o vi...

Page 18: ...R c VIDEO SETUP TV SYSTEM SCREEN SAVER VIDEO TV TYPE PASSWORD RATING DEFAULT EXIT SETUP TV SYSTEM NTSC AUTO PLAY PAL TV TYPE AUTO PASSWORD RATING DEFAULT EXIT SETUP TV SYSTEM SCREEN SAVER ON VIDEO OFF...

Page 19: ...NTER BUTTON TYPE THE OLD PASSWORD THE INSTAL FACTORY CODE IS 0000 AND KEY IN 4 CHARACTERS PASSWORD NOW YOU WANT TO USE AND TYPE AGAIN TO CONFIRM 1 4 3 PS PLAYED BACK IN THE PAN SCAN STYLE IF CONNECTED...

Page 20: ...ENTS RATING 8 ADULT SELECT THIS WHEN ONLY ALLOWS ADMISSION TO ALL ADULTS G DEFAULT RECOVER ACQUIESCING IN STATE WHEN LEAVING THE FACTORY B LANGUAGE SETUP SELCT THE PREFERRED OSD LANGUAGE AUDIO LANGUAG...

Page 21: ...T SETUP PORTUGUESE GERMAN LATIN C AUDIO SETUP SPDIF OFF ANALOG OR OPTICAL OUTPUT PORT ALL HAS NOT OUTPUT SIGNAL KEY EXIT SETUP c SUBTITLE LANGUAGE OSD LANGUAGE CHINESE AUDIO LANG JAPAN MENU LANG FRENC...

Page 22: ...TAL OR MPEG RECORDING SYSTEM THE ANALOG OR OPTICAL OUTPUT WILL BE MODULATED TO 2 CHANNEL OUTPUT BY PCM D VIDEO SETUP BRIGHTNESS CONTRAST HUE SATURATION SHARPNESS EXIT SETUP A BRIGHTNESS BRIGHTNESS CON...

Page 23: ...UP THIS IS FOR THE USE TO SET OPERATION MODE DYNAMIC RANGE COMPRESSION AND STEREO MODE TO SET THE OPERATING MODES FOR DOBLY DIGITAL DECODER 23 B DYNAMIC RANGE C DUAL MONO OP MODE OP MODE DYNAMIC RANGE...

Page 24: ...problem happening please detach the front panel and clean the connector with an alcohol swab Gently clean and avoid damaging NOTE For safekeeping always shut down the generator and take out key from t...

Page 25: ...attach it 3 Lever Insert the levers supp lied with the unit into the grooves at both sides of the unit and shown in figure until they click Pulling the levers makes posible to remove the unit from the...

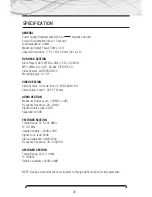
Page 26: ...ION Video System 4 3 Letter Box 4 3 PAN SCAN 16 9 Video Output Level 1 0VP P 75ohms AUDIO SECTION Maximum Output Level 2VRMS 3 dB Frequency Response 20 20Khz Signal to noise ratio 65dB Separation 60dB...

Page 27: ...RTAINMENT SY ST EM MANUAL DE INSTRUCCIONES DV 8772 REPRODUCTOR DE DVD MP4 PARA AUTOM VIL CON BLUETOOTH www b52audio com INSTRUCTIONS MANUAL 02 26 MANUAL DE INSTRUCCIONES 27 52 Manual de Instru es 53...

Page 28: ...l 31 Diagrama de cableado 32 Operaciones b sicas 32 Funcionamiento de radio 33 Funcionamiento de DVD MPEG4 VCD MP3 CD 35 Funcionamiento del BLUETOOTH 36 Diagrama de control Remoto 38 Panel delantero 5...

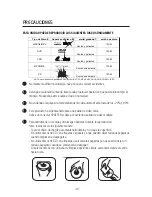
Page 29: ...s conexiones incorrectas pueden causar el mal funcionamiento del equipo o pueden da ar el sistema el ctrico del autom vil Aseg rese de conectar el cable del parlante a la terminal Nunca conecte los ca...

Page 30: ...a mantenerlo limpio y no toque la superficie No utilice discos de CD con etiquetas o stickers ya que pueden dejar residuos pegajosos cuando empiezan a despegarse No utilice discos de CD con etiquetas...

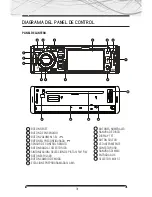
Page 31: ...CONTROL REMOTO BOT N BANDA SELECTOR ID3 SINTONIZACI N SELECCI N DE PISTAS FW RW BOT N EXPULSAR BOT N CAMBIO DE MODO ESTACIONE PREPROGRAMADAS AMS BOTONES NUMERALES RANURA DE DISCO DISPLAY TFT BOT N SOL...

Page 32: ...tambien presionar el bot n RESET para volver al modo normal y se borrar la configuraci n del horario y algunas funciones memorizadas ENCENDIDO APAGADO DE LA UNIDAD Presione el bot n de encendido powe...

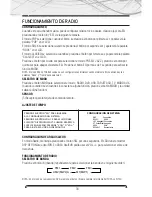
Page 33: ...por quinta vez para apagar el sistema EQ Presione el bot n EQ por m s de 1 segundo para activar la funci n MUDO NOTA El modo BASS y TREBLE vuelven a sus configuraciones iniciales cuando el sistema EQ...

Page 34: ...l del nivel de detenci n la radio mantendr dicha estaci n por 5 segundos y la frecuencia de la estaci n titilar en el LCD al mismo tiempo Si presiona el boton ams una vez mas la radio detendr la b squ...

Page 35: ...LCD el nombre de la canci n el artista y el nombre del archivo SELECCION DE PISTAS FW RW Presione 7 para elegir su pista favorita hacia adelante o atr s respectivamente Presione y mantenga presionado...

Page 36: ...antalla TFT se mostrar el logo Bluetooth dejar de titilar Podr ejercer las funciones Bluetooth presionando el bot n en el panel del control remoto NOTA Seg n el celular con Bluetooth el sistema Blueto...

Page 37: ...os n meros de tel fono de las llamadas perdidas hasta 10 n meros telef nicos Presione el bot n EQ por varios segundos para ingresar a la pantalla BLUETOOTH Pre sione el bot n EQ para buscar un n mero...

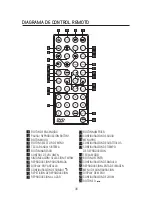
Page 38: ...GEN MENU DE CONFIGURACI N DISPLAY DE MEN CONFIGURACI N DE ZOOM BOT N EQ BOT N DE ENCENDIDO PAUSA REPRODUCCI N BOT N1 BOT N MUDO BOT N SELECTOR DE MEN TECLA BANDA SISTEMA BOT N INGRESAR CONTROL DE VOLU...

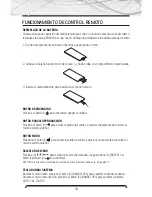
Page 39: ...n 1 para encender apagar la unidad BOT N PAUSA REPRODUCCI N Presione el bot n 3 para anular la salida de sonido y presione nuevamente para volver al nivel de sonido anterior BOT N MUDO Pressione el b...

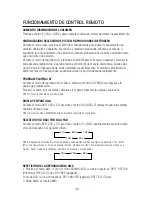
Page 40: ...e Disco presione el bot n 9 PROG para ingresar a la p gina de programaci n Presione el bot n 4 y las teclas num ricas 14 para programar las pistas a reproducir NOTA ST solo funcionar en el modo Radio...

Page 41: ...manera continua para cambiar el sonido de los parlantes izquierdo derecho o modo est reo PBC Menu Durante el modo VCD 2 0 cuando presione el bot n 16 PBC por primera vez comenzar la reproducci n PBC...

Page 42: ...ar el modo zoom Puede recorrer la imagen presionando las teclas del cursor NOTA No hay funci n zoom para el modo de reproducci n MP3 WMA CD CONFIGURACI N 1 Presione la tecla CONFIGURACION 23 del contr...

Page 43: ...star los diferentes ngulos para disfrutar mejor de la imagen Presione el bot n DETENER para volver al ultimo estado NOTA Si continua presionando la tecla derecha ingresar al estado de selecci n de arc...

Page 44: ...PROTECTOR DE PANTALLA VIDEO TIPO DE TV CLAVE CALIFICACI N DEFAULT SALIR CONFIGURACI N SISTEMA DE TV NTSC REPRODUCCI N AUTO PAL TIPO DE TV AUTO CLAVE CALIFICACI N DEFAULT SALIR CONFIGURACI N SISTEMA DE...

Page 45: ...necta a un TV wide screen se cortar n los extremos izquierdo y derecho REPRODUCE EN ESTILO LETTERBOX Si se conecta a un TV wide screen aparecer n bandas negras en la parte superior e inferior de la pa...

Page 46: ...tos Seleccione este nivel cuando solo puedan ver el programa adultos G Default Recupera el estado que ten a el equipo antes de dejar la f brica B CONFIGURACION DE IDIOMA Seleccione el idioma OSD desea...

Page 47: ...O SPDIF APAGADO PUERTO DE SALIDA AN LOGO U PTICO OUTPUT NO TIENE SE AL DE SALIDA SALIDA DE AUDIO LLAVE SALIR CONFIGURACION c IDIOMA SUBT TULO IDIOMA OSD CHINO IDIOMA DE AUDIO INGL S IDIOMA DE SUBT TUL...

Page 48: ...IDEZ SALIR CONFIGURACION A BRILLO BRILLO CONTRASTE HUE IMAGEN SATURACION NITIDEZ SALIR CONFIGURACION C HUE BRILLO CONTRASTE HUE IMAGEN SATURACION NITIDEZ SALIR CONFIGURACION B LLAVE SALIDA DE AUDIO LL...

Page 49: ...CONFIGURAR EL MODO DE FUNCIONAMIENTO EL RANGO DE COMPRESI N DIN MICO Y EL MODO EST REO PARA CONFIGURAR EL MODO DE OPERACI N PARA EL DECODIFICADOR DOLBY DIGITAL Para configurar el rango de compresi n d...

Page 50: ...Si el conector entre la unidad principal y el panel delantero est sucio puede causar que la unidad no funcione adecuadamente Para evitar que suceda dicho problema retire el panel delantero y limpie el...

Page 51: ...d en las ranuras a ambos lados de la unidad tal como se muestra en la figura hasta que escuche clic El tirar de las palancas hace posible remover la unidad del tablero Ajuste de la unidad al soporte d...

Page 52: ...4 3 Letter Box 4 3 Pan Scan 16 9 Nivel de Salida de Video 1 0V P P 75 OHMS SECCI N DE AUDIO Nivel de salida M ximo 2Vrms 3 dB Respuesta de frecuencia 20 20 KHz Indice se al ruido 65dB Separaci n 60dB...

Page 53: ...E RTAINMENT SY ST EM MANUAL DE INSTRU OES DV 8772 REPRODUTOR DE DVD MP4 PARA AUTOM VEL COM BLUETOOTH www b52audio com INSTRUCTIONS MANUAL 02 26 MANUAL DE INSTRUCCIONES 27 52 Manual de Instru es 53 78...

Page 54: ...as 58 Funcionamento do r dio 59 Funcionamento do DVD MPEG4 VCD MP3 CD 61 Funcionamento do BLUETOOTH 62 Diagrama do controle Remoto 64 Fun es do Controle Remoto 65 Configura o 70 Instala o do Painel Fr...

Page 55: ...orme o diagrama Conex es incorretas podem causar mal funcionamento no aparelho ou danificar o sistema el trico do autom vel Verifique a conex o dos cabos do alto falante com o terminal Nunca conecte c...

Page 56: ...forma Pegue o disco pela borda para mant lo limpo e sem tocar sua superf cie N o utilize CD com etiquetas ou adesivos porque podem deixar res duos pegajosos ao descolar do disco N o utilize CD com eti...

Page 57: ...CONTROLE REMOTO BOT O BANDA SELECTOR ID3 SINTONIZA O SELE O DE FAIXAS FW RW BOT O EXPULSAR BOT O TROCA DE MODO ESTACIONES PR PROGRAMADAS AMS BOT ES NUM RICOS RANHURA DE DISCO DISPLAY TFT BOT O SOLTAR...

Page 58: ...inicial NOTA ao acontecer erros no display lcd voc pode pressionar o bot o reset para retornar ao modo normal A configura o do hor rio e algumas fun es memorizadas ser o apagadas LIGA DESLIGA DO DISP...

Page 59: ...ODO Pressione o bot o MOD para selecionar o modo Radio DVD USB CART O SD TV MODO AUX Quando a unidade estiver desconectada de uma fun o pressione o bot o MODO para pular essa fun o SENSOR 5 Receptor p...

Page 60: ...r maior que o n vel de parada o r dio conservar essa esta o durante 5 segundos e a frequ ncia da esta o piscar ao mesmo tempo no LCD Ao pressionar mais de uma vez o bot o ams o r dio deter a busca na...

Page 61: ...o artista e o nome do arquivo SELE O DE FAIXAS FW RW Pressione 7 para selecionar a faixa desejada anterior ou posterior respectivamente Pressione e aperte o bot o 7 para avan ar rapidamente ou retroc...

Page 62: ...so e a tela TFT apresentar o logo Bluetooth que deixar de piscar Voc pode executar as fun es Bluetooth pressionando o bot o no painel do controle remoto NOTA Segundo o celular com Bluetooth o sistema...

Page 63: ...e os n meros de telefone de chamadas perdidas at 10 n meros de telefone Pressione o bot o EQ durante v rios segundos para ingressar na tela BLUETOOTH Pressione o bot o EQ para procurar um n mero de te...

Page 64: ...NGULO REPRODU O LENTA DE IMAGEM MENU DE CONFIGURA O DISPLAY DE MENU CONFIGURA O DE ZOOM BOT O EQ 1 BOT O LIGA DESLIGA 2 PAUSA REPRODU O BOT O1 3 BOT O MUDO 4 BOT O DE SELE O DE MENU 5 TECLA BANDA SIS...

Page 65: ...essione o bot o 1 para ligar desligar o aparelho BOT O PAUSA REPRODU O Pressione o bot o 3 para cancelar a sa da de som Ao pression la novamente voltar ao n vel de som anterior BOT O MUDO Pressione o...

Page 66: ...produ o de Disco para ingressar na p gina de programa o Pressione o bot o 4 e as teclas num ricas 14 para programar as faixas a reproduzir NOTA ST somente funcionar no modo R dio DISPLAY NA TELA Duran...

Page 67: ...sione continuamente o bot o 15 Audio durante o modo reprodu o para trocar entre os alto falantes esquerdo direito ou o modo est reo PBC Menu No modo VCD 2 0 e ao pressionar por primeira vez o bot o 16...

Page 68: ...vezes para cancelar o modo zoom Pode percorrer a imagem pressionando as teclas do cursor NOTA N o h fun o zoom para o modo de reprodu o MP3 WMA CD CONFIGURA O 1 Pressione a tecla CONFIGURA O 23 do co...

Page 69: ...monitor Pressione para ajustar os diferentes ngulos para aproveitar melhor a imagem Pressione o bot o PARAR para retornar ao ltimo estado NOTA Se continua pressionando a tecla direita ingressar no es...

Page 70: ...GURA O TIPO DE TV SISTEMA DE TV SISTEMA DE TV SISTEMA DE TV ESTE REPRODUCTOR REPRODUZ DISCOS GRAVADOS TANTO EM FORMATO PAL COMO NTSC SELECCIONE O FORMATO NTSC AO CONECTAR COM UMA TV NTSC SELECCIONE O...

Page 71: ...a de TV wide screen estar o cortadas as margens esquerda e direita 2 4 3 LB 3 1 6 9 REPRODUZ EM ESTILO LETTERBOX Ao ser conectado a uma TV wide screen faixas pretas aparecer o na parte superior e infe...

Page 72: ...ais N vel 8 Adultos Selecione este n vel quando somente adultos possam ver o programa G Default Recupera o estado do equipamento antes de deixar a f brica B CONFIGURA O DE IDIOMA Selecione o idioma OS...

Page 73: ...73...

Page 74: ...no amplificador de pot ncia pela porta an loga ou ptica Selecione este item Ao reproduzir um disco gravado por um sistema Dolby Digital DTS ou MPEG o sinal de sa da an logo ou ptico da unidade ser o m...

Page 75: ...VEL DIN MICO DUAL MONO SAIR CLASSIFICA O MODO OP A MODO OP N VEL DIN MICO DUAL MONO SAIR CLASSIFICA O MODO OP RF REMOD SA DA LINHA C DUAL MONO N VEL DIN MICO DUAL MONO SAIR CLASSIFICA O MODO OP EST RE...

Page 76: ...s retire o painel frontal e limpe o conector com um cotonete de algod o Limpe de forma suave e evite danificar o conector NOTA Para maior seguran a sempre deligue o gerador e retire a chave de funcion...

Page 77: ...bos os lados da unidade tal e como mostra a figura at escutar o clique O dispositivo do painel pode ser retirado s com puxar das alavancas Ajustar o dispositivo no suporte de montagem para r dio de f...

Page 78: ...4 3 Letter Box 4 3 Pan Scan 16 9 N vel de Sa da de V deo 1 0V P P 75 OHMS Se o DE AUDIO N VEL de sa da M ximo 2Vrms 3 dB Resposta de frequ ncia 20 20 KHz ndice sinal ru do 65dB Separa o 60dB Se o Radi...

Page 79: ......

Page 80: ...MOBILE E NTERTA INMEN T SYSTEM www b52audio com...

Reviews: