


Installation
Installation considerations
If you choose to install the amplifier by yourself, please read the entire owner’s manual carefully.
Before you start your installation, please take all steps into consideration.
If in doubt, please go to www.b2audio.com for authorized distributors / dealers that will be able to
configure your set up & ensure the warranty of your amplifier.
Disconnect the negative (-) battery cable before mounting or making any connection.
Check the battery & alternator ground (-) connection. Make sure they are properly connected/dimensioned
& free of corrosion. Before selecting a mounting location for the amplifier, please take cooling & safety
into consideration. Avoid areas with excessive vibration & up side down installation!
In order to avoid excessive heat from the amplifier, it is recommended to find a mounting location
that allows for vertical positioning of the heatsink fins. For safety purposes, install the amplifier in a dry and
well ventilated location and make sure no cables or other harness of the car is interfaced with the mounting
location or will present a hazard to the car’s cable, control cables, fuel lines/tanks, hydraulic lines or other
components of the vechicle. Route the RCA cables away from high current wires, if possible run RCA, Power and Speaker
cables individually and with a good distance from each other.
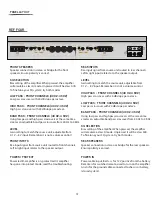
batt+ (Power connection)
Before mounting the amplifier, disconnect the negative (-) wire from the battery to protect any accidental
damage to the amplifier or the audio system. The amplifier is equipped with single 4 AWG power & ground
terminals. It is crucial that all terminals are used with the adequate cable to ensure correct operation.
Connect the power cables to the power terminal labeled as BATT+.
The amplifier has 3 x 40A internal fuses, however external fuses are required at both the battery and the amplifer.
Connect one end of the fuse holder to the power cable and the other end of the fuse holder to the positive
battery terminal within 8’’/ 20 cm of the same cable. The same shall be done at the other end of the cable that
connects to the amplifier. The fuses will protect the system and the vehicle against the possibility of
a short circuit in the power cable. Make sure that the fuses and the fuse holder is according to the system requirements.
GND (Ground connection)
Locate a secure grounding connection as close as possible to the amplifier.
Make sure the location is clean and provides a direct electrical connection to the chassis of the vehicle.
Connect one end of an equal sized cable as the positive cable to the location of ground.
It is important that the ground cable is as short as possible, but no longer than 20’’ / 50 cm at maximum.
Run one end of the cable to the grounding point. Run the other end of the cable to the mounting location.
Connect the ground cable to the terminals labeled as GND.
REMote ( REMOTE CONNECTION )
Run a remote turn on cable from the sw12V source.
This may be a toggle switch, a relay, the source unit's remote ouput cable or power antenna trigger cable.
Connect the remote turn on cable to the power terminal labeled as REM.
INPUT (RCA CABLE)
Run the RCA cables away from the high current cables / speaker cables and connect to the amplifier.
Use high qualtity cables with a secure grounding point to avoid amplifier malfunction and / or alternator whine.
6
Power connectors
Preparation