13
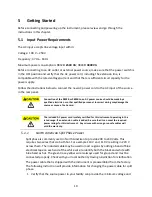
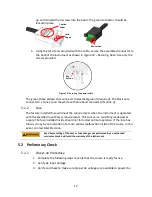
instrument. The AC voltage range must meet per the acceptable specifications.
4.
Connect Power
5.
Connect specified AC power cord and verify the hood is in place and correctly
secured to rear panel.
6.
Press the power switch to the
“|” ON position to turn ON the instrument.
It will take a few seconds before the fans power on and the self-test begins.
5.2.2
Warm-up Time
The 9830 series is fully operable upon switching the power on. However, to reach the
specified equipment accuracy, please allow the source to warm up for at least 15
minutes.
5.2.3
Power-off Procedure
When the instrument is not in use, make sure to set the front panel power switch to the
OFF position. After the power switch is turned off the internal fans will continue to run
for approximately 5-10 seconds to discharge the internal capacitors per safety
requirements. Once the discharge process is complete, the instrument will carry out an
automatic shutdown process of approximately 2-8 seconds. Do not turn the power back
on until the instrument has completed a full shut down cycle.
Do not connect multiple power supplies in series or parallel as this may cause
damage or a malfunction.
When the AC input voltage is lower than 190 VAC, the source will activate an inner
over temperature protector and cut off the output in response to the condition. To
ensure that the entire test process can be completed smoothly, confirm that the
input AC voltage is within the specified range.
When the AC input frequency is outside the range of 47 to 63 Hz, the source will
beep. To ensure the normal operation of the source, please make sure the AC
input frequency is within the required range.
5.3
Sense Lines
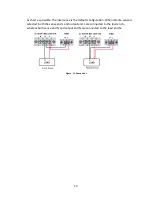
The source can be configured as local sense or remote sense to compensate the voltage
drop of the test leads. The following diagram shows how to connect the load by local
sense or remote sense configurations.
When local sense is selected, the sense end L is connected to the output end L and
sense end N is connected to the output end N, whereas the output end L is connected to
the load end L and output end N is connected to the load end N. When this sensing
mode is selected, the wires connecting between the sense ends to the load end must be
Summary of Contents for 9833B
Page 1: ...1 9830B Series USER MANUAL Model 9832B 9833B High Power Programmable AC Power Sources ...
Page 10: ...ix 2 Notations TEXT Denotes a softkey TEXT Denotes a front panel key ...
Page 28: ...15 6 Menu Tree ...
Page 86: ...73 THD 11 Harmonic 3 weight 21 3 THD 12 Harmonic 3 weight 24 5 ...
Page 88: ...75 THD 15 Harmonic 5 7 weight 2 45 3 95 THD 16 Harmonic 3 5 7 9 weight 11 4 05 2 1 3 ...
Page 89: ...76 THD 17 Harmonic 3 5 9 weight 7 17 3 42 0 8 THD 18 Harmonic 3 5 9 weight 8 11 3 48 1 ...
Page 95: ...82 THD 29 Harmonic 3 5 7 9 11 13 15 weight 33 3 20 13 8 10 8 8 5 7 2 5 5 ...


