B-CURE LASER SPORT Instructions For Use Manual Download Page 21

21

6.4 End of treatment, reset and turn OFF

To switch off the device, press the main power switch until a beep sounds. Release the button and the display will 
go blank. If the planned treatment time has not been fully utilized, the timer will display the remaining time at startup.  
To reset the timer, switch off the device, then press the main power switch for longer than 2 seconds while switching 
on the device.

7.  Treatment protocol
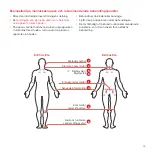
7.1 Intended use 

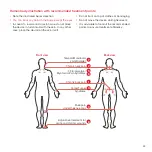
B-Cure Laser is intended for the management of pain including: Chronic back pain; Chronic neck pain; Knee pain; 
Carpal Tunnel Syndrome (CTS); Fibromyalgia; Myofascial Pain Syndrome (MPS); Temporomandibular Joint Disorder; 
May assist as an adjunctive treatment in treating acute and chronic wounds, Acupuncture treatment.

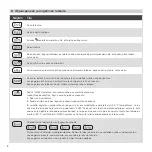
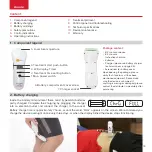
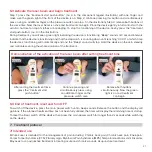
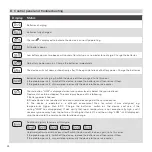
6.3 Activate the laser beam and begin treatment

Step 1: press the “treatment start push-button” (no. 4 in the component legend illustration) with one finger, and 
make sure the green light at the front of the device is on. Step 2: continue pressing this button and simultaneously 
press, using an additional finger on the pressure switch area (no. 1 in the illustration). Step 3: release both buttons at  
the same time. Now the laser beam is active and treatment can begin. Place the device gently in full contact with the 
skin. Do not treat on top of clothes or bandaging. To stop the functioning of the device, briefly press the “treatment 
start push-button” (no. 4 in the illustration).
During treatment, you will see a green light indicating the device is functioning. “Beep” sounds at 3 second intervals 
indicate that the device is functioning and that the stopwatch is counting down until reaching “00:00” at which time 
the device’s functioning will automatically end and the “Beep” sound will stop. Hold the device on the skin steadily 
and motionless during the whole duration of the treatment.

Release both buttons 

simultaneously. Now the green 

light is on and treatment  

can begin

Continue pressing and 

simultaneously press using 

an additional finger on the 

pressure switch area

After setting the treatment time, 

press the “treatment start  

push-button” 

Demonstration of the activation of the laser beam after setting treatment time

Step 1

Step 2

Step 3

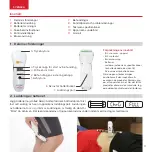
Summary of Contents for LASER SPORT

Page 1: ...INSTRUCTIONS FOR USE...

Page 2: ...Content Suomalainen Svenska English K ytt 03 Bruksanvisning 11 Instructions for use 19 For more convenient and efficient treatment it is recommended to use the B Cure Laser adjustable stand not includ...

Page 3: ...Vasta aiheet 6 K ytt ohjeet 7 Hoitotoimenpiteet 8 Ohjauspaneeli ja ongelmien ratkaisu 9 Tekniset tiedot 10 Laitteen huolto 11 Takuu 5 Lasers teen aukko 4 Hoidon aloitus painike 3 LCD n ytt ajastin 2...

Page 4: ...lasers dett silmiin Kysymyksiss kannattaa k nty aina l k rin puoleen l hoida laitteella vatsan aluetta jos olet raskaana l hoida aluetta jossa on pahanlaatuinen kasvain Kun lataat laitetta sijoita se...

Page 5: ...la ja varmista ett laitteen edess oleva vihre valo syttyy Vaihe 2 jatka painikkeen painamista ja paina samaan aikaan toisella sormella painekatkaisinta nro 1 kuvassa Vaihe 3 p st irti kummastakin pain...

Page 6: ...vit kipein kohta tunnustelemalla ja tee hoito sen alueelle 2 Krooniset niskakivut Hoida a Pituussuuntaan niskarangan mukaisesti b Hoida niskan kummaltakin sivulta pituussuuntaan korvalehden alta ja le...

Page 7: ...oraan iholle l tee hoitoa vaatteiden tai siteiden l pi l liikuta laitetta hoidon aikana Hoidon tehokkuuden takaamiseksi on suositeltavaa hoitaa kaikki suositellut kohdat Esimerkkikuva ihmiskehosta ja...

Page 8: ...empi Hoito tulee keskeytt Syyn voi olla jokin seuraavista 1 Akku on liian v hiss 2 Diodin elinik on l hes lopussa ja diodi tulee vaihtaa huollossa 3 Laitetta k ytet n ymp rist ss johon sit ei ole tark...

Page 9: ...av lit sekuntia 30 Pidennett viss ja lyhennett viss LCD n yt n mitat mm 26 x 15 N ytt alueen koko Ajastinn ytt Nelj numeroa 88 88 Sekunnin tarkkuudella Varoitus ni kyll N ytt Laitteen k ynnistys sammu...

Page 10: ...usten mukaisesti l j t laitetta autoon kuumalla s ll S ilyt laitetta kuivassa tilassa ja suojaa se rimm iselt kosteudelta kuumuudelta nukalta p lylt ja suoralta auringonvalolta 11 Takuu Laitteella on...

Page 11: ...Bruksanvisning 7 Behandlingar 8 Kontrollpanel och probleml sningar 9 Tekniska specifikationer 10 Apparatens underh ll 11 Garanti 5 Tryckbrytare 4 Tryckknapp f r start av behandling 3 LCD sk rm tidur...

Page 12: ...onen Vi rekommenderar att alltid r dfr ga din l kare r du gravid anv nd inte enheten f r att behandla magen Behandla inte ett omr de med en malign tum r N r du laddar batteriet placera enheten p ett s...

Page 13: ...na ljuset t nds Steg 2 H ll start av behandling knappen ner tryckt och tryck p samma g ng p str mavbrytaren bild 1 Steg 3 Sl pp loss b da knapparnasamtidigt Laserstr lningen startar och behandlingen k...

Page 14: ...str lar mot nedre extremitet ta reda p den sjukaste punkten genom att k nna och g r sedan behandlingen p det omr det 2 Kroniska nacksm rtor behandla a I l ngdriktning enligt ryggraden b Behandla nacke...

Page 15: ...p kl der eller bandage Flytta inte p apparaten under behandlingen Det r tillr dligt att behandla alla rekommenderade punkterna s att man s kert f r en effektiv behandling Exempelbild p m nniskokroppen...

Page 16: ...v r under nskad niv Behandlingen b r avbrytas Orsaken kan vara n gon av f ljande 1 F r lite batteri 2 Diodens livsl ngd har n tt slutet och dioden b r bytas p service 3 Apparaten anv nds i en annan mi...

Page 17: ...nder 30 Kan kas och minskas LCD sk rmens m tt mm 26 x 15 Sk rmens synliga omr de Tiduretssk rm fyra siffror 88 88 Med en sekunds noggrannhet Varningssignal ja Sk rmen Start av apparaten avst ngning be...

Page 18: ...nligt villkoren som angetts i teknisk information tabellen L mna inte apparaten i bilen d det r varmt v der F rvara enheten p en torr plats och skydda den mot extrem fukt v rme ludd damm och direkt so...

Page 19: ...5 Contra indications 6 Operating instructions 7 Treatment protocol 8 Control panel and troubleshooting 9 Technical specifications 10 Device maintenance 11 Warranty Package content B Cure Laser device...

Page 20: ...r beam at the eyes It is always recommended to consult your doctor If you are pregnant do not use the device to treat the stomach Do not treat an area with a malignant tumor When charging battery posi...

Page 21: ...ssing this button and simultaneously press using an additional finger on the pressure switch area no 1 in the illustration Step 3 release both buttons at the same time Now the laser beam is active and...

Page 22: ...int of the pain by touch and treat it 2 Chronic neck pain Treat a Lengthwise along the vertebra b Treat each side of the neck lengthwise under the ear lobe and exactly at the indentation behind the ja...

Page 23: ...op of clothes or bandaging Do not move the device during treatment It is advisable to treat all the recommended points to ensure treatment efficiency Human body illustration with recommended treatment...

Page 24: ...wer level is below the required level Treatment should be stopped The cause may be one of the following 1 Battery power is too low 2 Diode lifespan has reached its end and should be changed at the ser...

Page 25: ...r intervals seconds 30 Increment or decrement LCD display dimensions mm 26 x 15 Visible area Timer display 4 digits 88 88 1 second intervals Beep warning yes Display Device on off operating low laser...

Page 26: ...leave the device in the car in hot weather When not in use store the device in a dry room and protect it against extreme moisture heat lint dust and direct sunlight 11 Warranty The warranty is for 24...

Page 27: ...27...

Page 28: ...lat 1 A 9 F Brill Plaza No 84 Tokwawan Road Kowloon Hong Kong Made in China Distributor Erika Carmel LTD 5 Nachum Heth St Hi Tech Park Haifa 3508504 Israel Tel 972 73 7293001 2 E mail info bcurelaser...

Reviews: