7. CONFIGURATION IN TYP. SITUATIONS
LAN configuration
In the
LAN
item,
Primary LAN
, you can use the factory default configu-
ration as in the previous situation. The
ETH1
interface on the front panel of the router is used
for connection to the Internet. It can be configured in
Secondary LAN
. Connect the cable to the
router and set the appropriate values as in Fig.
. You may configure the static IP address,
default gateway and DNS server. Changes will take effect after you click on the
Apply
button.
Detailed LAN configuration is described in Chapter
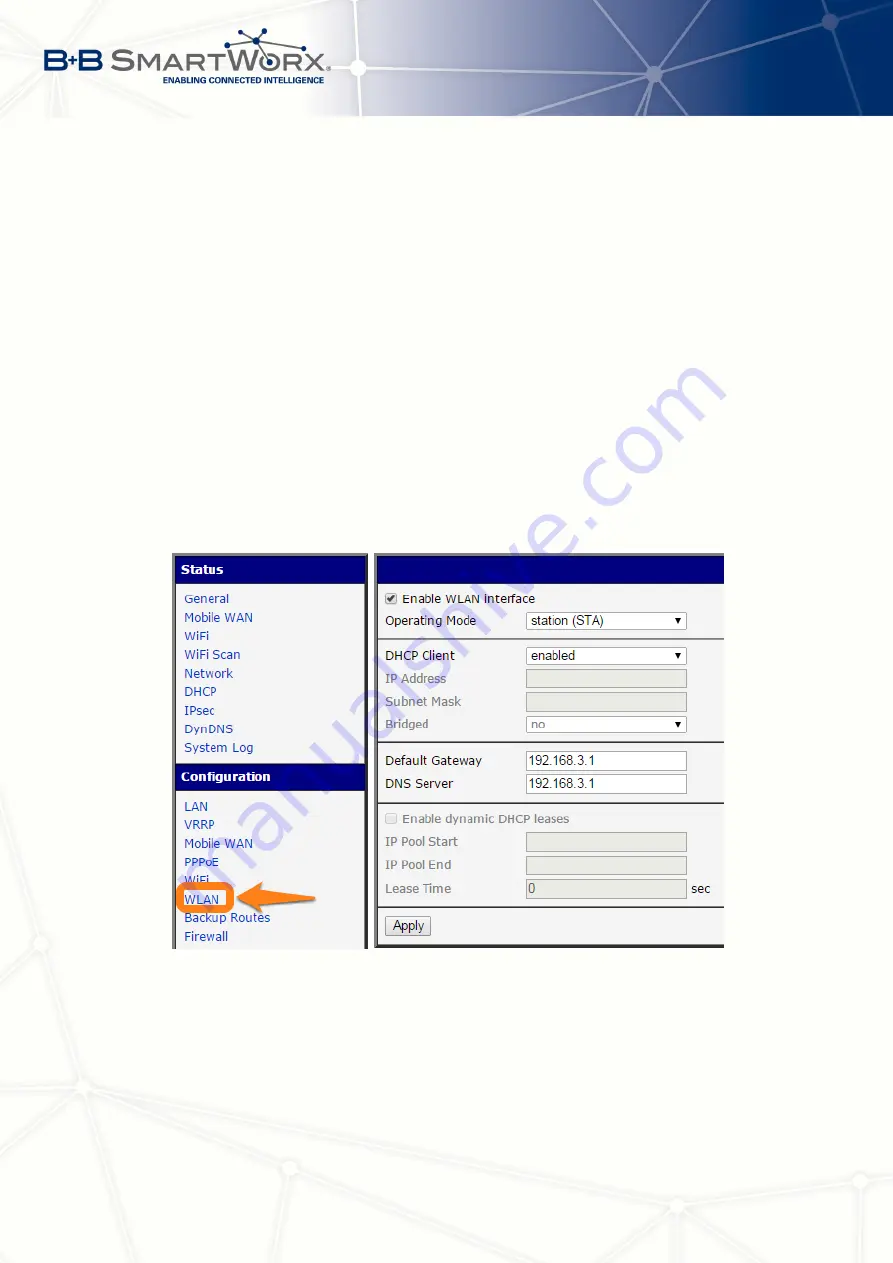
WLAN and WiFi configuration
To use the WLAN and WiFi options you will need to enable
the wlan0 network interface in the
WLAN
item, as shown in Fig.
. Check the
Enable WLAN
interface
, set the
Operating Mode
to
station (STA)
, enable the DHCP client and fill in the
default gateway and DNS server. Click the
Apply
button to confirm the changes. For details
see Chapter
Use the
WiFi
item to configure a connection to a WiFi network. (See Fig.
.) Check the
Enable WiFi
box and fill in the data for the connection (SSID, security, password). Click the
Apply
button to confirm the changes. For detailed configuration see Chapter
To verify that the WiFi connection is successful, check the
WiFi
item in the
Status
section.
If the connection is successful you should see the following message:
wpa_state=COMPLETED
.
Figure 87: Backup access to the Internet – WLAN configuration
113
Summary of Contents for SPECTRE V3
Page 1: ...Configuration Manual for v3 Routers ...
Page 22: ...3 STATUS Figure 4 WiFi Scan 13 ...
Page 32: ...4 CONFIGURATION Figure 12 Example 1 LAN Configuration Page 23 ...
Page 37: ...4 CONFIGURATION Figure 19 Example of VRRP configuration backup router 28 ...
Page 44: ...4 CONFIGURATION Figure 20 Mobile WAN Configuration 35 ...
Page 51: ...4 CONFIGURATION Figure 25 WiFi Configuration 42 ...
Page 74: ...4 CONFIGURATION Figure 39 IPsec Tunnels Configuration 65 ...
Page 105: ...4 CONFIGURATION Figure 63 Example 2 USB port configuration 96 ...


