background image

12

AB-6600

 To wire between the microswitch and the screw terminals, lay the wires from the terminals to the 

microswitch though the bottom inside of the box.

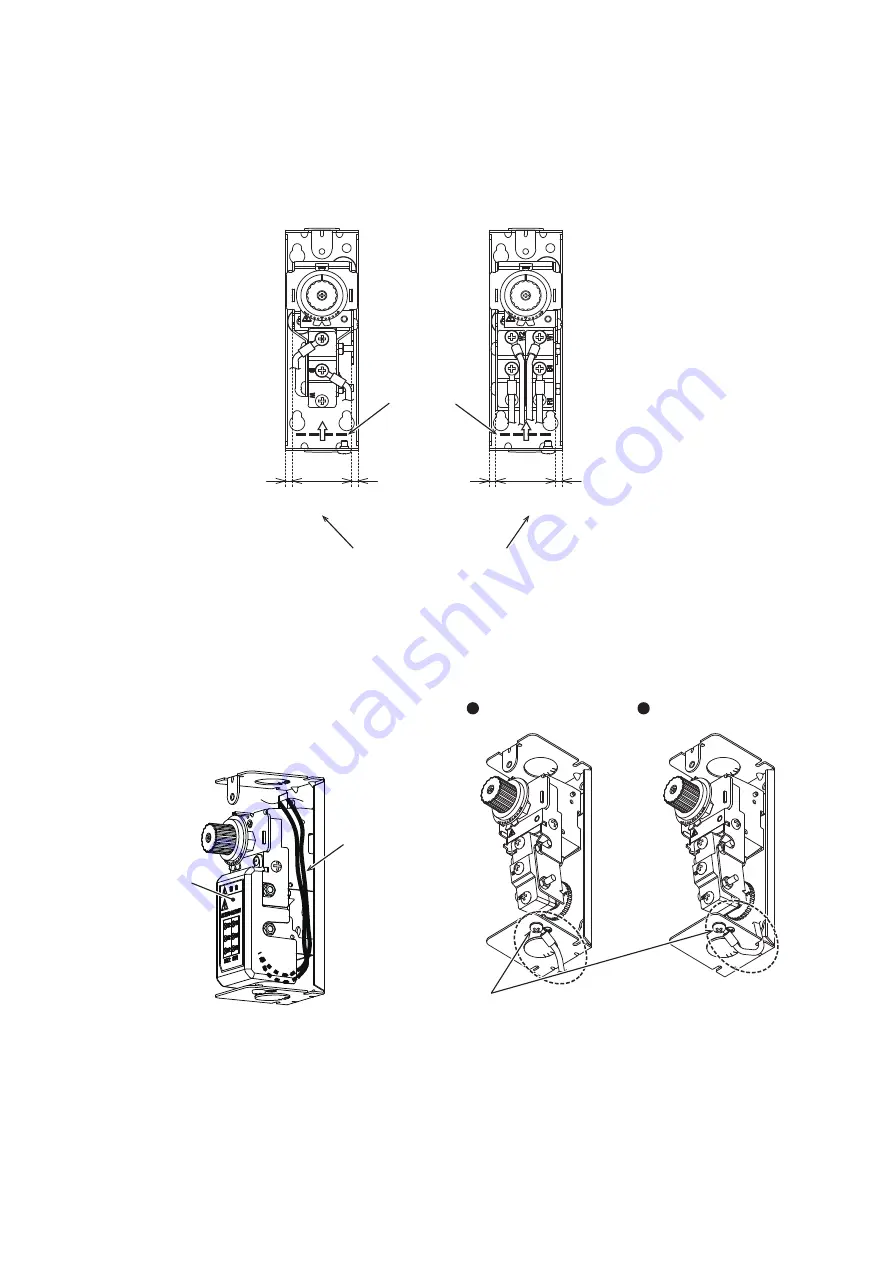
  Connect the wires to the screw terminals using the round screw terminals (M4 size) as shown in Figure 19.

  Note:  If the wiring was done improperly, the terminal lugs or wires may interfere each other and the terminal cover cannot be attached.

  Note:  Insert the wires through bottom of the terminal cover opening and lay the wires in direction as illustrated by the arrow.

Figure 19. 

Example of TY6800

Example of TTY6800

Position of the terminal 

cover opening

Approx. 

4 mm

(Clearance for wiring)

Approx. 

4 mm

(Clearance for wiring)

Approx. 

38 mm

Approx. 

4 mm

(Clearance for wiring)

Approx. 

4 mm

(Clearance for wiring)

Approx. 

38 mm

Fit the wires and crimp terminal lugs within this range considering the terminal cover attachment.

  If the knockout hole on the top of box is used, 

lay the wires along the inside wall of the box and 

connect the wires to the microswitch form the 
bottom side.


z

Example of wiring from the top side of box

Lay the wires along the inside wall of the box and connect the 

wires to the microswitch terminals form the bottom side of the 

terminal cover. Also the opposite side of the box illustrated in 

Figure 20. is applicable. 

Figure 20. 

Terminal cover

Wires

 Wire to the ground terminal (earth) as shown in 

Figure 21.


Note:  Detach the terminal screw and connect the ground 

wire using an insulated round crimping terminal (M4 

size)..


Note: Common for Model TY6800Z, TTY6800Z.

Figure 21. 

Screw for ground terminal

Grounded outside 

the case

Grounded by pulling 

the cable from the case

Summary of Contents for TTY6800Z Series

Page 1: ...easily adjusted to enable suitable sequence control for the connected equipment Model Numbers Model Number Temperature setting range C Allowable max temp of temp sensor C Allowable min temp of temp sensor C Capillary length m TY6800Z6000 15 70 100 40 1 5 TY6800Z6010 15 70 100 40 5 TY6800Z7000 5 90 100 40 1 5 TY6800Z7010 5 90 100 40 5 TY6800Z8000 40 125 150 40 1 5 TY6800Z8010 40 125 150 40 5 TTY680...

Page 2: ...ons such as the following Temperature may not be correctly measured Where exposed to warm or cold wind directly Where air stagnates or there is a draft Where water level changes largely Where the temperature sensor cannot be securely mounted Where unauthorized persons can have easy access Secure space around the product for maintenance Warnings and Cautions WARNING Alerts users that improper handl...

Page 3: ...ient tightening of the terminal screws might cause overheating or fire Do not disassemble the product Doing so might cause electric shock or device failure Dispose of the product as industrial waste in accordance with your local regulations Do not reuse all or part of this product IMPORTANT To use this product properly follow the instructions described in this manual and the manuals for other devi...

Page 4: ...ure sensor holder Figure 4 Dimensions of Model DY3002A1011 mm 14 φ14 3 140 R1 2 screw Seal ring 16 50 30 23 8 1 2NPT Packing Capillary tube 25 43 Washers x4 Nut 2 22 4 356 Accessories tapping screws x2 Nominal diameter 4 5 L 16 2 17 5 35 35 41 3 82 6 14 3 φ 4 6 M o u n t i n g h o l e 17 5 φ 6 4 M o u n t in g h o le 3 5 t0 5 10 φ5 19 47 5 82 6 41 3 16 5 31 ...

Page 5: ...48 A 30 6 A Environment conditions Operating conditions Transportation storage conditions Ambient temp 0 50 C 20 60 C Ambient humidity Max 90 RH without condensation Max 95 RH without condensation Temperature sensor Size Max φ6 5x152 mm Material Copper Max pressure 0 35 MPa Capillary tube Length Approx 1 5 m actual 1 35 1 6 m Approx 5 m actual 4 75 5 m Note Length of Model TTY6800Z7000 temperature...

Page 6: ...oplets or excessive damp air exists Where condensation is made on the product Where exposed to direct sunlight or high temperature Where vibrations or shocks are applied Where dust or particles will not easily enter into the product z z Cautions for installing this product Mount the the temperature sensor where representative temperature of the measuring object can be measured Do not mount the tem...

Page 7: ...gure 7 Mounting wall panel dimensions mm Figure 8 Installation procedure 31 106 4 106 4 31 4 5 Hole Wall or panel Mounting nuts x3 Accessories M4 Mounting screws x3 accessories M4 L 12 Wall plate t1 6 3 2 Main unit ...

Page 8: ...on remove the knockout hole on the top or bottom surface of the case which will be used to lead in the wires The capillary tube can be taken out from the top of the main unit Mount the main unit using the screws and nuts through the 3 mounting holes on the rear side of the case Screws and nuts are included in accessories Heat insulator For mounting on a surface which is excessively heated insert a...

Page 9: ... To connect the wires to the screw terminals use crimp terminal lugs that have insulation Failure to do so might cause short circuit and result in device failure or fire Firmly tighten the terminal screws Insufficient tightening of the terminal screws might cause overheating or fire IMPORTANT To use this product properly follow the instructions described in this manual and the manuals for other de...

Page 10: ...igure 12 Attaching the grommet φ23 8 6 4 Tabs on both sides Knockout hole at the bottom Grommet z z Wiring method It it is recommended using cable glands for wiring If cable glands are not used hold the wires near the product in order to reduce tension from the wires 1 According to the position of cable inlet outlet open a knockout hole 2 Remove the protrusions or burrs at the opening Note There a...

Page 11: ...ls z z Model TTY6800Z As temperature rises switch 1 right hand operates first and then switch 2 left hand operates Note denotes a screw terminal Figure 16 Switch configuration Figure 17 Example of cooling two step control Figure 18 Example of heating two step control W2 B2 R2 Temperature rise Switch 2 left hand W1 B1 R1 Switch 1 right hand Temperature rise W1 B1 R1 W2 B2 R2 Switch 1 right hand Chi...

Page 12: ...wiring Approx 4 mm Clearance for wiring Approx 38 mm Fit the wires and crimp terminal lugs within this range considering the terminal cover attachment If the knockout hole on the top of box is used lay the wires along the inside wall of the box and connect the wires to the microswitch form the bottom side z z Example of wiring from the top side of box Lay the wires along the inside wall of the box...

Page 13: ... differential gap max 11 C Figure 22 Differential gap setting for Model TY6800Z z z Differential between two switches setting for Model TTY6800Z To set the differential between two switches turn the adjustment gear using a flathead screwdriver Hook the screwdriver blade to the slit on the adjustment gear and turn the gear Shipping default of the differential between two switches is 2 5 C minimum T...

Page 14: ...perature of the controlled target falls to 47 C that is setpoint 50 C minus the differential gap 3 C the internal switch works to close the terminal R and W and then the heater starts 2 When the temperature of the controlled target rises to the setpoint 50 C the internal switch works to open the terminal R and W and then the heater stops 3 The operations 1 and 2 described above are repeated automa...

Page 15: ...er 2 starts 4 Along with operation of chiller 1 and chiller 2 when the temperature of the controlled target falls to 5 C that is chiller 2 triggered temperature 2 C minus the differential gap 3 C and then the chiller 2 stops Only the chiller 1 operates 5 When temperature of the controlled target falls further to 13 C that is setpoint 10 C minus the differential gap 3 C and then the chiller 1 stops...

Page 16: ... of the controlled target rises to 50 C the switch 1 works to open the terminal R1 and W1 and then the heater 2 stops Only the heater 1 operates 5 When the temperature of the controlled target rises further to 58 C that is setpoint 50 C plus the differential between two switches 8 C and then the chiller 1 stops 6 When the temperature of the controlled target falls again the steps from 1 will be ca...

Page 17: ... to do so might cause electric shock CAUTION Do not disassemble the product Doing so might cause device failure Determine the appropriate cycle of maintenance and inspection taking into consideration the environmental conditions frequency of use etc If use is only occasional inspection before every use is recommended Maintain and inspect the product following the procedures below 1 Wipe dirt and d...

Page 18: ...18 AB 6600 This blank page is added for page layout purposes ...

Page 19: ...19 AB 6600 This blank page is added for page layout purposes ...

Page 20: ...20 Rev 3 0 Aug 2015 AB 6600 J AI 6600 Rev 4 0 http www azbil com Building Systems Company Specifications are subject to change without notice ...

Reviews: